System Design
Top-Level Design
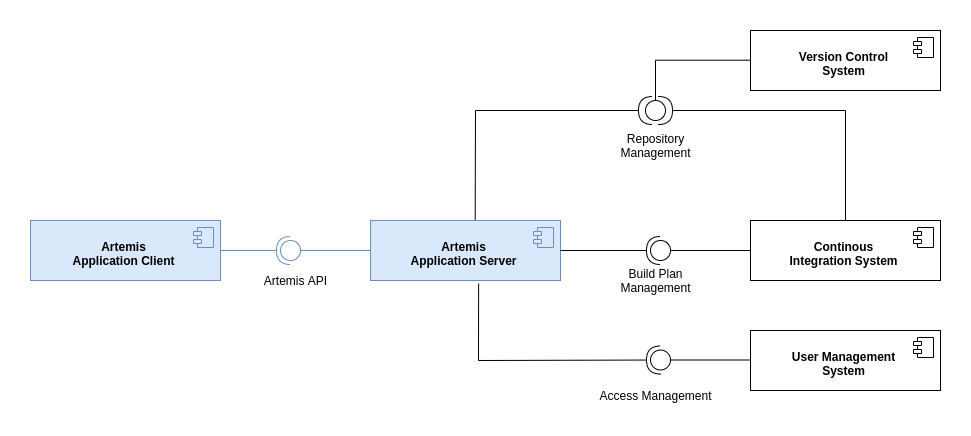
The following diagram shows the top-level design of Artemis which is decomposed into an application client (running as Angular web app in the browser) and an application server (based on Spring Boot). For programming exercises, the application server connects to a version control system (VCS) and a continuous integration system (CIS). Authentication is handled by an external user management system (UMS).
Top-Level Design
Deployment
The following UML deployment diagram shows a typical deployment of Artemis application server and application client. Student, Instructor and Teaching Assistant (TA) computers are all equipped equally with the Artemis application client being displayed in the browser.
The Continuous Integration Server typically delegates the build jobs to local build agents within the university infrastructure or to remote build agents, e.g. hosted in the Amazon Cloud (AWS).

Deployment Overview
Data Model
The Artemis application server uses the following (simplified) data model in the MySQL database. It supports multiple courses with multiple exercises. Each student in the participating student group can participate in the exercise by clicking the Start Exercise button. Then a repository and a build plan for the student (User) will be created and configured. The initialization state helps to track the progress of this complex operation and allows recovering from errors. A student can submit multiple solutions by committing and pushing the source code changes to a given example code into the version control system or using the user interface. The continuous integration server automatically tests each submission, and notifies the Artemis application server, when a new result exists. In addition, teaching assistants can assess student solutions and “manually” create results.

Data Model
Please note, that the actual database model is more complex. The UML class diagram above omits some details for readability (e.g. lectures, student questions, exercise details, static code analysis, quiz questions, exam sessions, submission subclasses, etc.)
Server Architecture
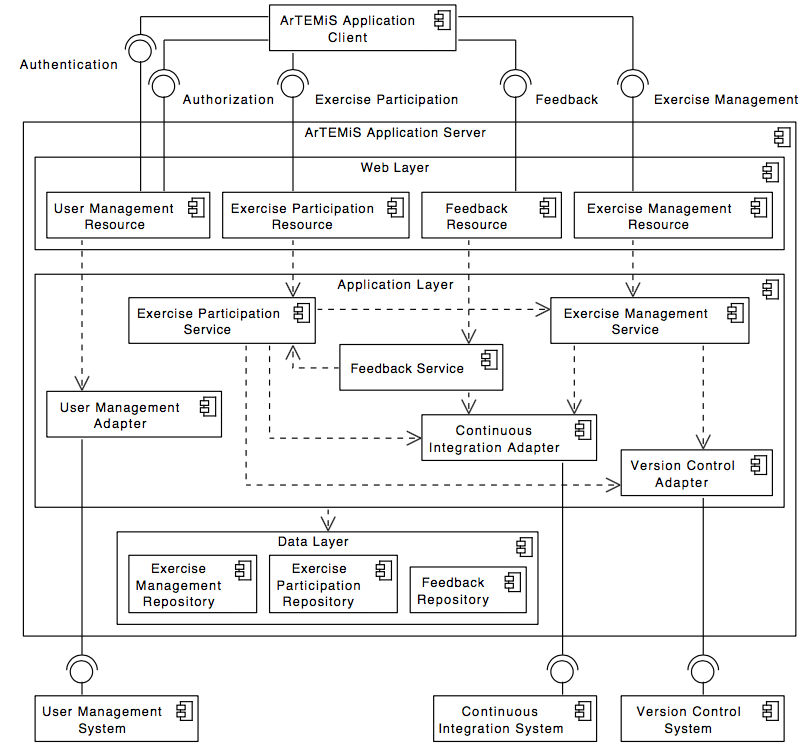
The following UML component diagram shows more details of the Artemis application server architecture and its REST interfaces to the application client.
Server Architecture
Integrated Code Lifecycle
Artemis supports an integrated version control system (VCS) and continuous integration system (CIS). If you use Integrated Code Lifecycle, the architecture differs from the architecture with external VC and CI systems. An exemplary deployment with Integrated Code Lifecycle (without using an external user management system), consisting of one main application server and three build agent servers, looks like this:

Integrated Code Lifecycle Deployment
Employing the Integrated Code Lifecycle, administrators and developers can set the Artemis application up without the need for dedicated VCS and CIS installations. This new architecture simplifies the setup process, reduces dependencies on external systems, and streamlines maintenance for both developers and administrators. Developers have fewer applications to run in parallel, which translates into decreased system requirements. See Integrated Code Lifecycle Setup on how to set up a single-node environment for developing purposes. TODO: Additional reference to the production setup.
Version Control Subsystem
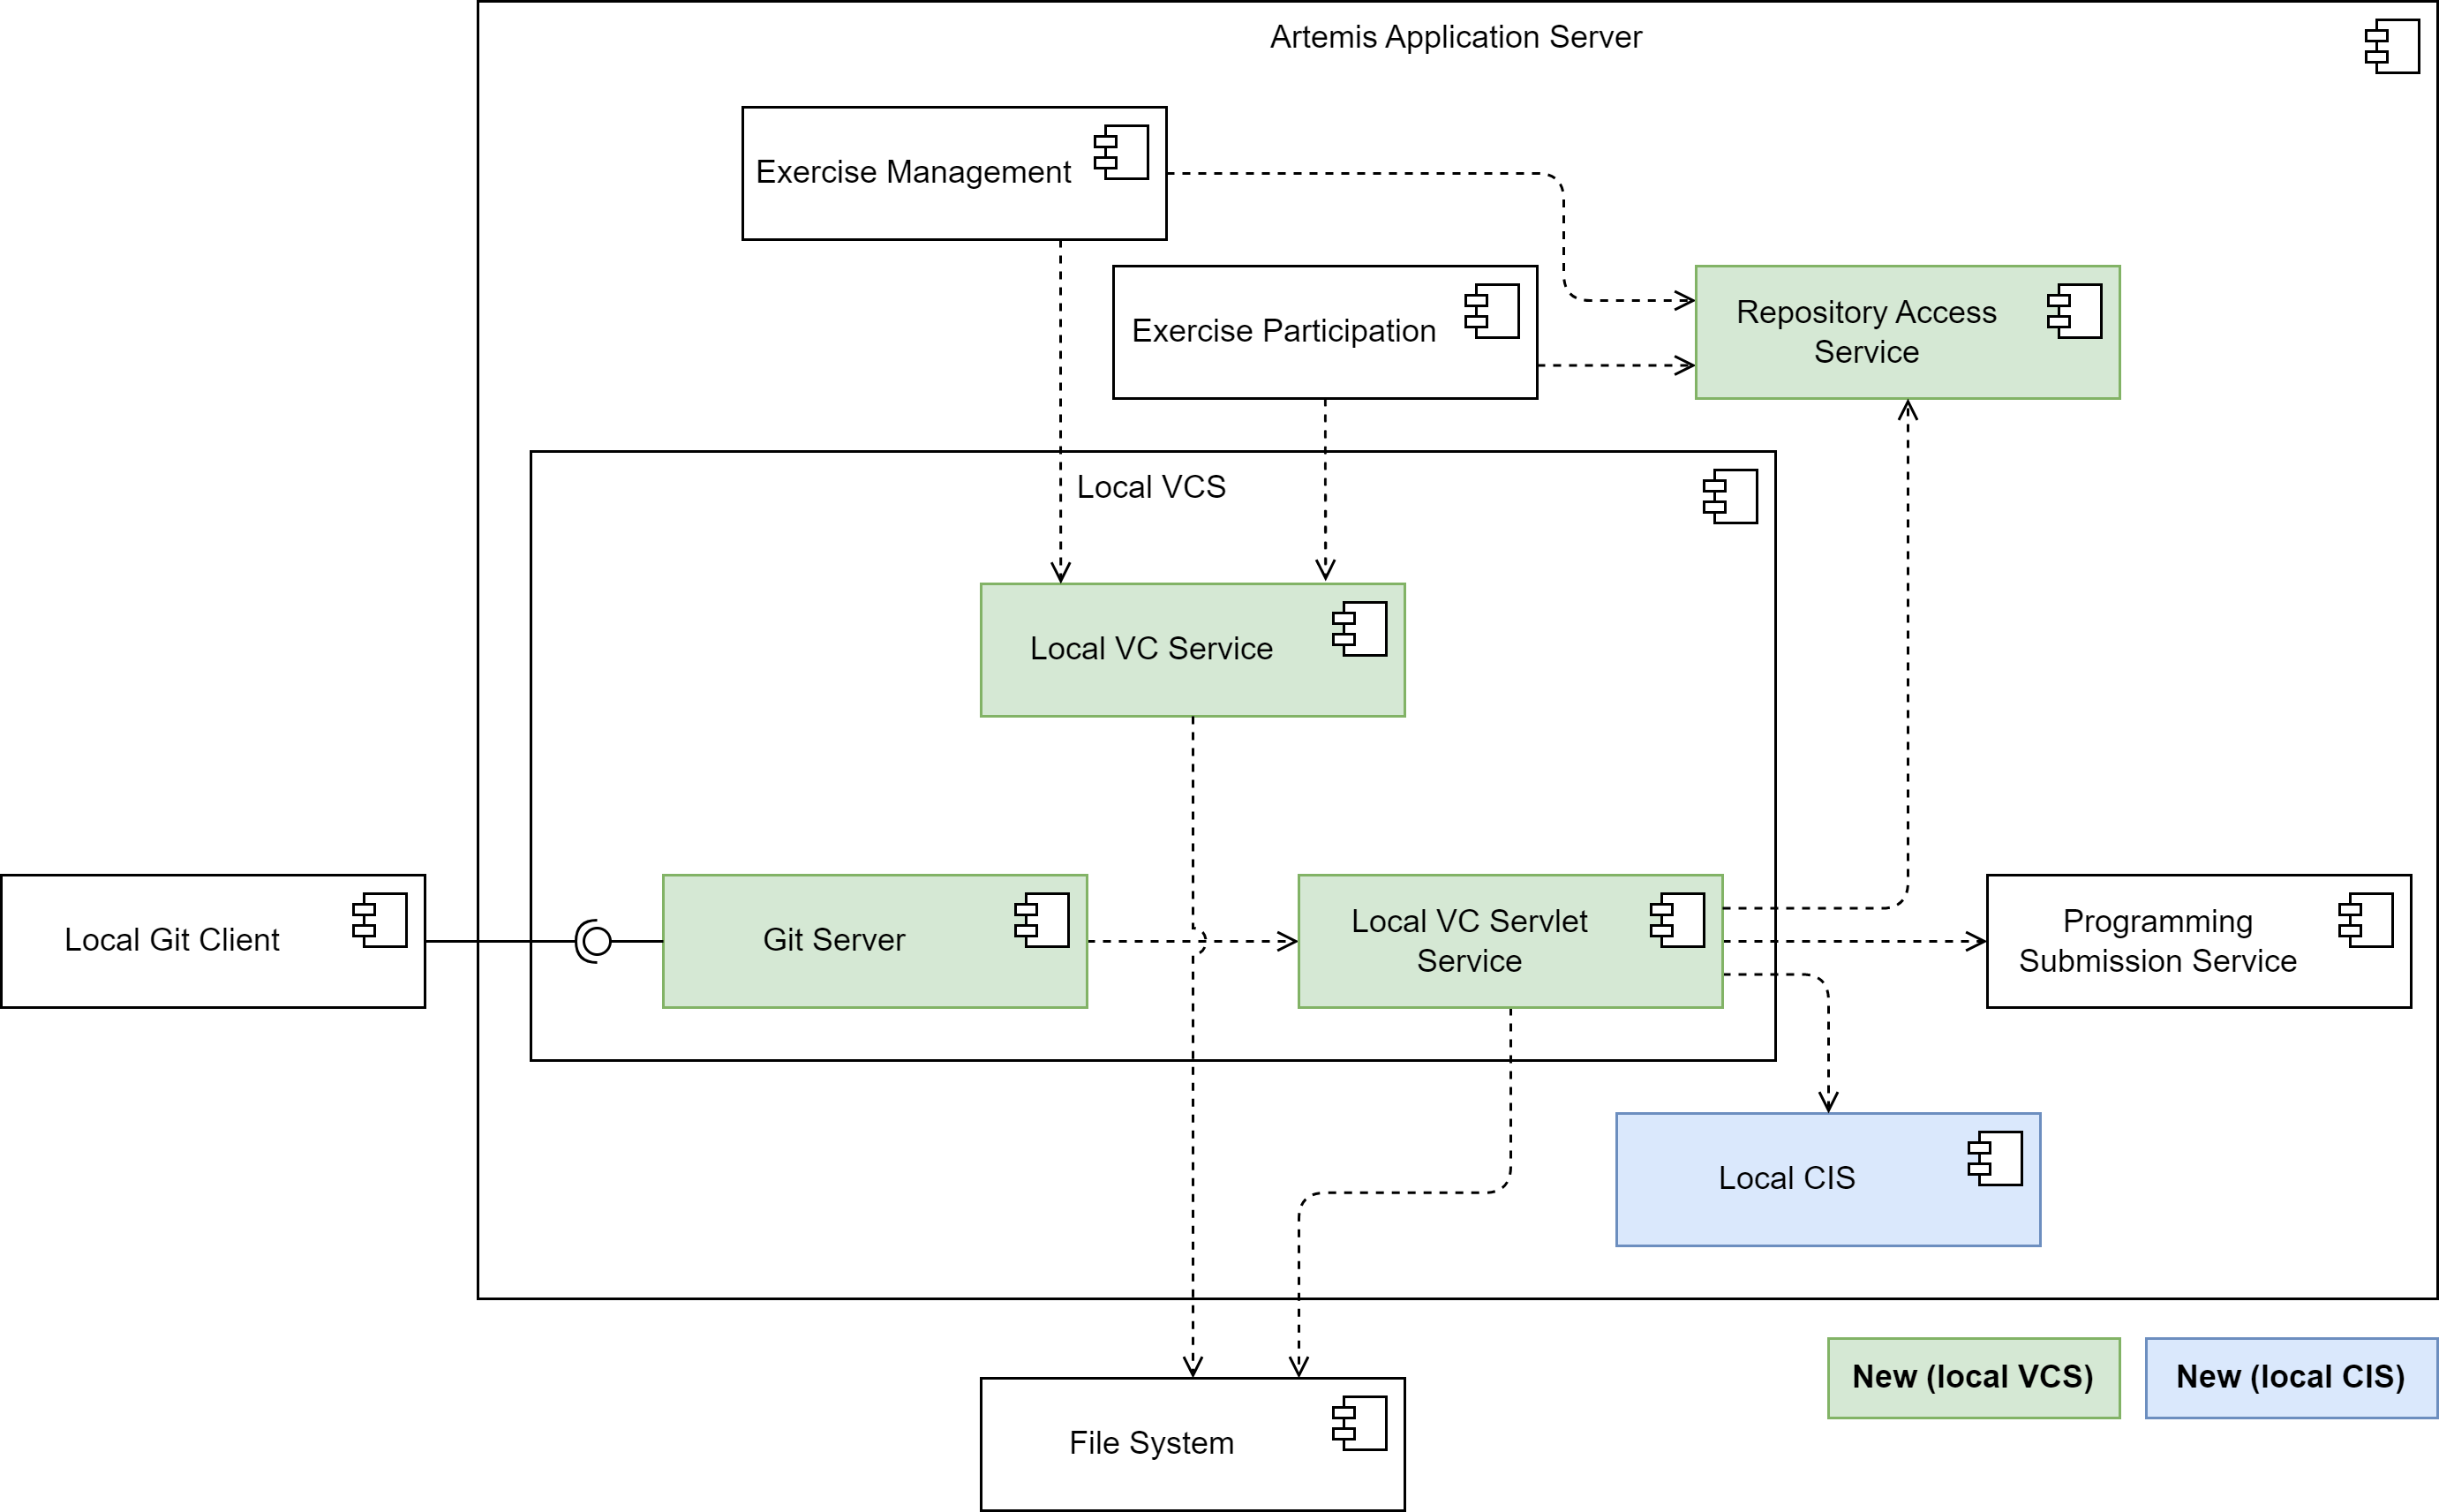
The following diagram shows an overview of the components in the version control subsystem:
Version Control Subsystem
The Local VC Service implements the VersionControlService interface and thus contains methods that the exercise management subsystem and the exercise participation subsystem need to interact with the VC system.
E.g. the createRepository() method creates a repository on the file system.
For users to be able to access the repositories using their integrated Git client, the integrated VC subsystem contains a Git Server component.
It responds to fetch and push requests from Git clients, enabling instructors and students to interact with their repositories the way they are used to.
It encompasses all the logic for implementing the Git HTTP protocol server-side.
This includes extracting the command and parameters from the client request and executing the Git commands on the server-side repository, provided the repository exists, and the user has the requisite permissions.
It reads objects and refs from the repository, updates the repository for push requests, and formats the results of the Git commands it executes into a response that it sends back to the client.
This could involve sending objects and refs to the client in a packfile, or transmitting error messages.
The Git Server delegates all logic connected to Artemis to the Local VC Servlet Service.
This service resolves the repository from the file system depending on the repository URI. It also handles user authentication (only Basic Auth for now) and authorization.
For authorization (e.g. “is the requesting user the owner of the repository?”, “has the due date already passed?”), it uses the logic outsourced to the RepositoryAccessService that the existing online editor also uses.
For push requests, the Local VC Servlet Service calls the processNewProgrammingSubmission() method of the Programming Submission Service to create a new submission and finally calls the integrated CI subsystem to trigger a new build.
Integrating the VC system into the Artemis server application improves performance. For instance, when an instructor creates a new programming exercise, Artemis needs to copy the template source code to the template repository. Using the integrated VCS, Artemis merely needs to communicate with the host file system, copying the files from one location in the file system to another, which is faster than communicating with the external VCS through the network.
Continuous Integration Subsystem
The following diagram shows an overview of the components in the integrated continuous integration subsystem:

Continuous Integration Subsystem
The integrated CIS consists of two further subsystems: the CI Management and the Build Agent. Both systems are decoupled and can be deployed on separate servers if necessary (not obligatory). This allows for a flexible scaling of the system, as we can deploy multiple build agent instances to handle a high number of build jobs.
CI Management
The following diagram shows an overview of the components in the CI Management subsystem:

CI Management Subsystem
The CI Management prepares information for build jobs and add them to the distributed Hazelcast queue. It has complete access to the distributed data structures related to the CI system. It provides endpoints so users can interact with these datastructures, such as viewing and cancelling build jobs. It also receives the build job results, grades them, and notifies the user. The CI Management has access to the database and the file system.
The CI Management subsystem implements the ContinuousIntegrationTriggerService interface, the LocalCITriggerService which provides the triggerBuild method. This method gets called whenever a repository needs to be tested, i.e. after creating a programming exercise or when a student submits code.
When the triggerBuild method is called, all information necessary to execute the build job is prepared and used to create a BuildJobQueueItem object. The object contains, among other things, repository URIs, the build configuration, a user-defined build script (prepared by the LocalCIScriptService) and a priority value (more details here).
The exercise due date is also taken into account. This object is then added to the job queue where it will be retrieved by a build agent to execute the build job. The following diagram shows the structure of the BuildJobQueueItem:

BuildJobQueueItem
The CI Management subsystem consists of two additional services: The SharedQueueManagementService and the Local CI Result Processing Service.
The SharedQueueManagementService has direct access to the job queue as well as to other Hazelcast data structures, a map for currently running build jobs, a map for build agent information and a topic for cancelled build jobs.
The service provides the functionality for an Artemis user to interact with build jobs and build agents. Build jobs can be viewed and cancelled. Build agents can only be viewed at the current state of this thesis.
The user can access this functionality using the UI over a set of endpoints provided by a REST API.
The LocalCIResultProcessingService retrieves the build job results which were generated by the build agents from the result queue. It is responsible for grading the build job results, notifying the user and persisting information on the build job execution in the database.
Additionally, the LocalCIEventListenerService is responsible for monitoring changes in build jobs and build agents to ensure job states remain accurate and users receive timely notifications.
It registers event listeners for both the job queue and ongoing job processing, handling state transitions such as when a job starts or finishes.
The service periodically checks for lost or stuck jobs, marking them as missing if necessary. This mechanism helps recover from issues like build agent crashes, network failures, or application restarts that could lead to inconsistencies in job tracking.
To provide real-time feedback, the service triggers WebSocket updates.New event listeners should be registered within this service to maintain consistency in handling CI-related events.
For simplicity, this service is not included in the diagram above.
Priority Calculation
Build jobs are assigned a priority value when they are added to the job queue. This value is used to determine the order in which build jobs are executed. The higher the priority value, the sooner the build job is executed.
The priority value is determined based on several factors related to the programming exercise and its context.
Exercises that are part of an ongoing exam are given the highest priority of 1 to ensure quick feedback.
Exam exercises that are part of a test exam or a test run within an exam are assigned a priority of 2.
Submissions made after the due date, such as those in practice mode or finished exams, receive a lower priority of 3.
Optional exercises, which are not included in the overall score, are also assigned a priority of 3.
If the build is part of a batch, for example, if an instructor triggers a re-build of all submissions of an exercise, it is assigned the lowest priority of 4.
If none of the above conditions apply, for example, exercises that are part of a real course and not part of an exam, the priority is set to 2.
Additionally, if the exercise is part of a test course, a penalty is added to the priority, making it less urgent. The penalty is implemented by adding a value of 5 to the priority.
The priority calculation is implemented in the LocalCITriggerService.
Build Agent
The following diagram shows an overview of the components in the Build Agent subsystem:

Build Agent Subsystem
The build agent is a separate subsystem that is responsible for executing build jobs. It can be run as a standalone application or as part of the main Artemis application. The build agent implements multiple services responsible for retrieving queued build jobs and executing them.
The SharedQueueProcessingService has direct access to the job queue and detects newly added build jobs. The job is then taken from the queue if the build agent currently has the capacity to execute the job.
The service then makes an asynchronous method call to the BuildJobManagementService that eventually results in either a BuildJobResult or an exception if something went wrong during the build job processing.
Either way, a ResultQueueItem object containing all necessary information about the build job execution is created and added to the result queue.
The BuildJobManagementService contains the logic for managing build jobs.
It prepares a build task as a lambda function and submits it to the ThreadPoolExecutor for execution.
The task execution is handled by the BuildJobExecutionService, which provides the runBuildJob method containing the core logic for executing a build job.
Once the build job completes, the result is returned to the BuildJobManagementService for further processing.
If any error happens during the build job execution, it is propagated to the BuildJobManagementService, so it can handle all errors in one spot.
The SharedQueueProcessingService utilizes the BuildAgentInformationService to update build agent information and gather relevant monitoring data.
This ensures that build agents are accurately tracked, including their status, number of running jobs, and performance metrics.
The collected data is used to maintain an up-to-date view of the system.
To improve the reliability of the system, the BuildJobManagementService implements a timeout mechanism.
Administrators can configure a maximum amount of time that build jobs can run by setting the artemis.continuous-integration.timeout-seconds environment variable. The default value is 120 seconds.
If a build job times out, the BuildJobManagementService interrupts the build job.
This is crucial to prevent jobs that require an abnormally high amount of time from clogging up the system and reducing overall system performance.
A basic build job for the purpose of providing automated assessment in Artemis consists of the following steps:
Check out the relevant repositories.
Configure Docker container.
Start a Docker container for the build job.
Copy repositories into container
Execute the build script in the container.
Retrieve the test results from the container.
Stop the container.
Parse the test results.
To address potential security risks associated with executing student code during automated assessment, we run the build job in a container, that the BuildJobContainerService creates and starts just for this purpose.
This container functions as an isolated environment.
If a student submits potentially malicious code, the container confines its execution, preventing it from directly affecting the host system or other containers.
The ephemeral nature of Docker containers allows the BuildJobExecutionService to quickly remove them and the data they produced during the build when a build job finishes.
Finally, when the build ran through successfully, the SharedQueueProcessingService puts the build result into the result queue so it can then be processed by the CI Management.
If there were any errors, the BuildJobManagementService stops the Docker container and SharedQueueProcessingService relays the exception message to the CI Management via the result queue.
Hazelcast Distributed Data Structures
The integration employs various Hazelcast distributed data structures to streamline the processing of build jobs across the network.
These structures include the buildJobQueue, an IQueue used for queuing all build jobs awaiting processing;
the processingJobs, an IMap tracking build jobs currently under processing;
and the canceledBuildJobsTopic, an ITopic utilized to signal build agents to cancel specific build jobs.
Here we can see an overview of all Hazelcast data structures used in Local CI and their purpose:
Name |
Type |
Description |
|---|---|---|
|
|
Queue for all build jobs that are waiting to be processed. |
|
|
Map including all build jobs that are currently being processed. |
|
|
Map containing information on each build agent, such as its status and metrics. |
|
|
Topic to order build agents to cancel a specific build job. |
|
|
Queue containing the results produced by the build job execution. |
|
|
Map containing information about the last date of use of Docker images. |
|
|
Topic used to notify which build agent should be paused. |
|
|
Topic used to notify which build agent should be resumed. |
This approach ensures the efficient synchronization of build job processing.
The CI Management also provides REST endpoints and supports WebSocket connections.
These endpoints and real-time connections allow users to monitor and manage both queued and running jobs along with the build agents themselves,
enhancing the system’s operability and user interaction capabilities.
Additionally, the processingJobs, buildJobQueue and canceledBuildJobsTopic are enhanced with Hazelcast EntryListener, ItemListener and MessageListener, enabling immediate detection of changes such as additions, removals, and updates.
As previously mentioned, the most of the listeners are added in LocalCIEventListenerService.
Build Job Cancellation
The build job cancellation mechanism is a crucial feature of the CI system. It allows users to cancel build jobs that are taking too long or are no longer needed. The following diagram shows an overview of the components in the build job cancellation mechanism:
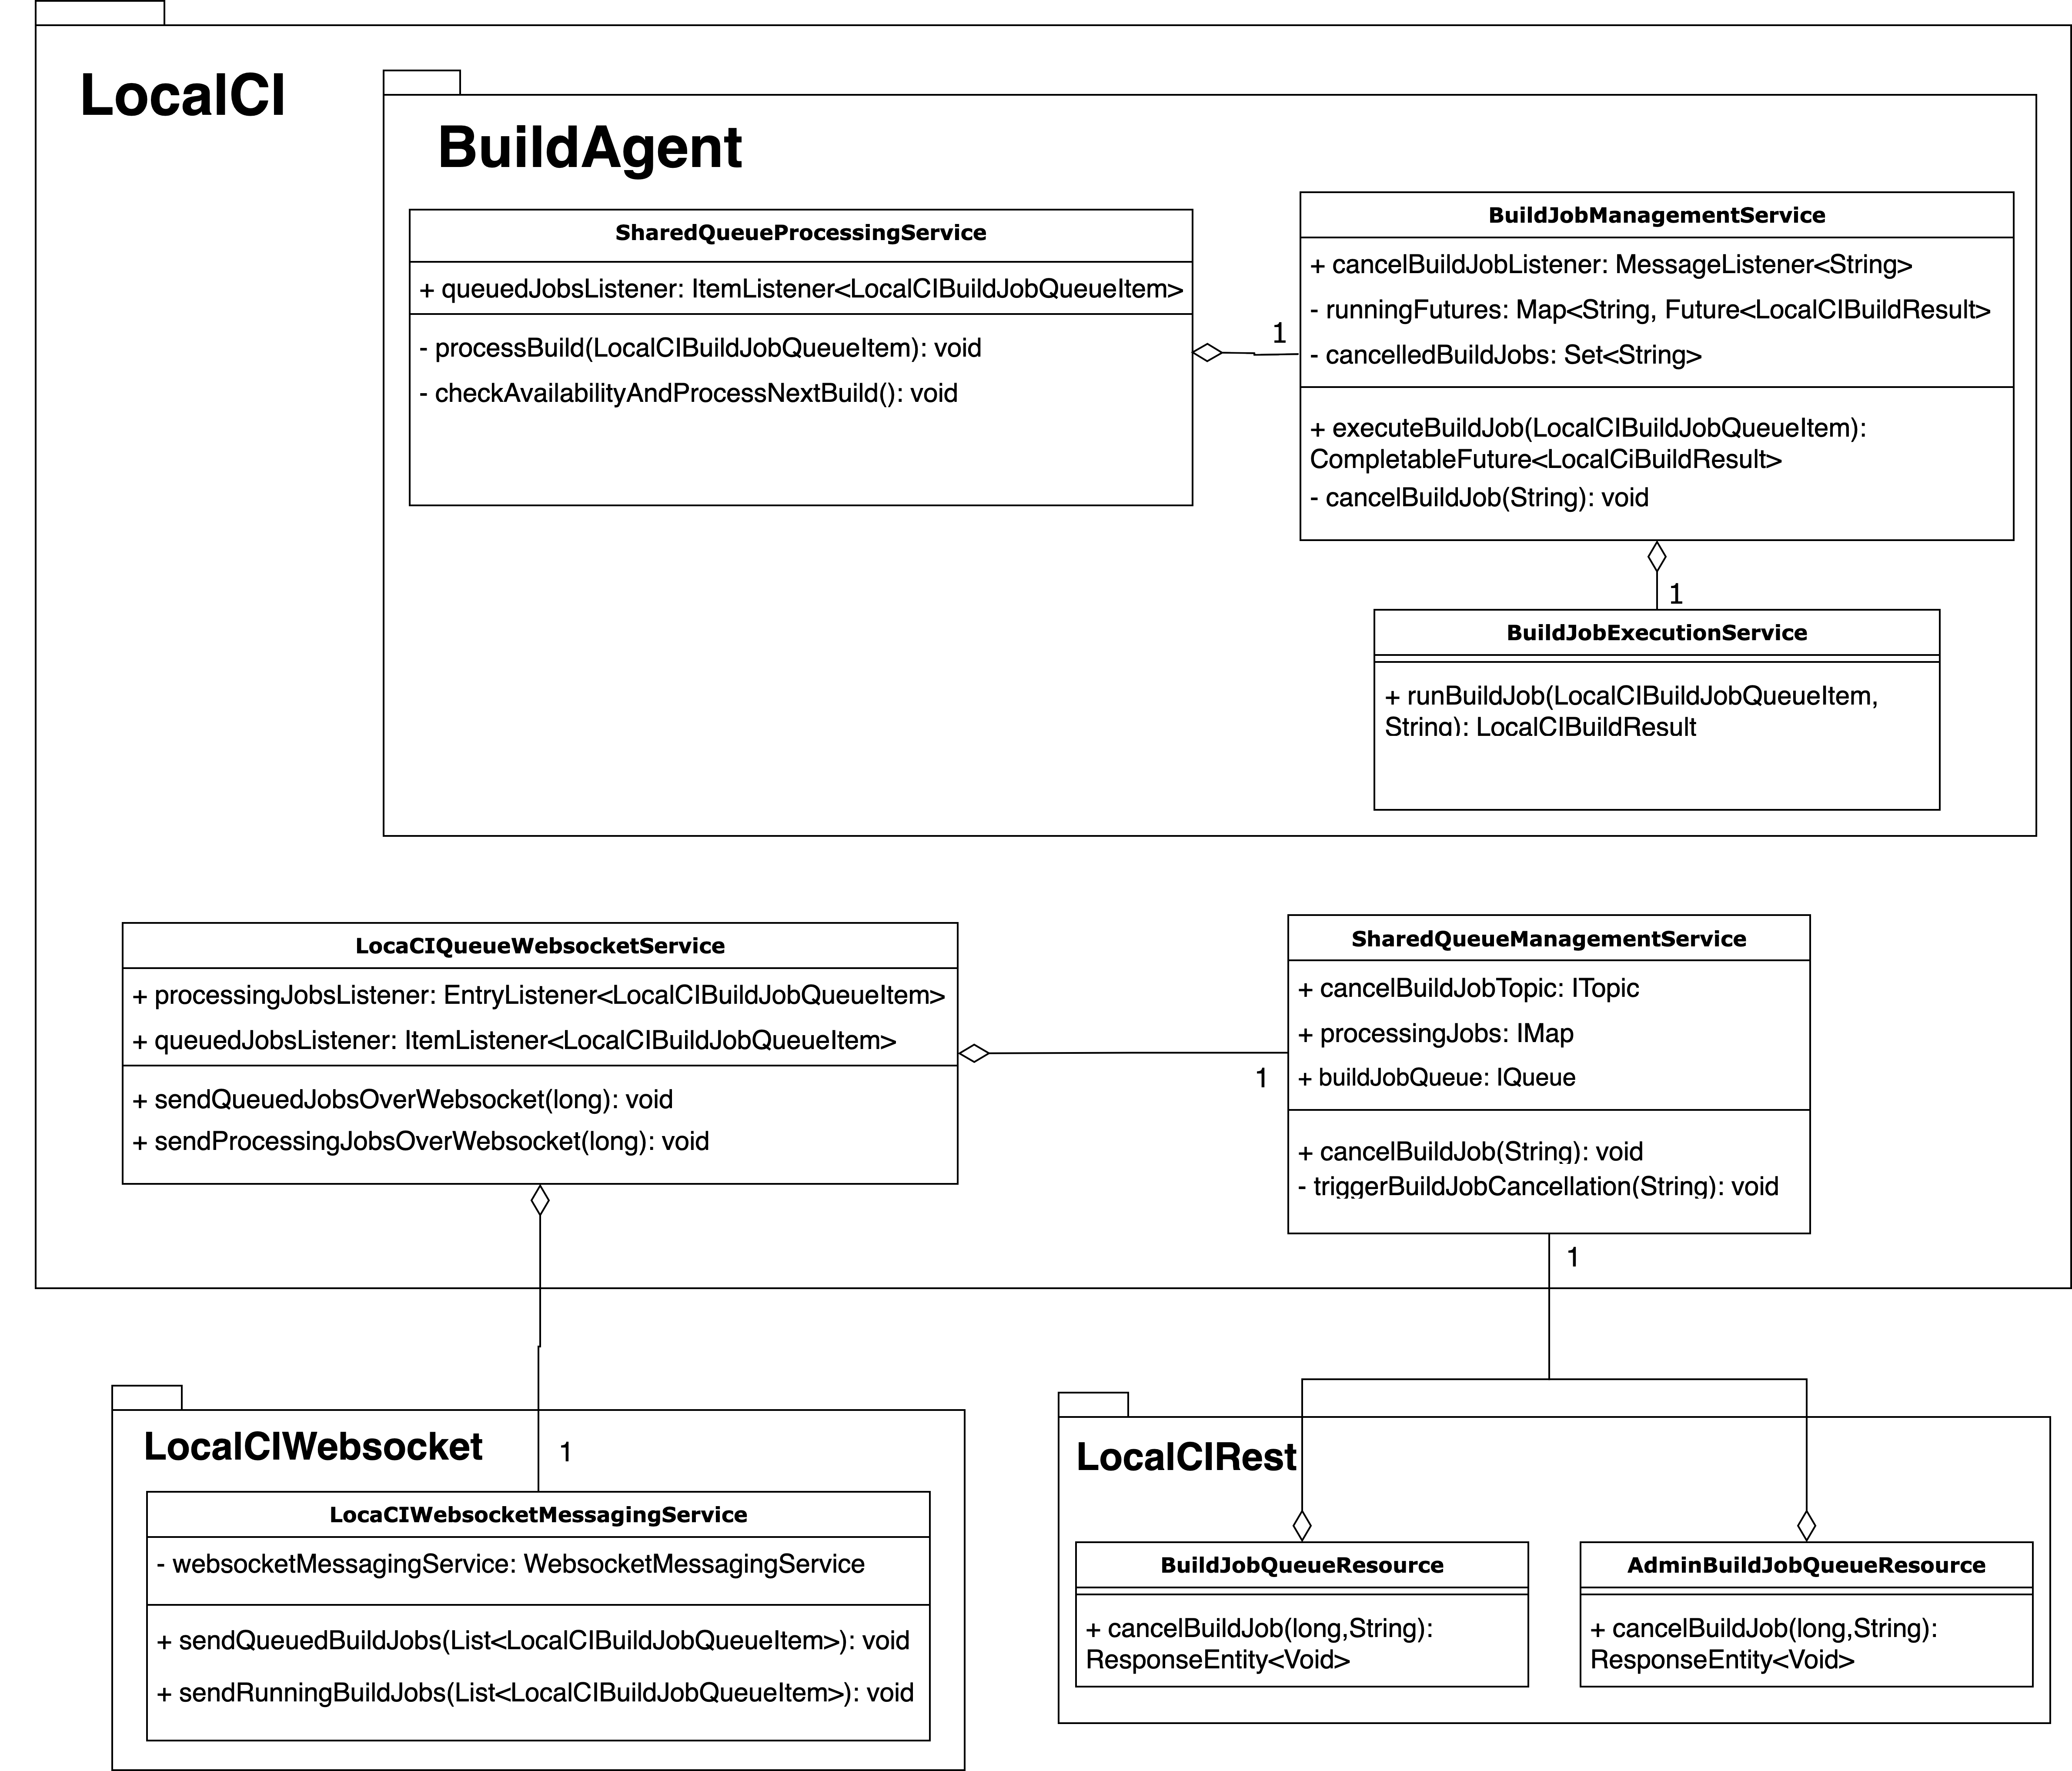
Build Job Cancellation Class Diagram
The build job cancellation mechanism is implemented using Hazelcast’s distributed data structures.
As shown in the Build Job Cancellation Class Diagram we have services such as the SharedQueueManagementService that run on the core Artemis node and are responsible for managing Hazelcast’s distributed datatypes.
However, the real processing of each build job runs independently on each build agent. Therefore we have separate services such as the SharedQueueProcessingService in a build agent package .
The processing of build jobs gets triggered by the insertion or removal of jobs from the buildJobQueue.
The queue listener in the SharedQueueProcessingService is then responsible for invoking the checkAvailabilityAndProcessNextBuild() method.
If a build agent has available threads, the job is moved from the buildJobQueue to the processingJobs.
Subsequently, the processBuild(BuildJobQueueItem buildJob) method is called, which in turn invokes executeBuildJob(BuildJobQueueItem buildJob) in the BuildJobManagementService.
This method is tasked with asynchronously executing the build job in the BuildJobExecutionService, by creating a future.
Upon creating the new future, it is added to a local Map<String, Future<LocalCIBuildResult>> runningFutures, which is unique to each build agent and contains only the futures of that agent.
This future is then processed, with outcomes such as completion, failure, or cancellation being sent back and managed within the processBuild(...) method.
This includes removing the build job from the processingJobs and initiating a new cycle by calling checkAvailabilityAndProcessNextBuild().
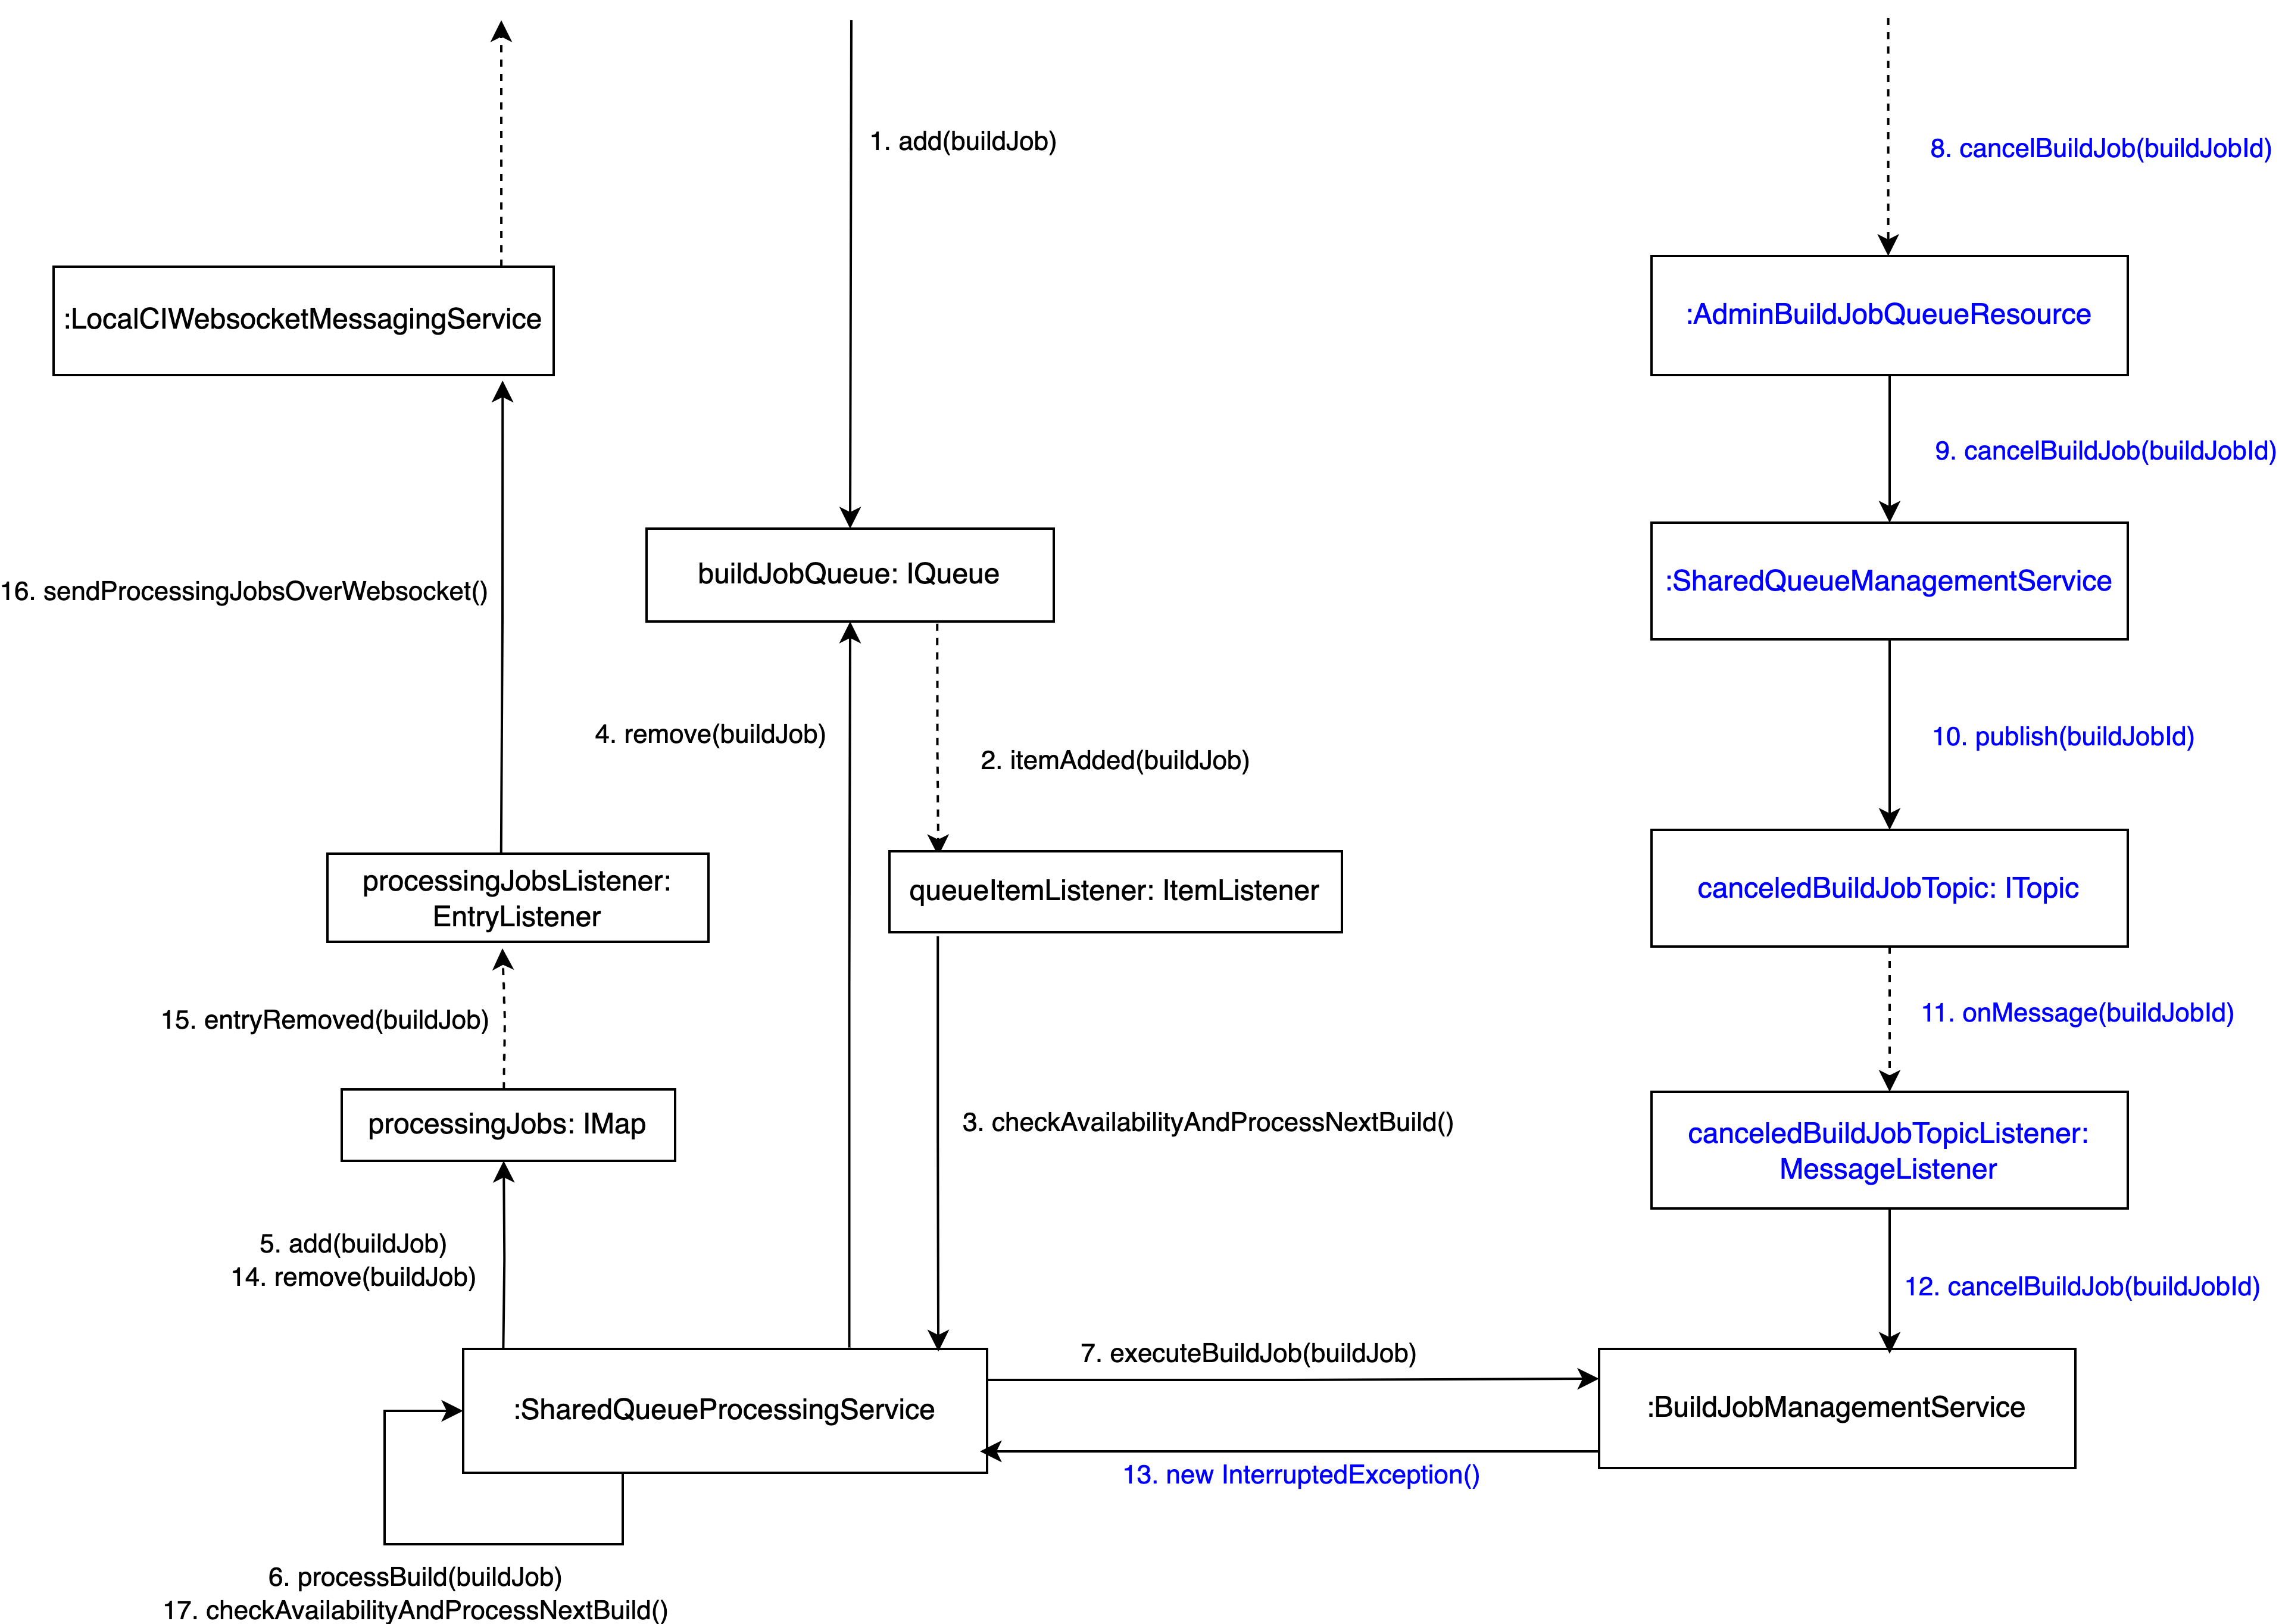
Build Job Cancellation Communication Diagram for a Processing Build Job
The above Communication Diagram sets the stage for understanding the cancellation mechanism.
Upon receiving a cancellation request through the @DeleteMapping("cancel-job/{buildJobId}") endpoint in either the AdminBuildJobQueueResource or BuildJobQueueResource,
the cancelBuildJob(String buildJobId) method within the SharedQueueManagementService is activated.
Initially, it checks whether the build job is queued but not yet in process. If so, it is simply removed from the buildJobQueue.
The process becomes more complex for jobs already in process, involving the canceledBuildJobsTopic ITopic`.
A cancellation message for the build job ID is broadcast to all build agents, with the BuildJobManagementService listening for these messages via Hazelcast’s MessageListener.
Every build agent then checks its runningFutures map to see if it holds the specific build job future.
Should a build agent currently process the specified job, it executes cancelBuildJob(String buildJobId) within the BuildJobManagementService.
This step involves canceling the future and recording the job ID in Set<String> cancelledBuildJobs.
The cancellation triggers an Exception which is caught and managed in processBuild(...) within the SharedQueueProcessingService.
The build status is set to CANCELLED, the job is removed from processingJobs, and the process reinitialized with checkAvailabilityAndProcessNextBuild().
Modifications to processingJobs trigger WebSocket updates, consequently removing the canceled job from the client’s build overview display.