Bamboo, Bitbucket and Jira Setup
This section describes how to set up a programming exercise environment based on Bamboo, Bitbucket and Jira.
Therefore, a check is included within the BambooBuildPlanService that ensures that builds are not started in Docker agents if the development setup is present.
Prerequisites:
Docker-Compose
Before you start the docker compose, check if the bamboo version in the
build.gradle (search for com.atlassian.bamboo:bamboo-specs) is
equal to the bamboo version number in the docker compose in
docker/atlassian.yml
If the version number is not equal, adjust the version number.
Further details about the docker compose setup can be found in docker
Execute the docker compose file e.g. with
docker compose -f docker/atlassian.yml up -d.
Error Handling: It can happen that there is an overload with other
docker networks
ERROR: Pool overlaps with other one on this address space. Use the
command docker network prune to resolve this issue.
Make sure that docker has enough memory (~ 6GB). To adapt it, go to Settings → Resources
In case you want to enable Swift or C programming exercises, refer to the readme in
docker
Configure Bamboo, Bitbucket and Jira
By default, the Jira instance is reachable under localhost:8081, the
Bamboo instance under localhost:8085 and the Bitbucket instance
under localhost:7990.
Get evaluation licenses for Atlassian products: Atlassian Licenses
Get licenses for Bamboo, Bitbucket and Jira Service Management.
Bamboo: Select
Bamboo (Data Center)andnot installed yetBitbucket: Select
Bitbucket (Data Center)andnot installed yetJira: Select
Jira Service Management (formerly Service Desk) (Data Center)andnot installed yet
Provide the just created license key during the setup and create an admin user with the same credentials in all 3 applications. - Bamboo:
Choose the H2 database
Select the evaluation/internal/test/dev setups if you are asked
Put the admin username and password into
application-local.ymlatartemis.version-control.userandartemis.continuous-integration.user.
Jira:
On startup select
I'll set it up myselfSelect Build In Database Connection
Create a sample project
Bitbucket: Do not connect Bitbucket with Jira yet
Make sure that Jira, Bitbucket and Bamboo have finished starting up.
Execute the shell script
atlassian-setup.shin thedocker/atlassiandirectory (e.g. with./docker/atlassian/atlassian-setup.sh). This script creates groups, users and assigns the user to their respective group.The script (step 3) has already created the required users and assigned them to their respective group in Jira. Now, make sure that they are assigned correctly according to the following test setup: users 1-5 are students, 6-10 are tutors, 11-15 are editors and 16-20 are instructors. The usernames are artemis_test_user_{1-20} and the password is again the username. When you create a course in artemis you have to manually choose the created groups (students, tutors, editors, instructors).
Use the user directories in Jira to synchronize the users in bitbucket and bamboo:
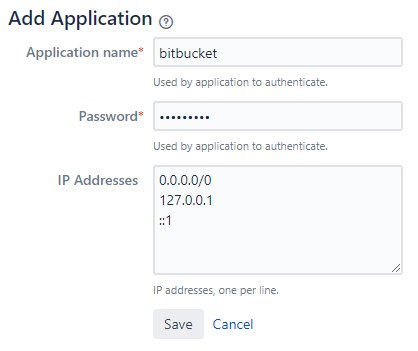
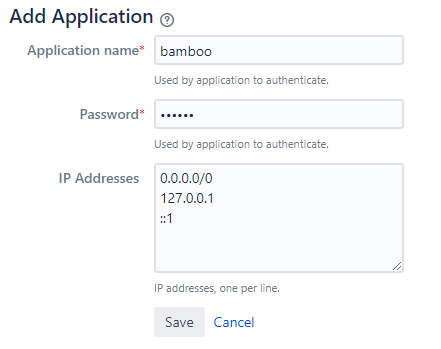
Go to Jira → User management → Jira user server → Add application → Create one application for bitbucket and one for bamboo → add the IP-address
0.0.0.0/0to IP Addresses
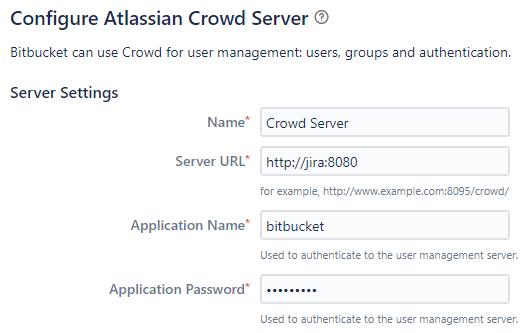
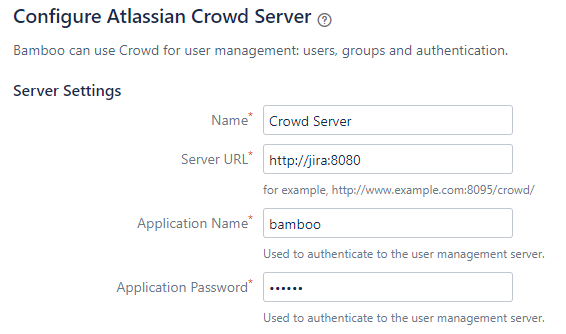
Go to Bitbucket → User Directories and Bamboo → User Directories → Add Directories → Atlassian Crowd → use the URL
http://jira:8080as Server URL → use the application name and password which you used in the previous step. Also, you should decrease the synchronisation period (e.g. to 2 minutes).
Press synchronise after adding the directory, the users and groups should now be available.
Give the test users User access on Bitbucket: On the Administration interface (settings cogwheel on the top), go to the Global permissions. Type the names of all test users in the search field (“Add Users”) and give them the “Bitbucket User” permission. If you skip this step, the users will not be able to log in to Bitbucket or clone repositories.
In Bamboo create a global variable named SERVER_PLUGIN_SECRET_PASSWORD, the value of this variable will be used as the secret. The value of this variable should be then stored in
src/main/resources/config/application-local.ymlas the value ofartemis-authentication-token-value. You can create a global variable from settings on Bamboo.In Bamboo create a shared username and password credential where the username and password should be the same as the ones you used to create the Bitbucket admin user. The name of the shared credential must be equal to the value set in
artemis.version-control.user.The shared user can be created via Bamboo → Bamboo Administration → Shared credentials → Add new credentials → Username and password
Download the bamboo-server-notification-plugin and add it to bamboo. Go to Bamboo → Manage apps → Upload app → select the downloaded .jar file → Upload
Authorize the Bamboo agent. Bamboo Administration → Agents → Remote agents → Agent authentication
Approve the agent and edit the IP address in a development setup to
*.*.*.*as the Docker container doesn’t have a static IP address.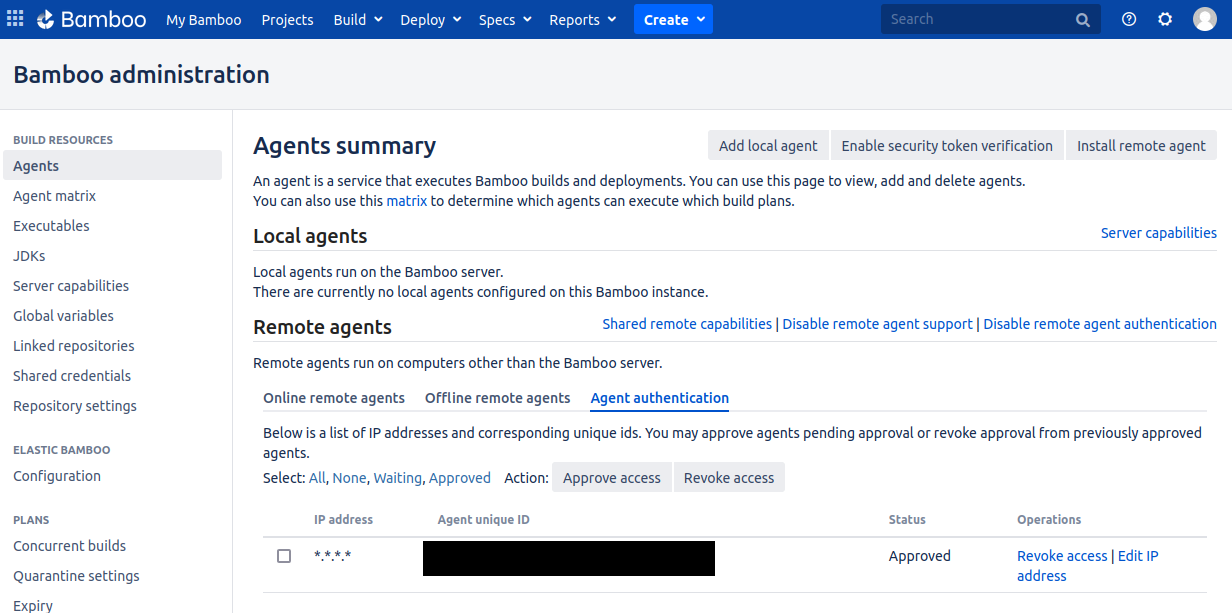
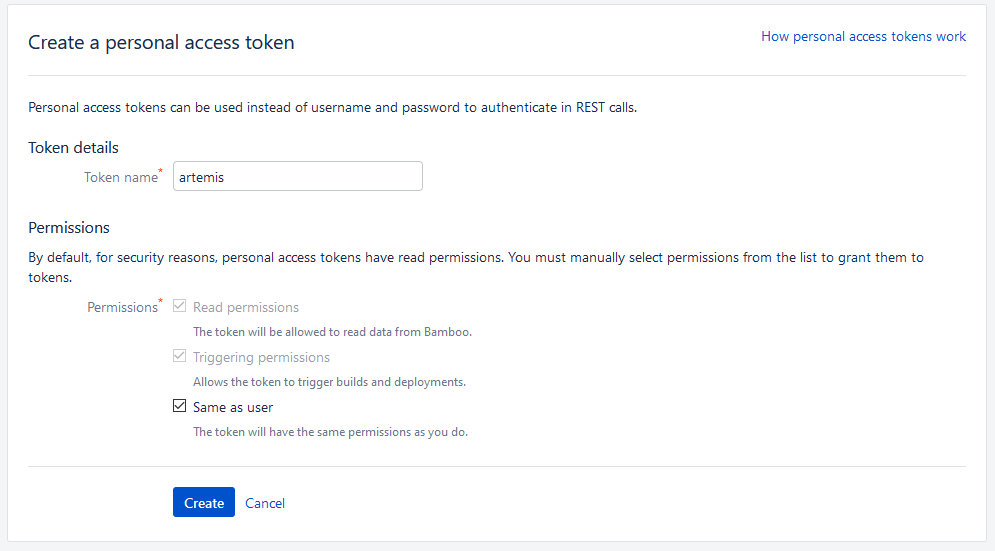
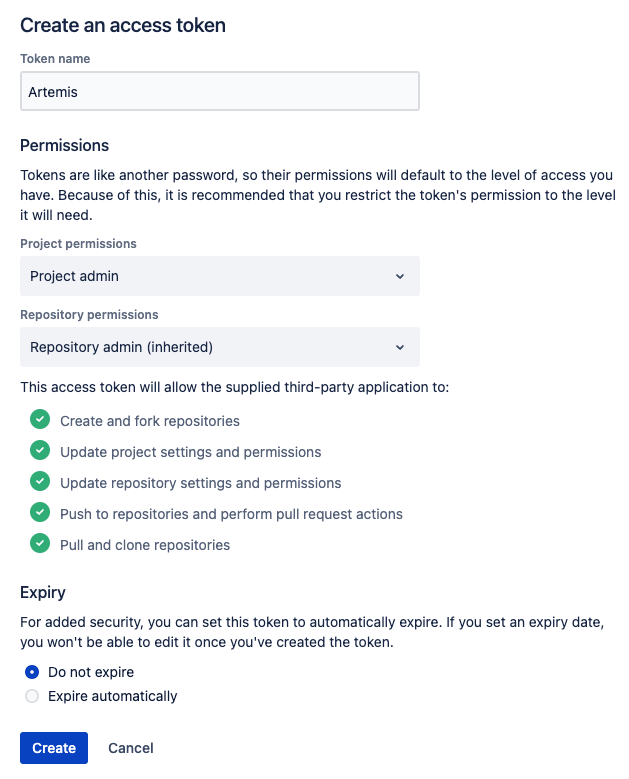
Generate a personal access token
While username and password can still be used as a fallback, this option is already marked as deprecated and will be removed in the future.
Personal access token for Bamboo:
Log in as the admin user and go to Bamboo → Profile (top right corner) → Personal access tokens → Create token
Insert the generated token into the file
application-local.ymlin the sectioncontinuous-integration:
artemis:
    continuous-integration:
        user: <username>
        password: <password>
        token: #insert the token here
Personal access token for Bitbucket:
Log in as the admin user and go to Bitbucket → Your profile image (top right corner) → Manage account → HTTP access tokens → Create token
Insert the generated token into the file
application-local.ymlin the sectionversion-control:
artemis:
    version-control:
        user: <username>
        password: <password>
        token: #insert the token here
Add a SSH key for the admin user
Artemis can clone/push the repositories during setup and for the online code editor using SSH. If the SSH key is not present, the username + token will be used as fallback (and all git operations will use HTTP(S) instead of SSH). If the token is also not present, the username + password will be used as fallback (again, using HTTP(S)).
You first have to create a SSH key (locally), e.g. using
ssh-keygen(more information on how to create a SSH key can be found e.g. at ssh.com or at atlassian.com).The list of supported ciphers can be found at Apache Mina.
It is recommended to use a password to secure the private key, but it is not mandatory.
Please note that the private key file must be named
id_rsa,id_dsa,id_ecdsaorid_ed25519, depending on the ciphers used.You now have to extract the public key and add it to Bitbucket. Open the public key file (usually called
id_rsa.pub(when using RSA)) and copy it’s content (you can also usecat id_rsa.pubto show the public key).Navigate to
BITBUCKET-URL/plugins/servlet/ssh/account/keysand add the SSH key by pasting the content of the public key.<ssh-private-key-folder-path>is the path to the folder containing theid_rsafile (but without the filename). It will be used in the configuration of Artemis to specify where Artemis should look for the key and store theknown_hostsfile.<ssh-private-key-password>is the password used to secure the private key. It is also needed for the configuration of Artemis, but can be omitted if no password was set (e.g. for development environments).
Configure Artemis
Modify
src/main/resources/config/application-local.ymlto include the correct URLs and credentials:repo-clone-path: ./repos/ repo-download-clone-path: ./repos-download/ bcrypt-salt-rounds: 11 # The number of salt rounds for the bcrypt password hashing. Lower numbers make it faster but more unsecure and vice versa. # Please use the bcrypt benchmark tool to determine the best number of rounds for your system. https://github.com/ls1intum/bcrypt-Benchmark user-management: use-external: true external: url: http://localhost:8081 user: <jira-admin-user> password: <jira-admin-password> admin-group-name: instructors internal-admin: username: artemis_admin password: artemis_admin version-control: url: http://localhost:7990 user: <bitbucket-admin-user> password: <bitbucket-admin-password> token: <bitbucket-admin-token> # step 10.2 ssh-private-key-folder-path: <ssh-private-key-folder-path> ssh-private-key-password: <ssh-private-key-password> continuous-integration: url: http://localhost:8085 user: <bamboo-admin-user> password: <bamboo-admin-password> token: <bamboo-admin-token> # step 10.1 artemis-authentication-token-value: <artemis-authentication-token-value> # step 7
If you run the Atlassian suite in containers and Artemis on your host machine, you may have to set internal urls for bamboo, so that the CI and VCS servers are reachable from each other. If Artemis is executed in a container in the same network, you won’t need to specify internal URLs, as Artemis can then communicate with Bamboo and Bitbucket and Bamboo and Bitbucket can communicate with each other using the same url. If you use the default docker-compose setup, you can use the following configuration:
bamboo:
    internal-urls:
        ci-url: http://bamboo:8085
        vcs-url: http://bitbucket:7990
Also, set the server URL in
src/main/resources/config/application-local.yml:server: port: 8080 # The port of artemis url: http://172.20.0.1:8080 # needs to be an ip # url: http://docker.for.mac.host.internal:8080 # If the above one does not work for mac try this one # url: http://host.docker.internal:8080 # If the above one does not work for windows try this one
In addition, you have to start Artemis with the profiles bamboo,
bitbucket and jira so that the correct adapters will be used,
e.g.:
--spring.profiles.active=dev,bamboo,bitbucket,jira,artemis,scheduling,local
All of these profiles are enabled by default when using one of the run configurations in IntelliJ. Please read Server Setup for more details.
How to verify the connection works?
Artemis → Jira
You can login to Artemis with the admin user you created in Jira
Artemis → Bitbucket
You can create a programming exercise
Artemis → Bamboo
You can create a programming exercise
Bitbucket → Bamboo
The build of the students repository gets started after pushing to it
Bitbucket → Artemis
When using the code editor, after clicking on Submit, the text Building and testing… should appear.
Bamboo → Artemis
The build result is displayed in the code editor.