Setup for Programming Exercises with Jenkins and GitLab
This page describes how to set up a programming exercise environment
based on Jenkins and GitLab. Optional commands are in curly brackets {}.
The following assumes that all instances run on separate servers. If you have one single server, or your own NGINX instance, just skip all NGINX related steps and use the configurations provided under Separate NGINX Configurations
If you want to setup everything on your local development computer,
ignore all NGINX related steps. Just make sure that you use
unique port mappings for your Docker containers (e.g. 8081 for
GitLab, 8082 for Jenkins, 8080 for Artemis)
Prerequisites:
Make sure that docker has enough memory (~ 6GB). To adapt it, go to
Preferences -> Resourcesand restart Docker.
Content of this document
Artemis
In order to use Artemis with Jenkins as Continuous Integration
Server and Gitlab as Version Control Server, you have to configure
the file application-prod.yml (Production Server) or
application-artemis.yml (Local Development) accordingly. Please note
that all values in <..> have to be configured properly. These values
will be explained below in the corresponding sections.
artemis:
    repo-clone-path: ./repos/
    repo-download-clone-path: ./repos-download/
    encryption-password: artemis-encrypt     # arbitrary password for encrypting database values
    user-management:
        use-external: false
        internal-admin:
             username: artemis_admin
             password: artemis_admin
    version-control:
        url: <https://gitlab-url>
        user: <gitlab-admin-user>
        password: <gitlab-admin-password>
        token: <token>
        ci-token: <ci-token>
    continuous-integration:
        user: <jenkins-admin-user>
        password: <jenkins-admin-password>
        url: <https://jenkins-url>
        empty-commit-necessary: false
        secret-push-token: <secret push token>
        vcs-credentials: <vcs-credentials>
        artemis-authentication-token-key: <artemis-authentication-token-key>
        artemis-authentication-token-value: <artemis-authentication-token-value>
In addition, you have to start Artemis with the profiles gitlab and
jenkins so that the correct adapters will be used, e.g.:
--spring.profiles.active=dev,jenkins,gitlab,artemis,scheduling
Please read Setup Guide for more details.
For a local setup on Windows you can use http://host.docker.internal appended by the chosen ports as the version-control and continuous-integration url.
Make sure to change the server.url value in application-dev.yml
or application-prod.yml accordingly. This value will be used for the
communication hooks from Gitlab to Artemis and from Jenkins to Artemis.
In case you use a different port than 80 (http) or 443 (https) for the
communication, you have to append it to the server.url value,
e.g. 127.0.0.1:8080.
When you start Artemis for the first time, it will automatically create
an admin user based on the default encryption password specified in the
yml file above. In case you want to use a different encryption password,
you can insert users manually into the jhi_user table. You can use
Jasypt Online Encryption
Tool
to generate encryption strings. Use Two Way Encryption (With Secret
Text).
Note: Sometimes Artemis does not generate the admin user which may lead to a startup error. You will have to create the user manually in the MySQL database and in Gitlab. Make sure both are set up correctly and follow these steps:
Use the tool mentioned above to generate a password hash.
Connect to the database via a client like MySQL Workbench and execute the following query to create the user. Replace artemis_admin and HASHED_PASSWORD with your chosen username and password:
INSERT INTO `artemis`.`jhi_user` (`id`,`login`,`password_hash`,`first_name`,`last_name`,`email`,
`activated`,`lang_key`,`activation_key`,`reset_key`,`created_by`,`created_date`,`reset_date`,
`last_modified_by`,`last_modified_date`,`image_url`,`last_notification_read`,`registration_number`)
VALUES (1,"artemis_admin","HASHED_PASSWORD","artemis","administrator","artemis_admin@localhost",
1,NULL,NULL,NULL,NULL,NULL,NULL,NULL,NULL,NULL,NULL,NULL);
Give the user admin and user roles:
INSERT INTO `artemis`.`jhi_user_authority` (`user_id`, `authority_name`) VALUES (1,"ROLE_ADMIN");
INSERT INTO `artemis`.`jhi_user_authority` (`user_id`, `authority_name`) VALUES (1,"ROLE_USER");
4. Create a user in Gitlab (http://your-gitlab-domain/admin/users/new) and make sure that the username,
email, and password are the same as the user from the database:
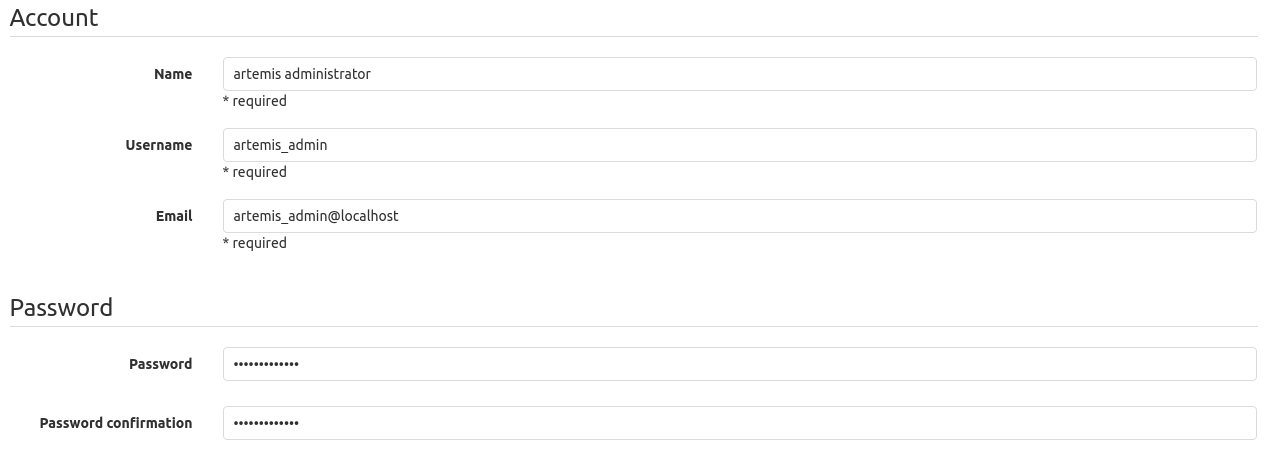
Starting the Artemis server should now succeed.
GitLab
Gitlab Server Setup
Pull the latest GitLab Docker image
docker pull gitlab/gitlab-ce:latest
Start Gitlab
Run the image (and change the values for hostname and ports). Add
-p 2222:22if cloning/pushing via ssh should be possible. As Gitlab runs in a docker container and the default port for SSH (22) is typically used by the host running Docker, we change the port Gitlab uses for SSH to2222. This can be adjusted if needed.Make sure to remove the comments from the command before running it.
docker run -itd --name gitlab \
    --hostname your.gitlab.domain.com \   # Specify the hostname
    --restart always \
    -m 3000m \                            # Optional argument to limit the memory usage of Gitlab
    -p 8081:80 -p 443:443 \               # Alternative 1: If you are NOT running your own NGINX instance
    -p <some port of your choosing>:80 \  # Alternative 2: If you ARE running your own NGINX instance
    -p 2222:22 \                          # Remove this if cloning via SSH should not be supported
    -v gitlab_data:/var/opt/gitlab \
    -v gitlab_logs:/var/log/gitlab \
    -v gitlab_config:/etc/gitlab \
    gitlab/gitlab-ce:latest
Wait a couple of minutes until the container is deployed and GitLab is set up, then open the instance in you browser and set a first admin password of your choosing. You can then login using the username
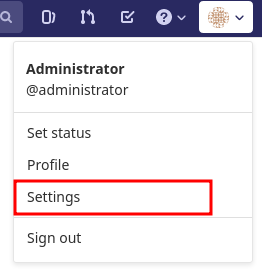
rootand your password.We recommend to rename the
rootadmin user toartemis. To rename the user, click on the image on the top right and selectSettings. Now selectAccounton the left and change the username. Use the same password in the Artemis configuration fileapplication-artemis.ymlartemis: version-control: user: artemis password: the.password.you.chose
If you run your own NGINX or if you install Gitlab on a local development computer, then skip the next steps (6-7)
Configure Gitlab to automatically generate certificates using LetsEncrypt. Edit the Gitlab configuration
docker exec -it gitlab /bin/bash
nano /etc/gitlab/gitlab.rb
And add the following part
letsencrypt['enable'] = true                          # GitLab 10.5 and 10.6 require this option
external_url "https://your.gitlab.domain.com"         # Must use https protocol
letsencrypt['contact_emails'] = ['gitlab@your.gitlab.domain.com'] # Optional

nginx['redirect_http_to_https'] = true
nginx['redirect_http_to_https_port'] = 80
Reconfigure gitlab to generate the certificate.
# Save your changes and finally run
gitlab-ctl reconfigure
If this command fails, try using
gitlab-ctl renew-le-certs
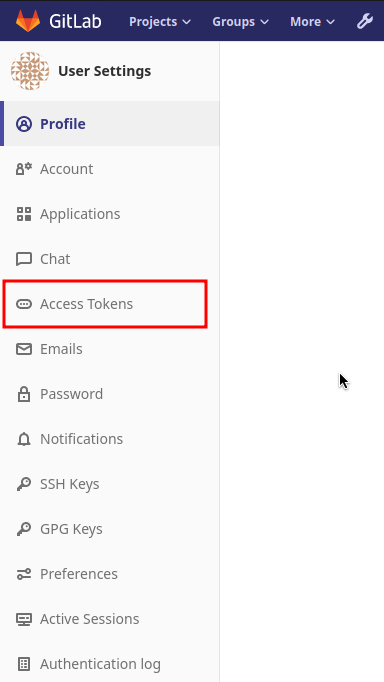
Login to GitLab using the Artemis admin account and go to the profile settings (upper right corned → Settings)
Gitlab Access Token
Go to Access Tokens
Create a new token named “Artemis” and give it all rights.
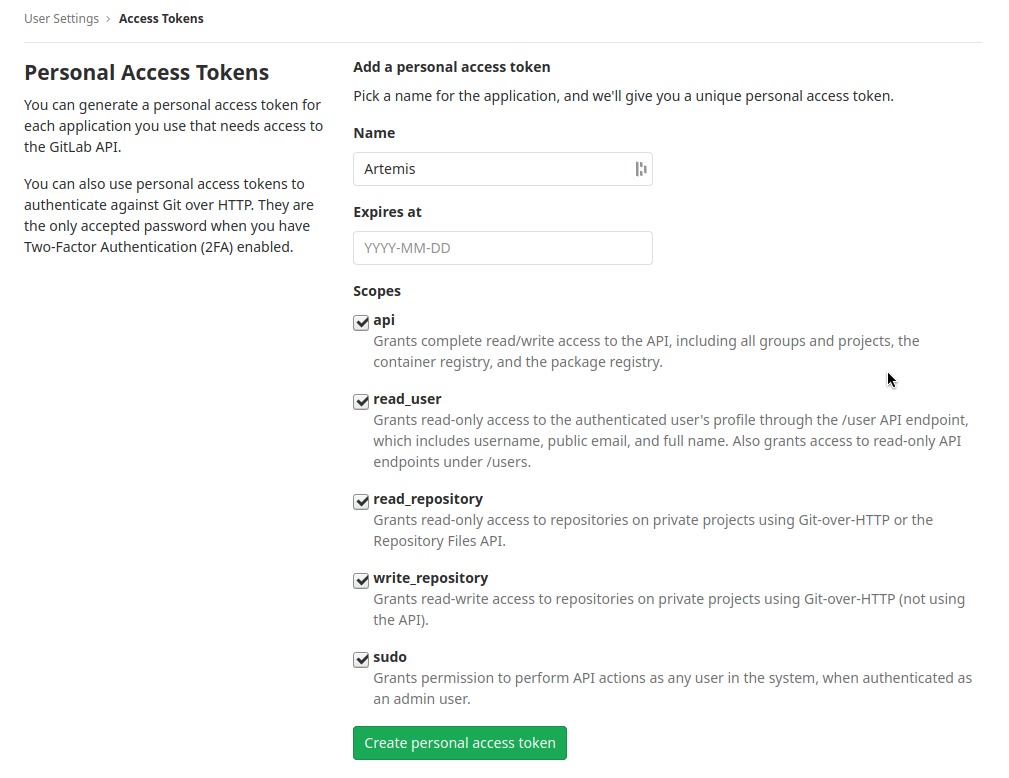
Copy the generated token and insert it into the Artemis configuration file application-artemis.yml
artemis:
    version-control:
        token: your.generated.api.token
(Optional, only necessary for local setup) Allow outbound requests to local network
There is a known limitation for the local setup: webhook URLs for the communication between Gitlab and Artemis and between Gitlab and Jenkins cannot include local IP addresses. This option can be deactivated in Gitlab on
<https://gitlab-url>/admin/application_settings/network→ Outbound requests. Another possible solution is to register a local URL, e.g. using ngrok, to be available over a domain the Internet.Adjust the monitoring-endpoint whitelist. Run the following command
docker exec -it gitlab /bin/bash
Then edit the Gitlab configuration
nano /etc/gitlab/gitlab.rb
Add the following lines
gitlab_rails['monitoring_whitelist'] = ['0.0.0.0/0']
gitlab_rails['gitlab_shell_ssh_port'] = 2222
This will disable the firewall for all IP addresses. If you only want to allow the server that runs Artemis to query the information, replace
0.0.0.0/0withARTEMIS.SERVER.IP.ADRESS/32If you use SSH and use a different port than
2222, you have to adjust the port above.Disable prometheus. As we encountered issues with the prometheus log files not being deleted and therefore filling up the disk space, we decided to disable prometheus within Gitlab. If you also want to disable prometheus, edit the configuration again using
nano /etc/gitlab/gitlab.rb
and add the following line
prometheus_monitoring['enable'] = false
The issue with more details can be found here.
Reconfigure Gitlab
gitlab-ctl reconfigure
Upgrade GitLab
You can upgrade GitLab by downloading the latest Docker image and starting a new container with the old volumes:
docker stop gitlab
docker rename gitlab gitlab_old
docker pull gitlab/gitlab-ce:latest
See https://hub.docker.com/r/gitlab/gitlab-ce/ for the latest version. You can also specify an earlier one.
Start a GitLab container just as described in Start-Gitlab and wait for a couple of minutes. GitLab
should configure itself automatically. If there are no issues, you can
delete the old container using docker rm gitlab_old and the olf
image (see docker images) using docker rmi <old-image-id>.
You can also remove all old images using docker image prune -a
Jenkins
Jenkins Server Setup
Pull the latest Jenkins LTS Docker image
Run the following command to get the latest jenkins LTS docker image.
docker pull jenkins/jenkins:lts
Create a custom docker image
In order to install and use Maven with Java in the Jenkins container, you have to first install maven, then download Java and finally configure Maven to use Java instead of the default version.
To perform all these steps automatically, you can prepare a Docker image:
Create a dockerfile with the content found here <src/main/docker/jenkins/Dockerfile>. Copy it in a file named
Dockerfile, e.g. in the folder/opt/jenkins/usingvim Dockerfile.Now run the command
docker build --no-cache -t jenkins-artemis .This might take a while because Docker will download Java, but this is only required once.
If you run your own NGINX or if you install Jenkins on a local development computer, then skip the next steps (4-6)
Create a file increasing the maximum file size for the nginx proxy. The nginx-proxy uses a default file limit that is too small for the plugin that will be uploaded later. Skip this step if you have your own NGINX instance.
echo "client_max_body_size 16m;" > client_max_body_size.conf
Run the NGINX proxy docker container, this will automatically setup all reverse proxies and force https on all connections. (This image would also setup proxies for all other running containers that have the VIRTUAL_HOST and VIRTUAL_PORT environment variables). Skip this step if you have your own NGINX instance.
docker run -itd --name nginx_proxy \
    -p 80:80 -p 443:443 \
    --restart always \
    -v /var/run/docker.sock:/tmp/docker.sock:ro \
    -v /etc/nginx/certs \
    -v /etc/nginx/vhost.d \
    -v /usr/share/nginx/html \
    -v $(pwd)/client_max_body_size.conf:/etc/nginx/conf.d/client_max_body_size.conf:ro \
    jwilder/nginx-proxy
The nginx proxy needs another docker-container to generate letsencrypt certificates. Run the following command to start it (make sure to change the email-address). Skip this step if you have your own NGINX instance.
docker run --detach \
    --name nginx_proxy-letsencrypt \
    --volumes-from nginx_proxy \
    --volume /var/run/docker.sock:/var/run/docker.sock:ro \
    --env "DEFAULT_EMAIL=mail@yourdomain.tld" \
    jrcs/letsencrypt-nginx-proxy-companion
Start Jenkins
Run Jenkins by executing the following command (change the hostname and choose which port alternative you need)
docker run -itd --name jenkins \
    --restart always \
    -v jenkins_data:/var/jenkins_home \
    -v /var/run/docker.sock:/var/run/docker.sock \
    -v /usr/bin/docker:/usr/bin/docker:ro \
    -e VIRTUAL_HOST=your.jenkins.domain -e VIRTUAL_PORT=8080 \    # Alternative 1: If you are NOT using a separate NGINX instance
    -e LETSENCRYPT_HOST=your.jenkins.domain \                     # Only needed if Alternative 1 is used
    -p 8082:8080 \                                                # Alternative 2: If you ARE using a separate NGINX instance OR you ARE installing Jenkins on a local development computer
    -u root \
    jenkins/jenkins:lts
If you still need the old setup with python & maven installed locally, use jenkins-artemis instead of jenkins/jenkins:lts. Also note that you can omit the
-u root,-v /var/run/docker.sock:/var/run/docker.sockand-v /usr/bin/docker:/usr/bin/docker:roparameters, if you do not want to run Docker builds on the Jenkins master (but e.g. use remote agents).- Open Jenkins in your browser (e.g.
localhost:8082) and setup the admin user account (install all suggested plugins). You can get the initial admin password using the following command.
# Jenkins highlights the password in the logs, you can't miss it
docker logs -f jenkins
or alternatively
docker exec jenkins cat /var/jenkins_home/secrets/initialAdminPassword
- Open Jenkins in your browser (e.g.
- Set the chosen credentials in the Artemis configuration
application-artemis.yml
artemis:
    continuous-integration:
        user: your.chosen.username
        password: your.chosen.password
Required Jenkins Plugins
You will need to install the following plugins (apart from the recommended ones that got installed during the setup process):
GitLab for enabling webhooks to and from GitLab
Timestamper for adding the time to every line of the build output (Timestamper might already be installed)
Pipeline for defining the build description using declarative files (Pipeline might already be installed)
Note: This is a suite of plugins that will install multiple plugins
Pipeline Maven to use maven within the pipelines.
The plugins above (and the pipeline-setup associated with it) got introduced in Artemis 4.7.3. If you are using exercises that were created before 4.7.3, you also have to install these plugins:
Please note that this setup is deprecated and will be removed in the future. Please migrate to the new pipeline-setup if possible.
Multiple SCMs for combining the exercise test and assignment repositories in one build
Post Build Task for preparing build results to be exported to Artemis
Xvfb for exercises based on GUI libraries, for which tests have to have some virtual display
Choose “Download now and install after restart” and checking the “Restart Jenkins when installation is complete and no jobs are running” box
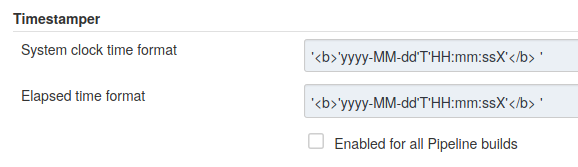
Timestamper Configuration
Go to Manage Jenkins → Configure System. There you will find the Timestamper configuration, use the following value for both formats:
'<b>'yyyy-MM-dd'T'HH:mm:ssX'</b> '
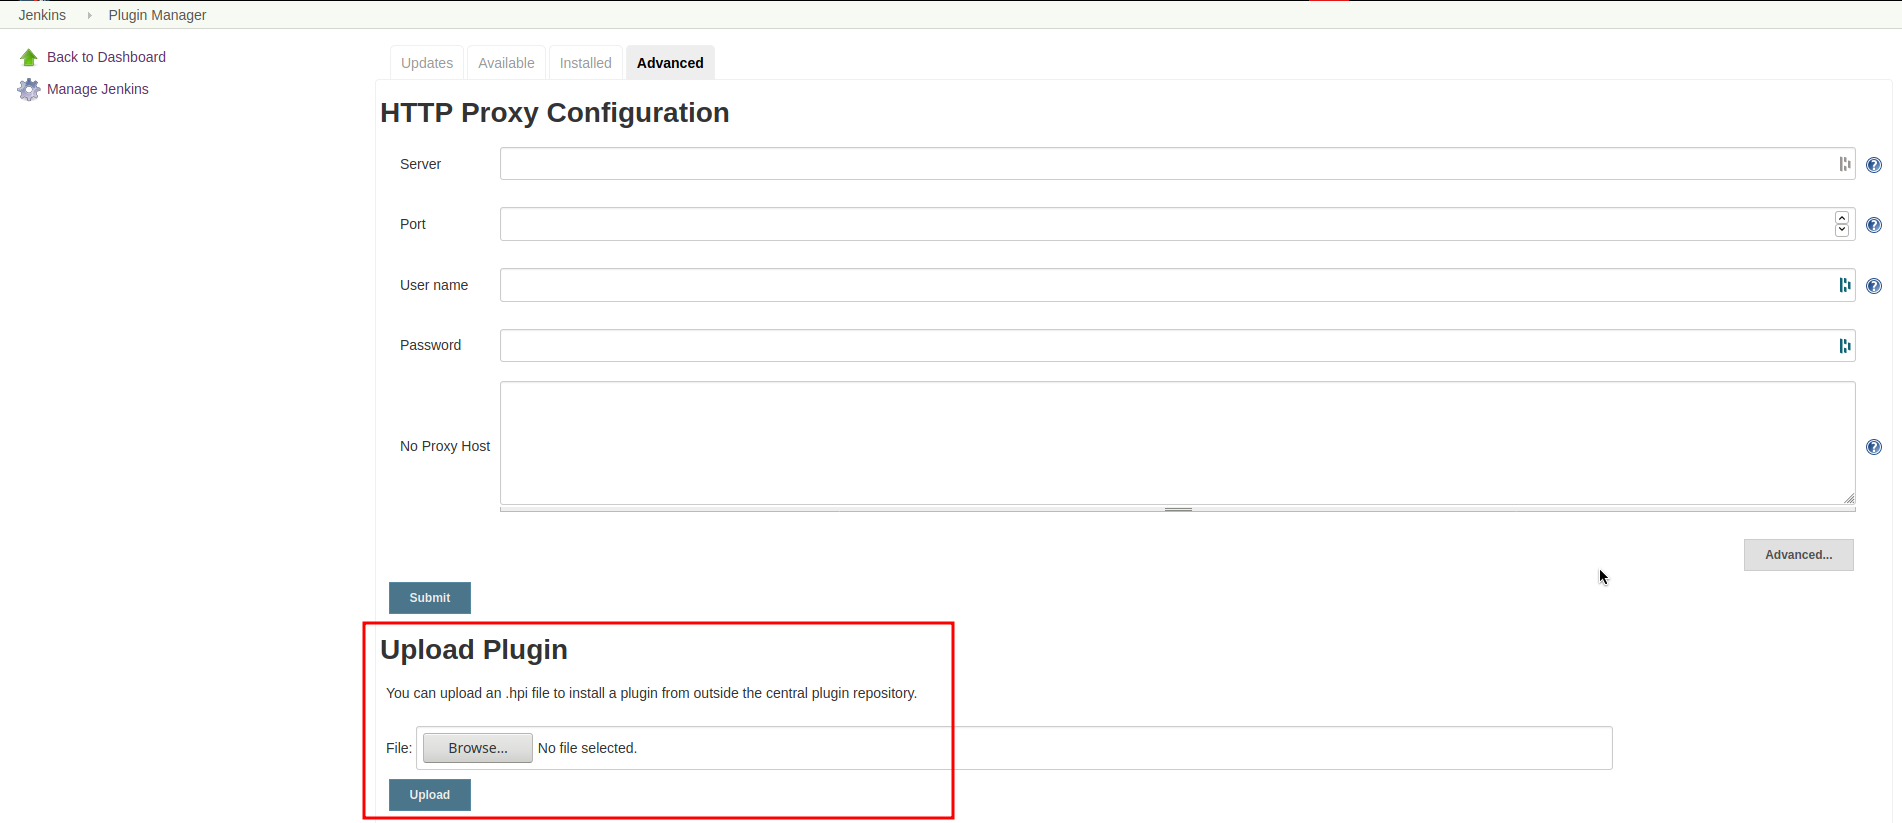
Server Notification Plugin
Artemis needs to receive a notification after every build, which contains the test results and additional commit information. For that purpose, we developed a Jenkins plugin, that can aggregate and POST JUnit formatted results to any URL.
You can download the current release of the plugin here (Download the .hpi file). Go to the Jenkins plugin page (Manage Jenkins → Manage Plugins) and install the downloaded file under the Advanced tab under Upload Plugin
Jenkins Credentials
Go to Manage Jenkins -> Security -> Manage Credentials → Jenkins → Global credentials and create the following credentials
GitLab API Token
Create a new access token in GitLab named
Jenkinsand give it api rights and read_repository rights. For detailed instructions on how to create such a token follow Gitlab Access Token.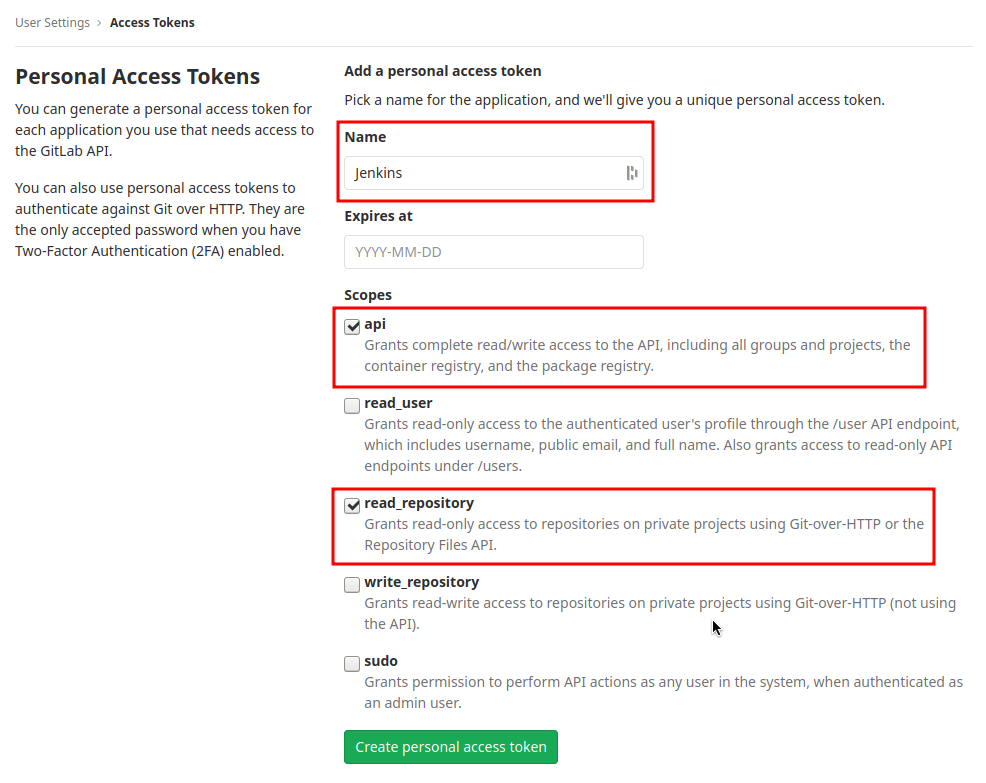
Copy the generated token and create new Jenkins credentials:
Kind: GitLab API token
Scope: Global
API token: your.copied.token
Leave the ID field blank
The description is up to you
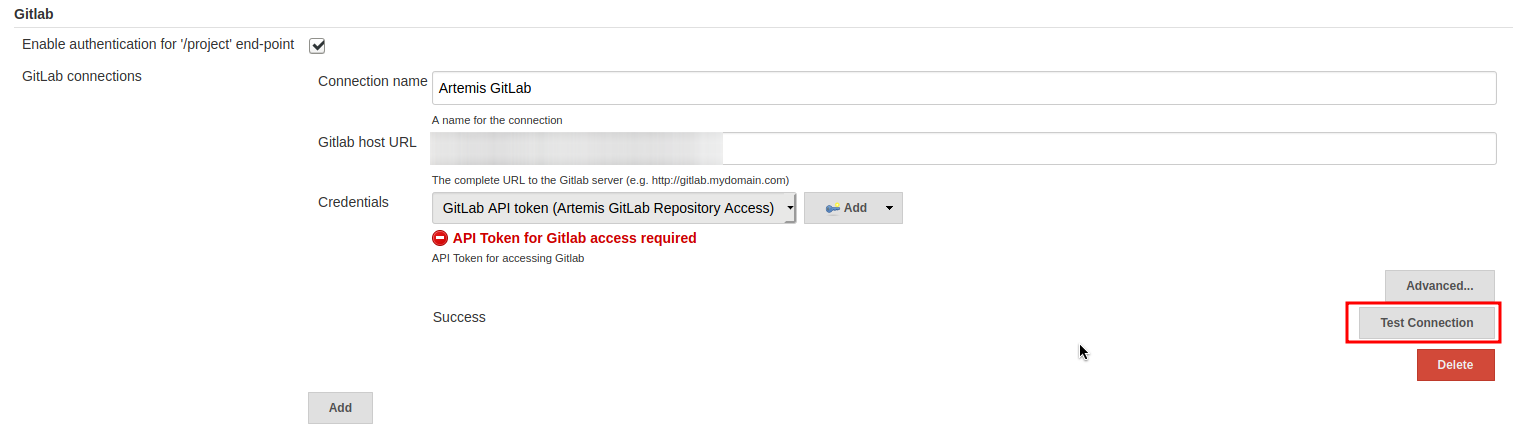
Go to the Jenkins settings Manage Jenkins → Configure System. There you will find the GitLab settings. Fill in the URL of your GitLab instance and select the just created API token in the credentials dropdown. After you click on “Test Connection”, everything should work fine. If you have problems finding the right URL for your local docker setup, you can try http://host.docker.internal:8081 for Windows or http://docker.for.mac.host.internal:8081 for Mac if GitLab is reachable over port 8081.
Server Notification Token
Create a new Jenkins credential containing the token, which gets send by the server notification plugin to Artemis with every build result:
Kind: Secret text
Scope: Global
Secret: your.secret_token_value (choose any value you want, copy it for the nex step)
Leave the ID field blank
The description is up to you
Copy the generated ID of the new credentials and put it into the Artemis configuration application-artemis.yml
artemis:
    continuous-integration:
        artemis-authentication-token-key: the.id.of.the.notification.token.credential
Copy the actual value you chose for the token and put it into the Artemis configuration application-artemis.yml
artemis:
    continuous-integration:
        artemis-authentication-token-value: the.actual.value.of.the.notification.token
GitLab Repository Access
Create a new Jenkins credentials containing the username and password of the GitLab administrator account:
Kind: Username with password
Scope: Global
Username: the_username_you_chose_for_the_gitlab_admin_user
Password: the_password_you_chose_for_the_gitlab_admin_user
Leave the ID field blank
The description is up to you
Copy the generated ID (e.g.
ea0e3c08-4110-4g2f-9c83-fb2cdf6345fa) of the new credentials and put it into the Artemis configuration file application-artemis.ymlartemis: continuous-integration: vcs-credentials: the.id.of.the.username.and.password.credentials.from.jenkins
GitLab to Jenkins push notification token
GitLab has to notify Jenkins build plans if there are any new commits to the repository. The push notification that gets sent here is secured by a token generated by Jenkins. In order to get this token, you have to do the following steps:
Create a new item in Jenkins (use the Freestyle project type) and name it TestProject
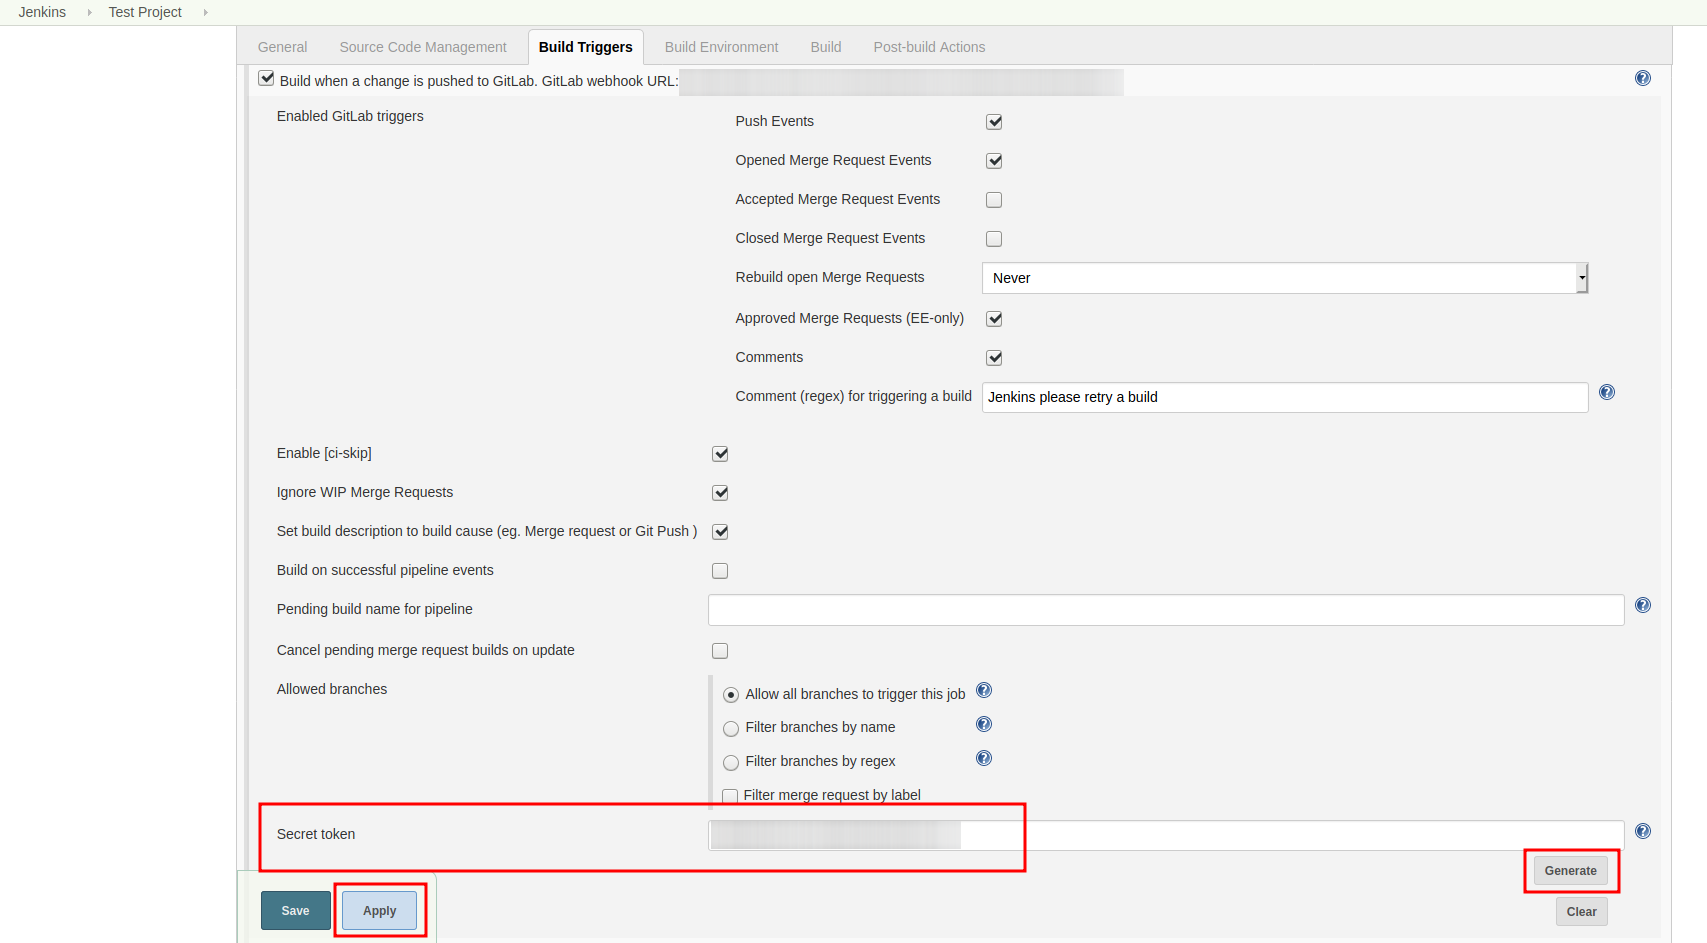
In the project configuration, go to Build Triggers → Build when a change is pushed to GitLab and activate this option
Click on Advanced.
You will now have a couple of new options here, one of them being a “Secret token”.
Click on the “Generate” button right below the text box for that token.
Copy the generated value, let’s call it $gitlab-push-token
Apply these change to the plan (i.e. click on Apply)
Perform a GET request to the following URL (e.g. with Postman) using Basic Authentication and the username and password you chose for the Jenkins admin account:
GET https://your.jenkins.domain/job/TestProject/config.xml
You will get the whole configuration XML of the just created build plan, there you will find the following tag:
<secretToken>{$some-long-encrypted-value}</secretToken>

Job configuration XML
Copy the
secret-push-token valuein the line<secretToken>{secret-push-token}</secretToken>. This is the encrypted value of thegitlab-push-tokenyou generated in step 5.Now, you can delete this test project and input the following values into your Artemis configuration application-artemis.yml (replace the placeholders with the actual values you wrote down)
artemis:
    version-control:
        ci-token: $gitlab-push-token
    continuous-integration:
        secret-push-token: $some-long-encrytped-value
In a local setup, you have to disable CSRF otherwise some API endpoints will return HTTP Status 403 Forbidden. This is done by creating a groovy script inside the
jenkinsdocker container atjenkins_home/init.groovywith the following contents:import jenkins.model.Jenkins def instance = Jenkins.instance instance.setCrumbIssuer(null)
In order to save the script, first create a file called
jenkins-disable-csrf.groovywith the groovy code from above.Then create a init.groovy file in your Jenkins container:
docker exec jenkins /bin/bash -c "cd /var/jenkins_home; touch init.groovy"
Now we need to pipe the script into the container:
docker exec -i jenkins dd of=/var/jenkins_home/init.groovy < jenkins-disable-csrf.groovy
To make sure that the commands worked as intended, the following command should output the script from above:
docker exec jenkins cat /var/jenkins_home/init.groovy
The last step is to disable the
use-crumboption inapplication-jenkins.yml:jenkins:: use-crumb: false
Build agents
You can either run the builds locally (that means on the machine that hosts Jenkins) or on remote build agents.
Configuring local build agents
Go to Manage Jenkins > Manage Nodes and Clouds > master Configure your master node like this (adjust the number of executors, if needed). Make sure to add the docker label.
Jenkins local node
Installing remote build agents
You might want to run the builds on additional Jenkins agents, especially if a large amount of students should use the system at the same time. Jenkins supports remote build agents: The actual compilation of the students submissions happens on these other machines but the whole process is transparent to Artemis.
This guide explains setting up a remote agent on an Ubuntu virtual machine that supports docker builds.
Prerequisites: 1. Install Docker on the remote machine: https://docs.docker.com/engine/install/ubuntu/
Add a new user to the remote machine that Jenkins will use:
sudo adduser --disabled-password --gecos "" jenkinsAdd the jenkins user to the docker group (This allows the jenkins user to interact with docker):
sudo usermod -a -G docker jenkinsGenerate a new SSH key locally (e.g. using
ssh-keygen) and add the public key to the.ssh/authorized_keysfile of the jenkins user on the agent VM.Validate that you can connect to the build agent machine using SSH and the generated private key and validate that you can use docker (docker ps should not show an error)
Log in with your normal account on the build agent machine and install Java:
sudo apt install default-jreAdd a new secret in Jenkins, enter private key you just generated and add the passphrase, if set:
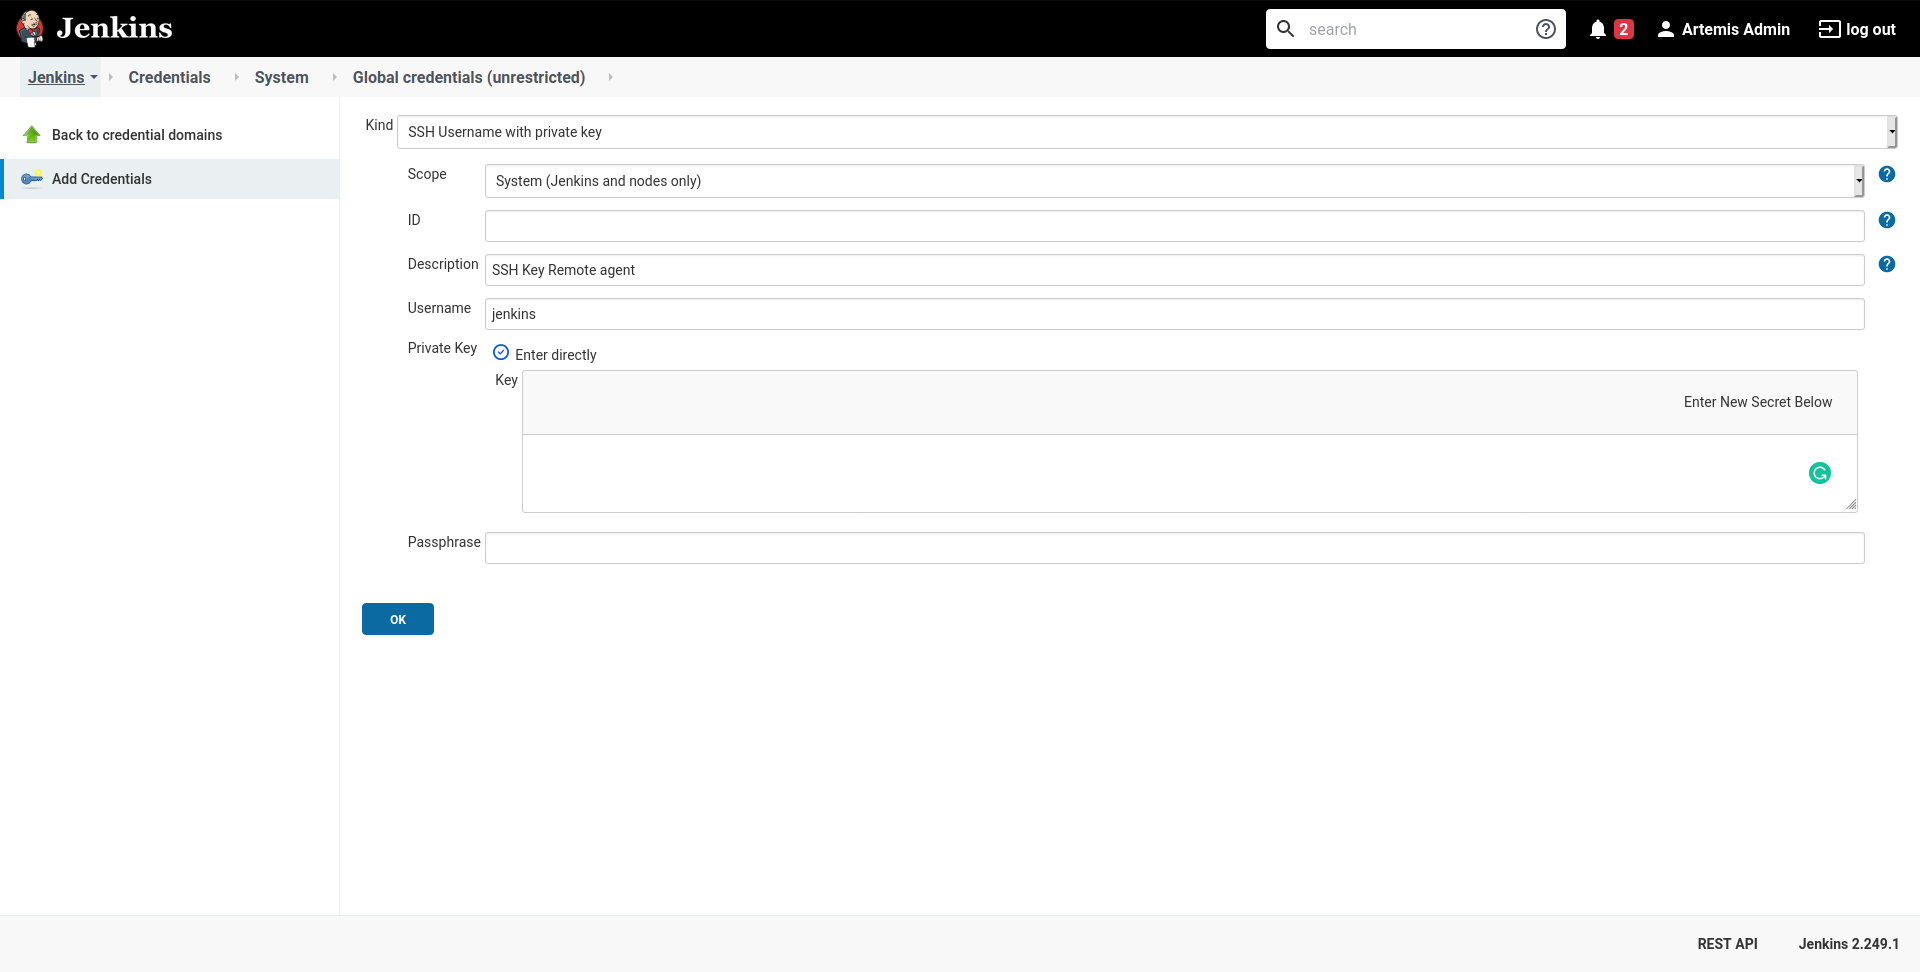
Jenkins SSH Credentials
- Add a new node (select a name and select Permanent Agent):
Set the number of executors so that it matches your machine’s specs: This is the number of concurrent builds this agent can handle. It is recommended to match the number of cores of the machine, but you might want to adjust this later if needed.
Set the remote root directory to
/home/jenkins/remote_agent.Set the usage to Only build jobs with label expressions matching this node. This ensures that only docker-jobs will be built on this agent, and not other jobs.
Add a label
dockerto the agent.Set the launch method to Launch via SSH and add the host of the machine. Select the credentials you just created and select Manually trusted key Verification Strategy as Host key verification Strategy. Save it.
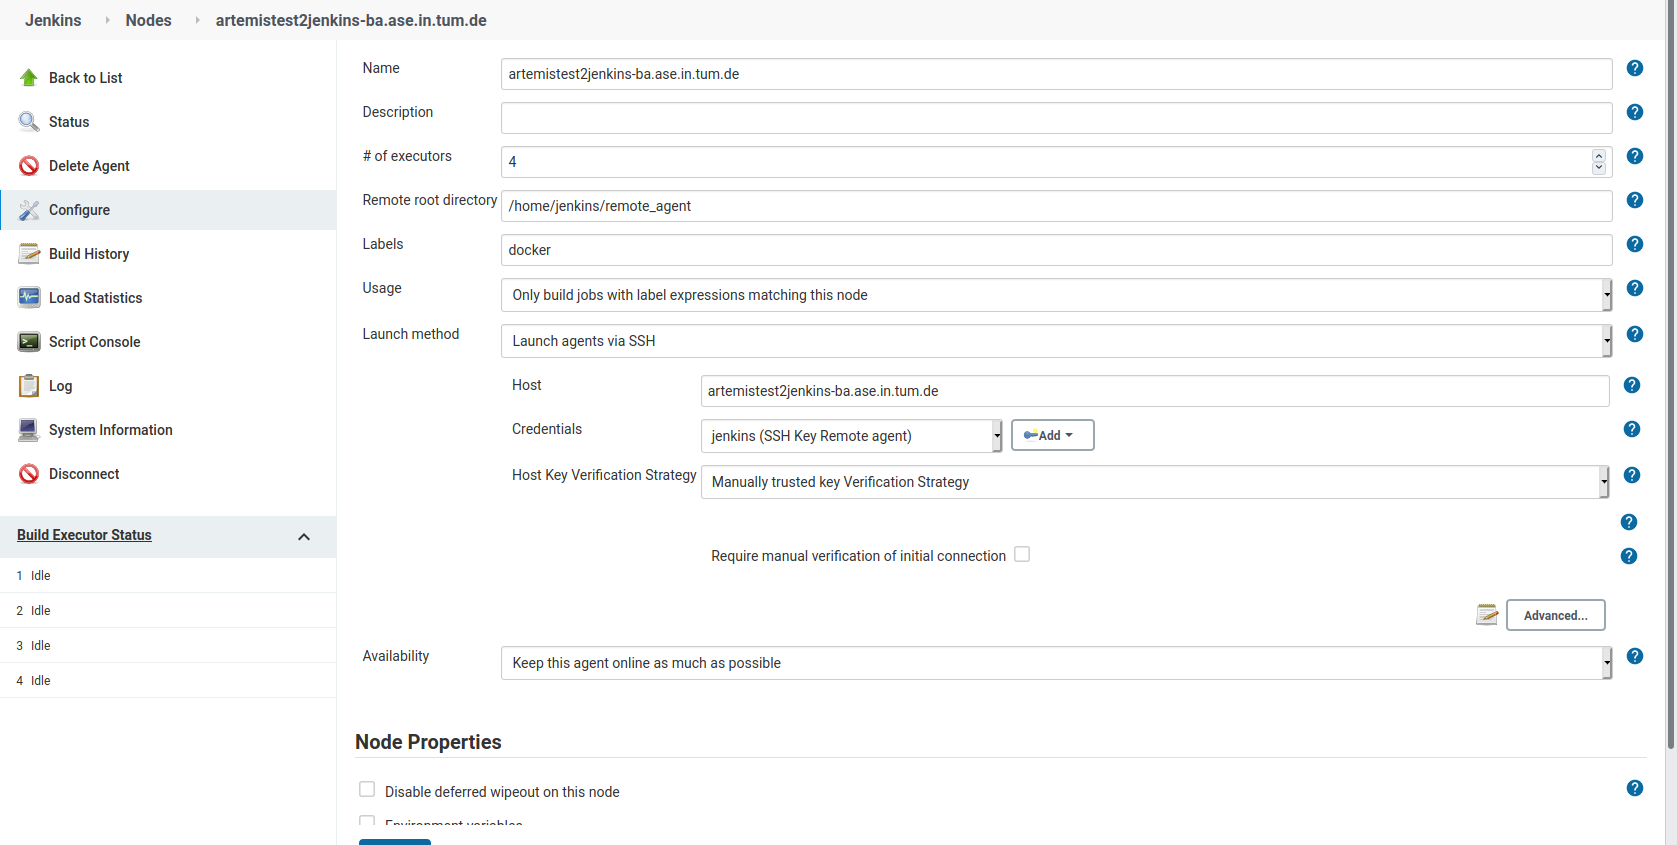
Add a Jenkins node
- Wait for some moments while jenkins installs it’s remote agent on the agent’s machine.
You can track the progress using the Log page when selecting the agent. System information should also be available.
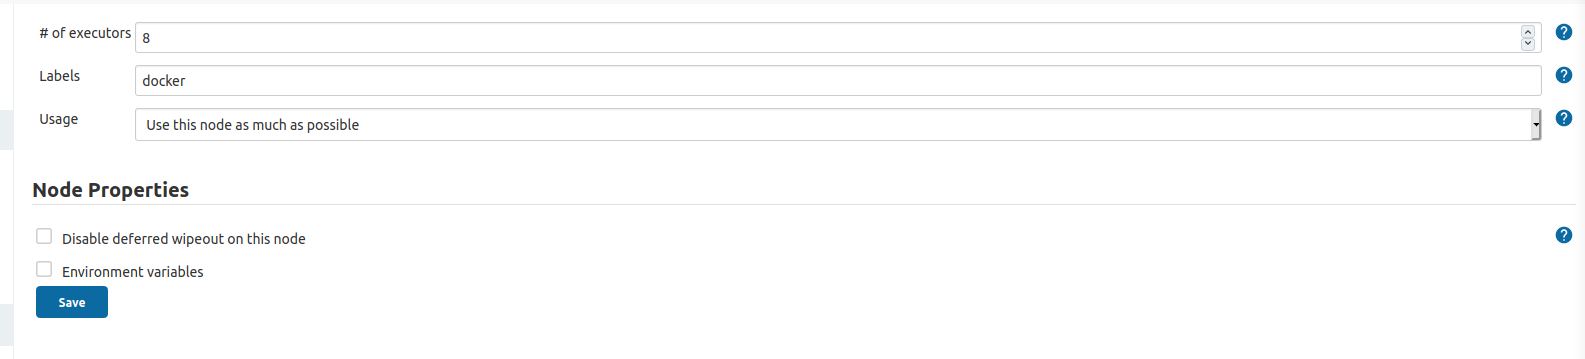
Change the settings of the master node to be used only for specific jobs. This ensures that the docker tasks are not executed on the master agent but on the remote agent.
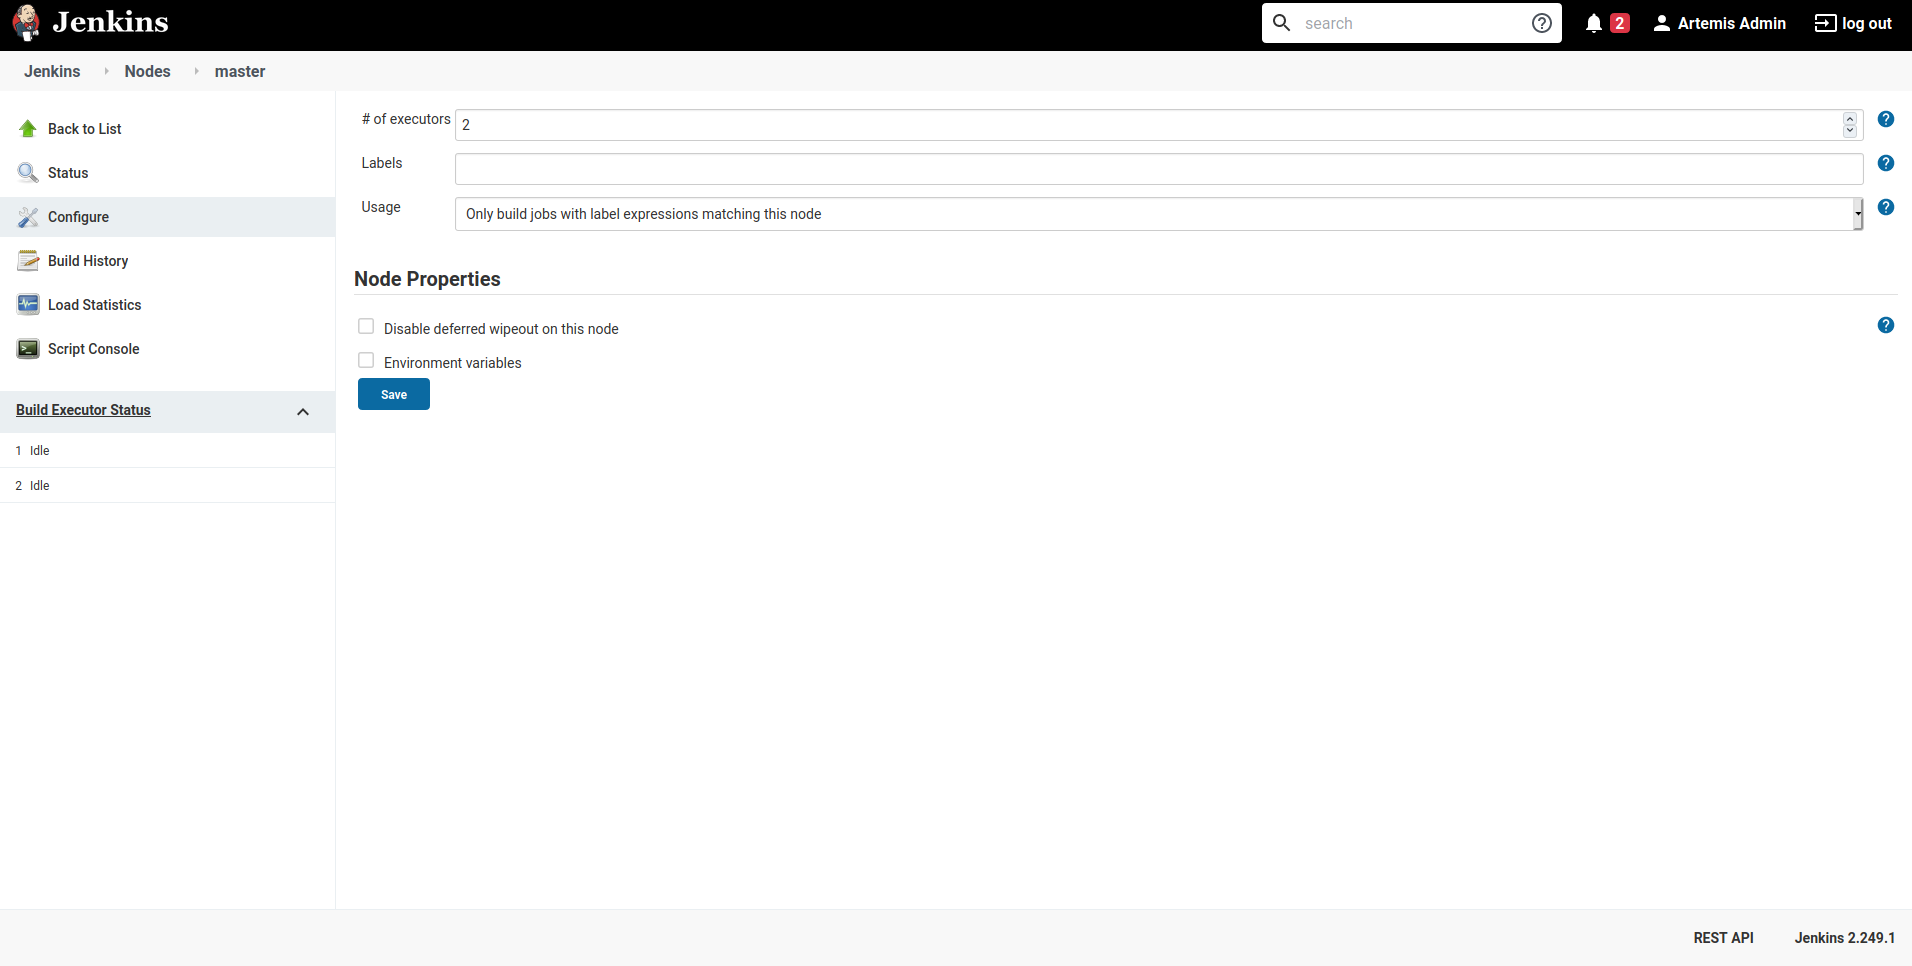
Adjust Jenkins master node settings
You are finished, the new agent should now also process builds.
Caching
You can configure caching for e.g. Maven repositories. See Adjustments for programming exercises for more details.
Upgrade Jenkins
Build the latest version of the jenkins-artemis Docker image, stop
the running container and mount the Jenkins data volume to the new LTS
container. Make sure to perform this command in the folder where the
Dockerfile was created (e.g. /opt/jenkins/):
docker stop jenkins
docker rename jenkins jenkins_old
docker build --no-cache -t jenkins-artemis .
Now start a new Jenkins container just as described in Start-Jenkins.
Jenkins should be up and running again. If there are no issues, you can
delete the old container using docker rm jenkins_old and the old
image (see docker images) using docker rmi <old-image-id>.
You can also remove all old images using docker image prune -a
You should also update the Jenkins plugins regularly due to security reasons. You can update them directly in the Web User Interface in the Plugin Manager.
Separate NGINX Configurations
There are some placeholders in the following configurations. Replace them with your setup specific values ### GitLab
server {
    listen 443 ssl http2;
    server_name your.gitlab.domain;
    ssl_session_cache shared:GitLabSSL:10m;
    include /etc/nginx/common/common_ssl.conf;
    add_header Strict-Transport-Security "max-age=63072000; includeSubDomains; preload";
    add_header X-Frame-Options DENY;
    add_header Referrer-Policy same-origin;
    client_max_body_size 10m;
    client_body_buffer_size 1m;

    location / {
        proxy_pass              http://localhost:<your exposed GitLab HTTP port (default 80)>;
        proxy_read_timeout      300;
        proxy_connect_timeout   300;
        proxy_http_version      1.1;
        proxy_redirect          http://         https://;

        proxy_set_header    Host                $http_host;
        proxy_set_header    X-Real-IP           $remote_addr;
        proxy_set_header    X-Forwarded-For     $proxy_add_x_forwarded_for;
        proxy_set_header    X-Forwarded-Proto   $scheme;

        gzip off;
    }
}
Jenkins
server {
    listen 443 ssl http2;
    server_name your.jenkins.domain;
    ssl_session_cache shared:JenkinsSSL:10m;
    include /etc/nginx/common/common_ssl.conf;
    add_header Strict-Transport-Security "max-age=63072000; includeSubDomains; preload";
    add_header X-Frame-Options DENY;
    add_header Referrer-Policy same-origin;
    client_max_body_size 10m;
    client_body_buffer_size 1m;

    location / {
        proxy_pass              http://localhost:<your exposed Jenkins HTTP port (default 8081)>;
        proxy_set_header        Host                $host:$server_port;
        proxy_set_header        X-Real-IP           $remote_addr;
        proxy_set_header        X-Forwarded-For     $proxy_add_x_forwarded_for;
        proxy_set_header        X-Forwarded-Proto   $scheme;
        proxy_redirect          http://             https://;

        # Required for new HTTP-based CLI
        proxy_http_version 1.1;
        proxy_request_buffering off;
        proxy_buffering off; # Required for HTTP-based CLI to work over SSL

        # workaround for https://issues.jenkins-ci.org/browse/JENKINS-45651
        add_header 'X-SSH-Endpoint' 'your.jenkins.domain.com:50022' always;
    }

    error_page 502 /502.html;
    location /502.html {
        root /usr/share/nginx/html;
        internal;
    }
}
/etc/nginx/common/common_ssl.conf
If you haven’t done so, generate the DH param file:
sudo openssl dhparam -out /etc/nginx/dhparam.pem 4096
ssl_certificate     <path to your fullchain certificate>;
ssl_certificate_key <path to the private key of your certificate>;
ssl_protocols       TLSv1.2 TLSv1.3;
ssl_dhparam /etc/nginx/dhparam.pem;
ssl_prefer_server_ciphers   on;
ssl_ciphers ECDH+CHACHA20:EECDH+AESGCM:EDH+AESGCM:!AES128;
ssl_ecdh_curve secp384r1;
ssl_session_timeout  10m;
ssl_session_cache shared:SSL:10m;
ssl_session_tickets off;
ssl_stapling on;
ssl_stapling_verify on;
resolver <if you have any, specify them here> valid=300s;
resolver_timeout 5s;
#Deployment Artemis / GitLab / Jenkins using Docker on Local machine
Execute the following steps in addition to the ones described above:
Preparation
Create a Docker network named “artemis” with
docker network create artemis
Gitlab
Add the Gitlab container to the created network with
docker network connect artemis gitlabGet the URL of the Gitlab container with the first IP returned by
docker inspect -f '{{range .NetworkSettings.Networks}}{{.IPAddress}}{{end}}' gitlabUse this IP in the
application-artemis.ymlfile atartemis.version-control.url
Jenkins
Add the Jenkins container to the created network with
docker network connect artemis jenkinsGet the URL of the Gitlab container with the first IP returned by
docker inspect -f '{{range .NetworkSettings.Networks}}{{.IPAddress}}{{end}}' jenkinsUse this IP in the
application-artemis.ymlfile atartemis.continuous-integration.url
Artemis
In
docker-compose.ymlMake sure to use unique ports, e.g. 8080 for Artemis, 8081 for Gitlab and 8082 for Jenkins
Change the SPRING_PROFILES_ACTIVE to dev,jenkins,gitlab,artemis
In
src/main/resources/config/application-dev.ymlAt
spring.profiles.active:add& gitlab & jenkinsAt
spring.liquibase:add the new propertychange-log: classpath:config/liquibase/master.xmlAt
server:use port 8080 for Artemis
Run
docker-compose upAfter the container has been deployed run
docker inspect -f '{{range .NetworkSettings.Networks}}{{.IPAddress}}{{end}}' artemis_artemis-serverand copy the first resulting IP.In
src/main/resources/config/application-dev.ymlatserver:aturl:paste the copied IPStop the Artemis docker container with Control-C and re-run
docker-compose up