Instructors’ Guide
Content of this document
Timeline of an Artemis Online Exam

1. Creation and Configuration
During the exam creation and configuration, you can create your exam and configure it to fit your needs. Add exercises with different variants, register students, generate student exams and conduct test runs. For more information see 1.2 Create and Configure Exam.
1.1 Accessing the Exam Management Page
Log in to Artemis with your account credentials.
Click on
 .
.Click on
 for your course. It will open the Exam Management Screen.
Here you have access to all the exams of your course. All aspects of the exam are managed from the management screen.
You can create an exam by clicking on
 .
.
1.2 Create and Configure Exam
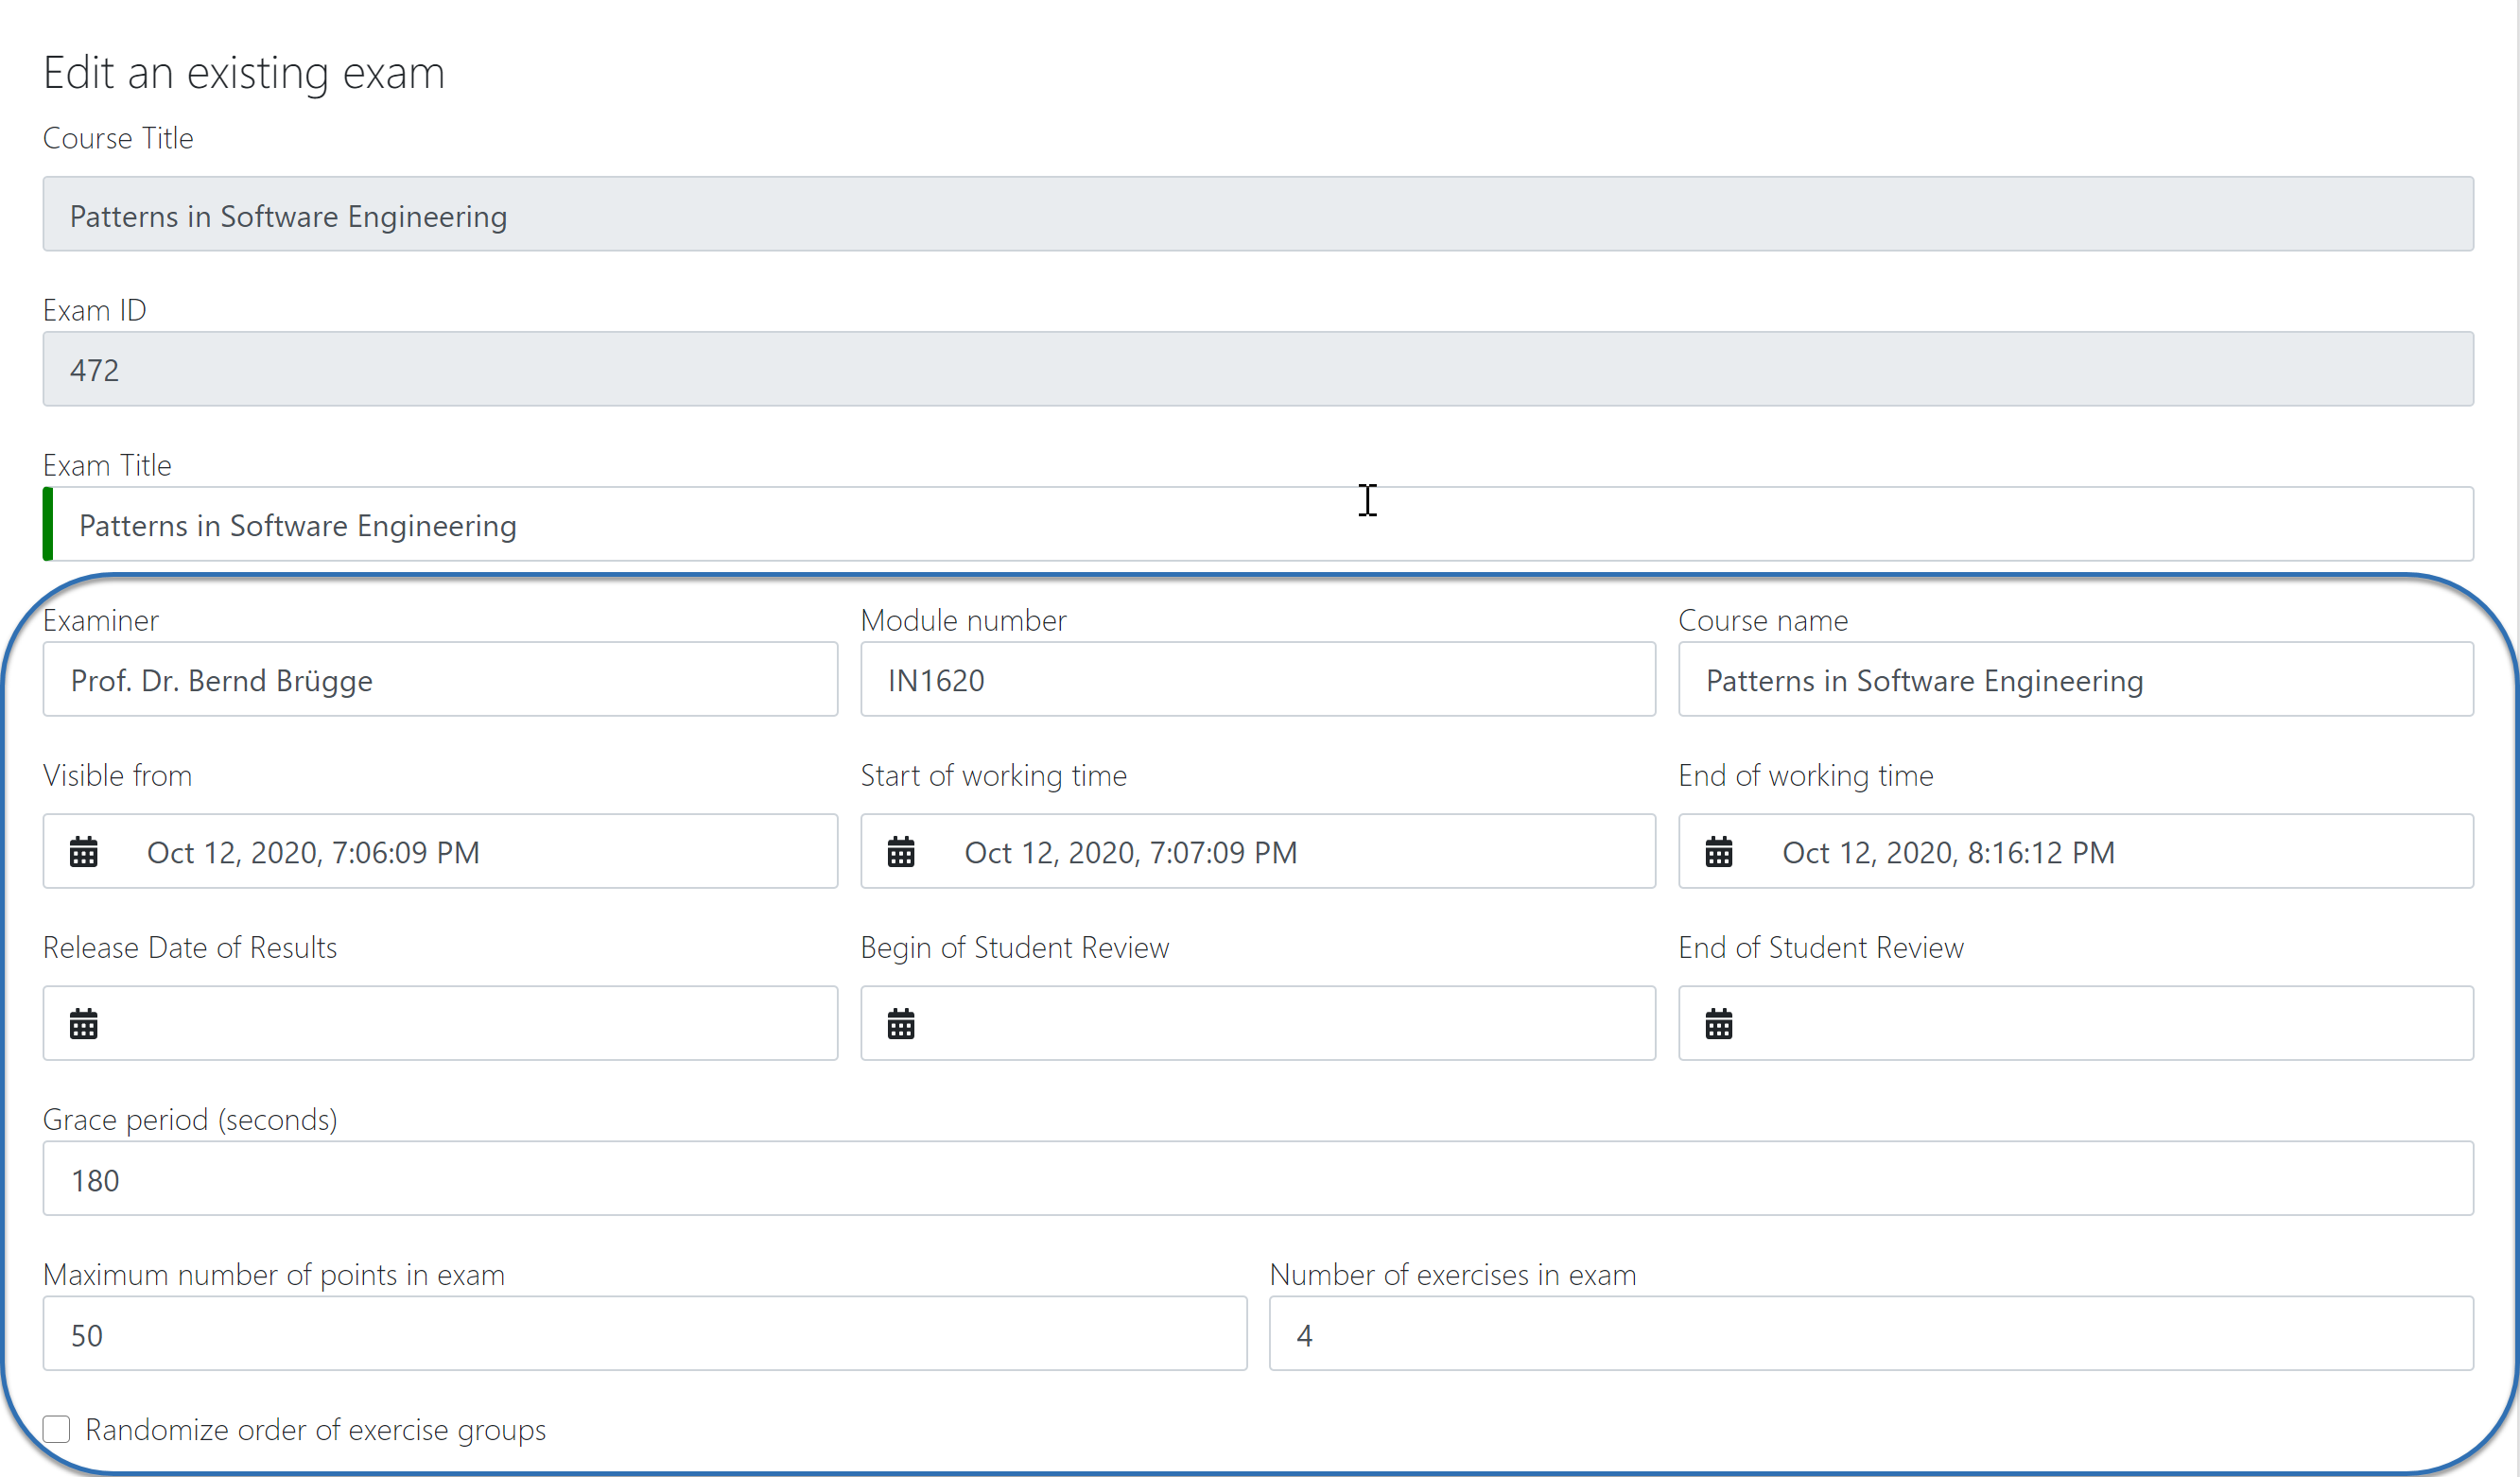
When you click on
you are presented with the Create Exam view. Here you can set the basic information such as title,examineretc. The timeline of the exam is defined by the dates:visible from,start of working time,end of working time,release date of results,begin of student review,end of student review.The first three dates are mandatory when you create an exam. The rest can be set when required.
The
grace perioddefines the amount of time the students have at their disposal to hand in their exam after theworking timeis over. This is set to 3 minutes by default.You can also define the
number of exercisesin the exam. You can leave this out initally, however it must be set before you can generate the student exams. For more information, see 1.3 Exercise Groups.Artemis will randomize the order of the exercises for each student if you activate
randomize order of exercise groups.Finally, you can fill out the exam
start textandend text. Artemis will present these texts to the students during the exam conduction, at the Start- and End page respectively.
1.3 Exercise Groups
Artemis exam mode allows you to define multiple exercise variants so that each student can receive a unique exam. Artemis achieves this through exercise groups. Exercise groups represent an individual exercise slot for each student exam. Within one exercise group you can define different exercises.
Artemis selects one exercise per exercise group randomly, to generate the individual student exams.
You can distinguish between mandatory exercise groups and non-mandatory exercise groups.
Artemis always includes mandatory exercise groups in the individual exam of a student.
non-mandatory exercise groups can be left out, if there are more exercise groups than the
number of exercisesdefined in the exam configuration.By default, every exercise group is mandatory. You can set the
mandetoryflag when you add an exercise group initially, or later by clicking on the exercise group.

Exercise Groups with different Exercise Variants
1.4 Add Exercises
Exercise groups can contain multiple exercises. For every student exam, Artemis will randomly select one exercise per exercise group.
Note
If you want all student to have the same exam, define only one exercise per exercise group.
To add exercises navigate to the Exercise Groups of the exam. On the header of each exercise group you will find the available exercise types. You can choose between
creating a new exerciseorimporting an existing onefrom your courses.

Add different Exercises
For exercise types
text,programming, andmodelingyou can also define example submissions and example assessments to guide your assessor team.Assessors will review the example submissions and assessments in order to familiarise themselves with the exercise and assessment instructions, before they can assess the real submissions.
1.4.1 Programming Exercises
Programming exercises have multiple special options to adjust their behaviour:
You can check the option to
allow manual assessment.Note
If you do not set this flag, your assessors will not be able to manually assess the student’s submissions during the assessment process.
You can activate
Run Tests once after Due Date. This will compile and run the test suite on all the student submissions once after the set date.After you add a programming exercise you can configure the grading via
.
In the Configure Grading screen, you can tweak the
weightof the tests, thebonus multiplierand add,bonus points.You can hide tests so that they are not executed during the exam conduction. Students can not receive feedback from hidden tests during the exam conduction.
Note
If you hide all tests, the students will only be able to see if their submission compiles during the conduction. Set the due date after the exam end date to achieve this effect.
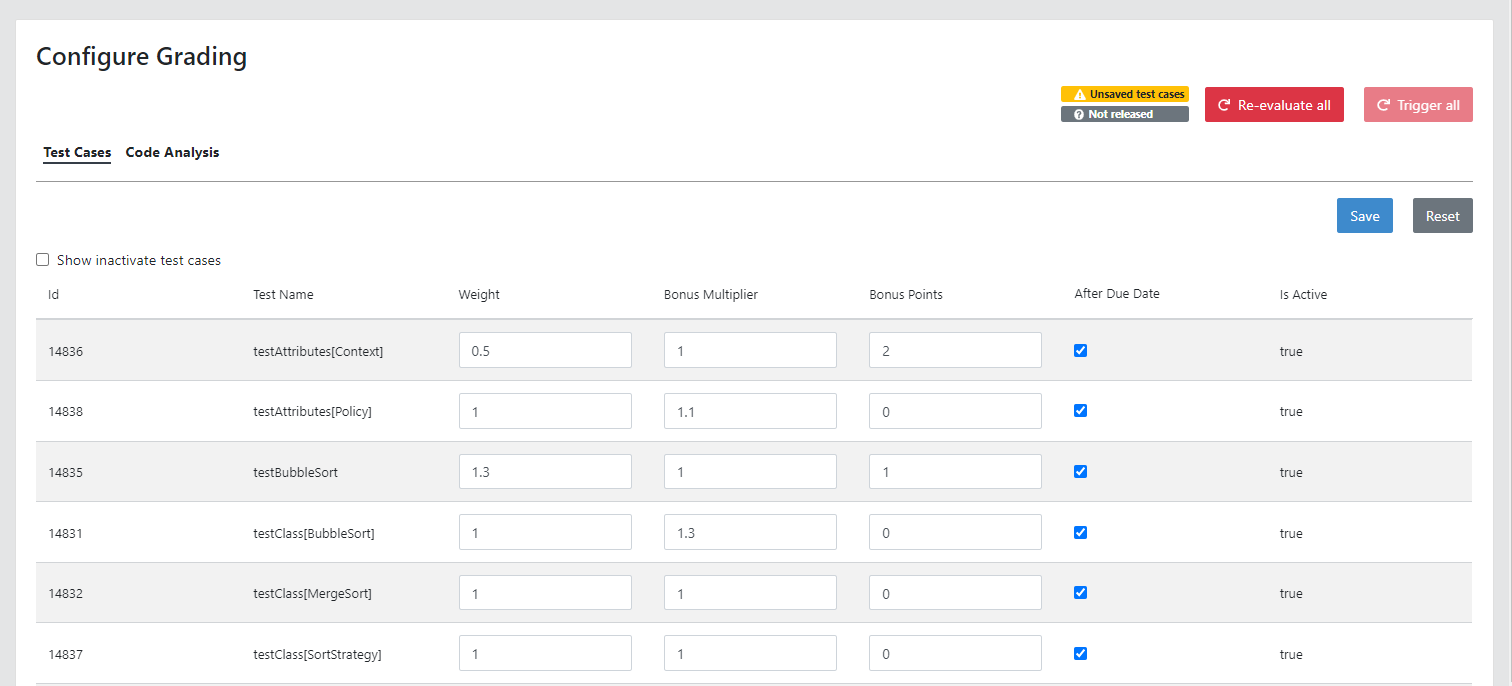
Configure the Grading of a Programming Exercise
1.5 Register Students
To register students to the exam, navigate from the exam management to the Students page. Artemis offers two options to register students. You can:
Add students manually my searching via the search bar.
Bulk import students using a
CSVfile. You can do this by pressing theImport studentsbutton.
Note
Just registering the students to the exam will not allow them to participate in the exam. First, individual student exams must be generated.
You can also remove students from the exam. When you do so, you have the option to also delete their participations and submissions linked to the user’s student exam.
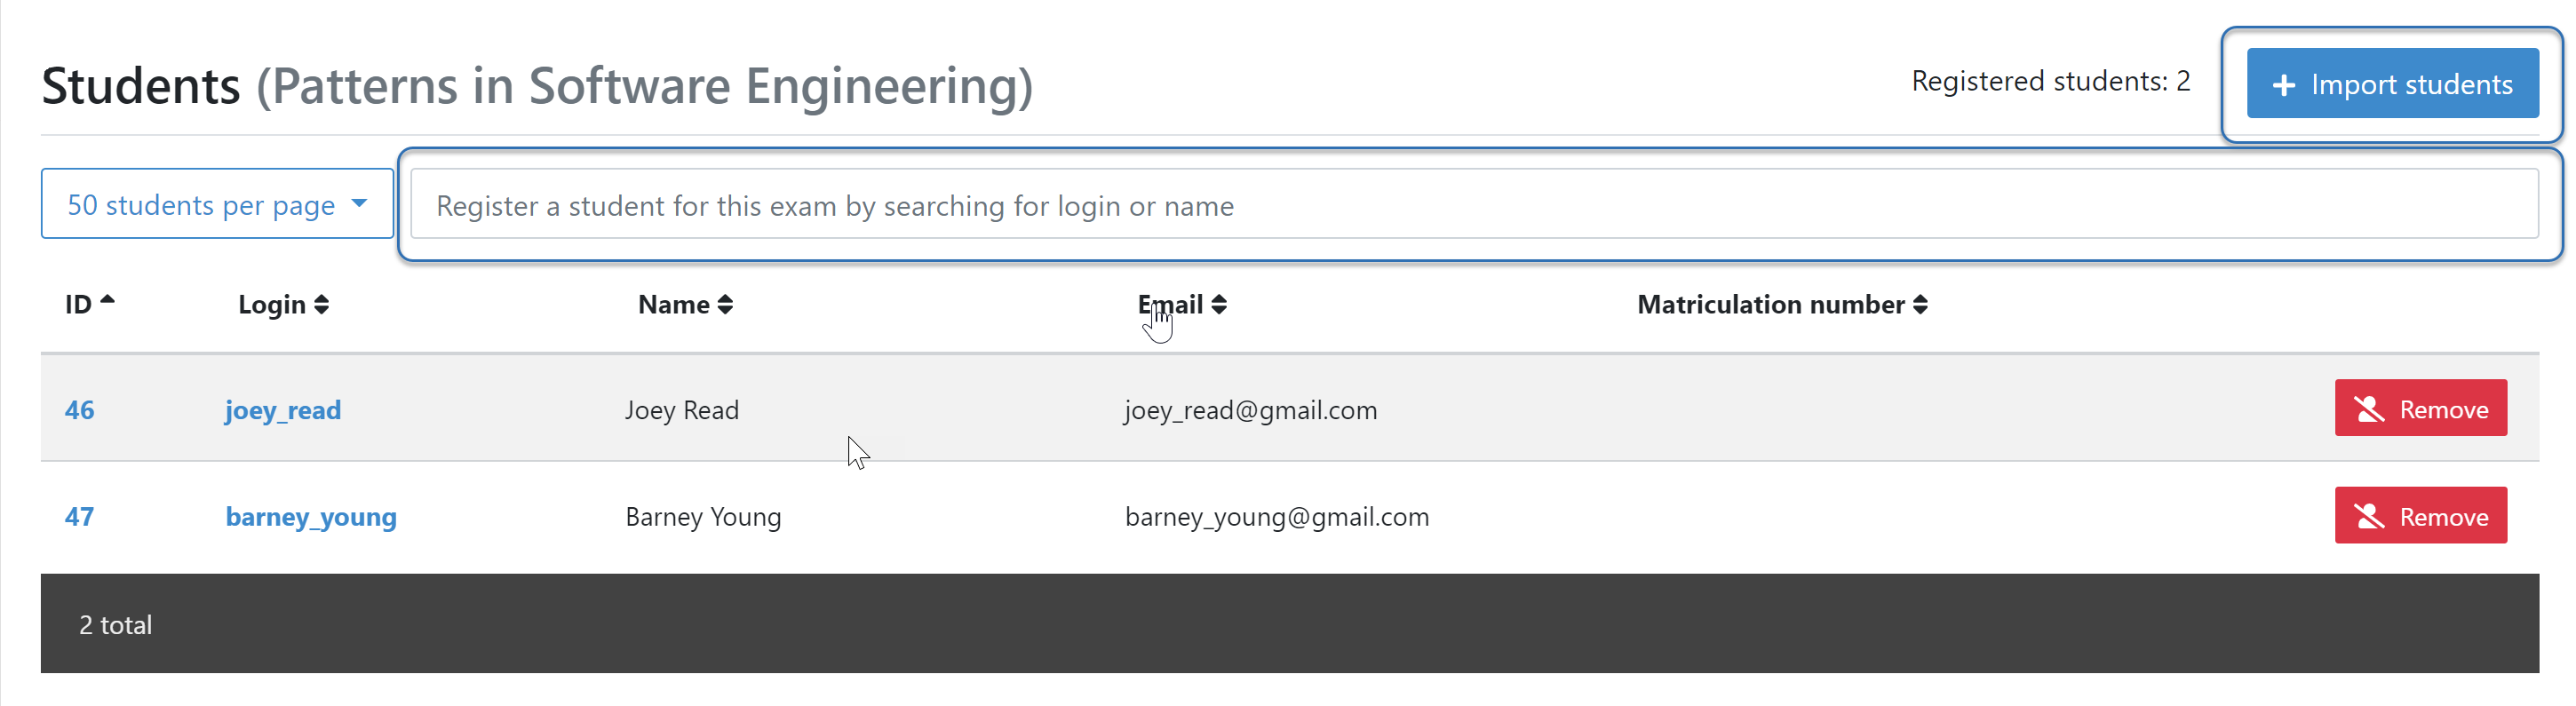
Register Students Page
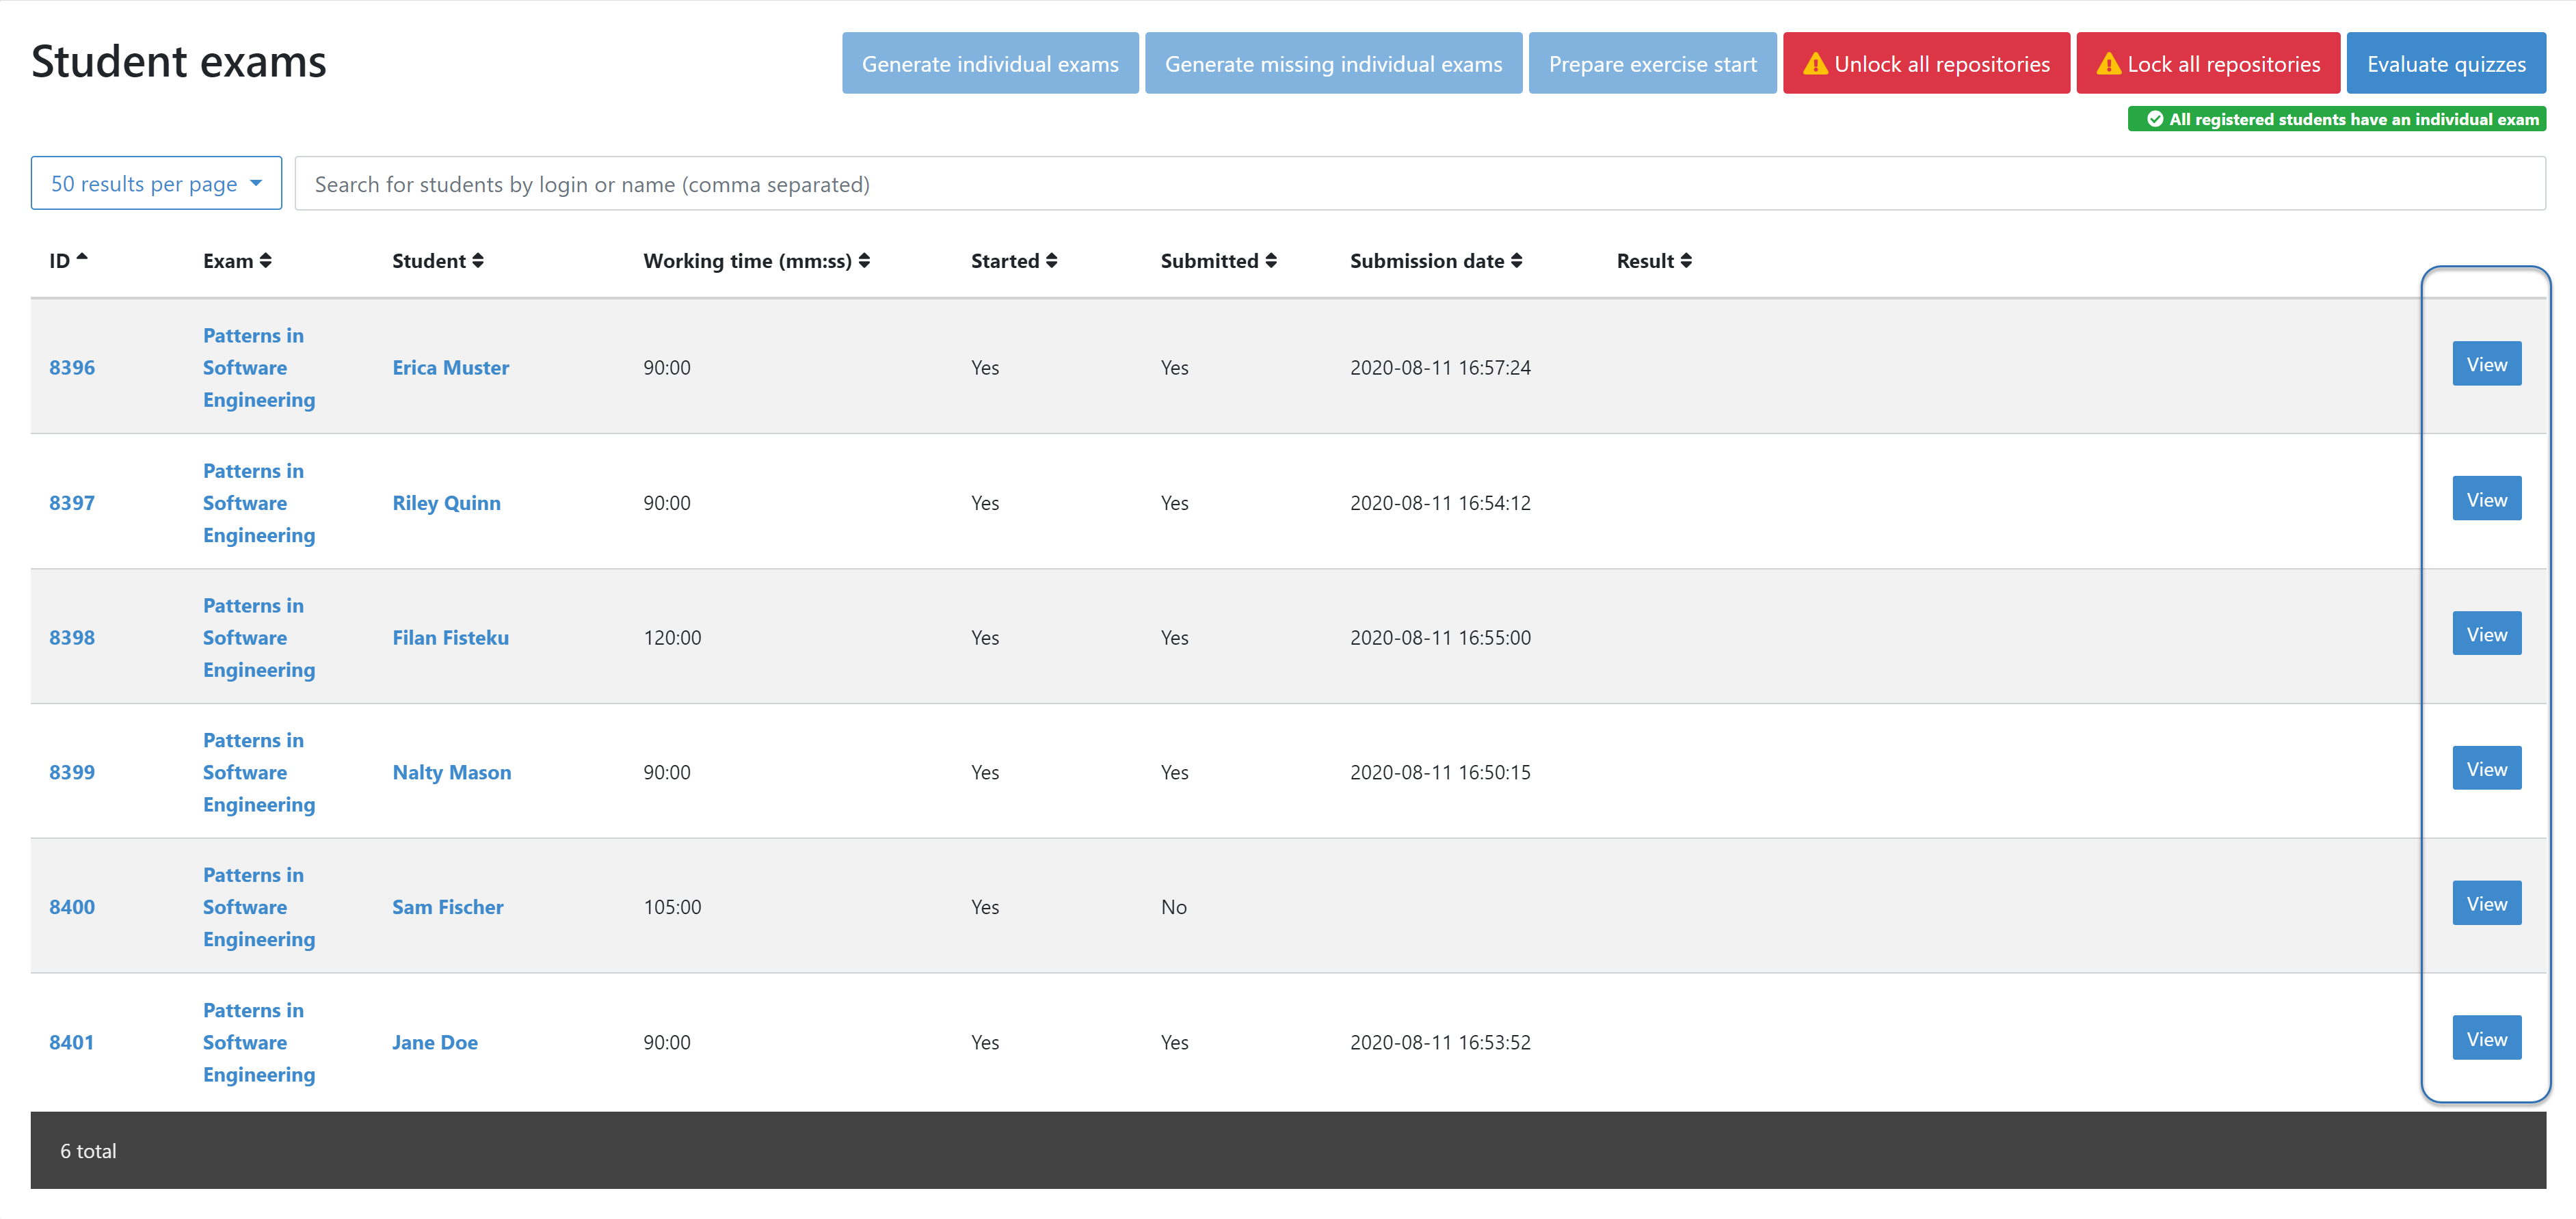
1.6 Manage Student Exams
Student exams represent the exam of a student. It consists of an individual set of exercises based on the configured exercise groups.
Student exams are managed via the Student Exams page.
Here you can have an overview of all student exams. When you press
Viewon a student exam, you can view thedetails of the student, the allocatedworking time, his/herparticipation status, theirsummary, as well as theirscores. Additionally, you will also be able to view which assessor is responsible for each exercise.Note
You can change the individual working time of students from here.
To generate student exams you must click on
 . This will trigger Artemis to create a student exam for every registered user.
Artemis determines the number of exercises from the exam configuration and randomly selects one exercise per exercise group.
Note
button will be locked once the exam becomes visible to the students. You cannot perform changes to student exams once the exam conduction has started.If you have added more students recently, you can choose to
 .
. creates a participation for each exercise for every registered user, based on their assigned exercises. It also creates the individual repositories and build plans for programming exercises. This action can take a while if there are many registered students due to the communication between the version control (VC) and continuous integration (CI) server.
Warning
You must trigger
before the exam conduction begins.On the Student Exams page, you can also maintain the repositories of student exams. This functionality only affects programming exercises. You can choose to
 and
and  all student repositories.
Note
Artemis locks and unlocks the student repositories automatically based on the individual exam start and end date. These buttons are typically not necessary unless something went wrong.
Additionally, once the exam conduction ends, you can click on
 . This action will evaluate all student exam submissions for all quiz exercises and assign an automatic result.
Note
If you do not press this button, the students quiz exercises will not be graded.
Student Exam Page
1.7 Conducting Test Runs
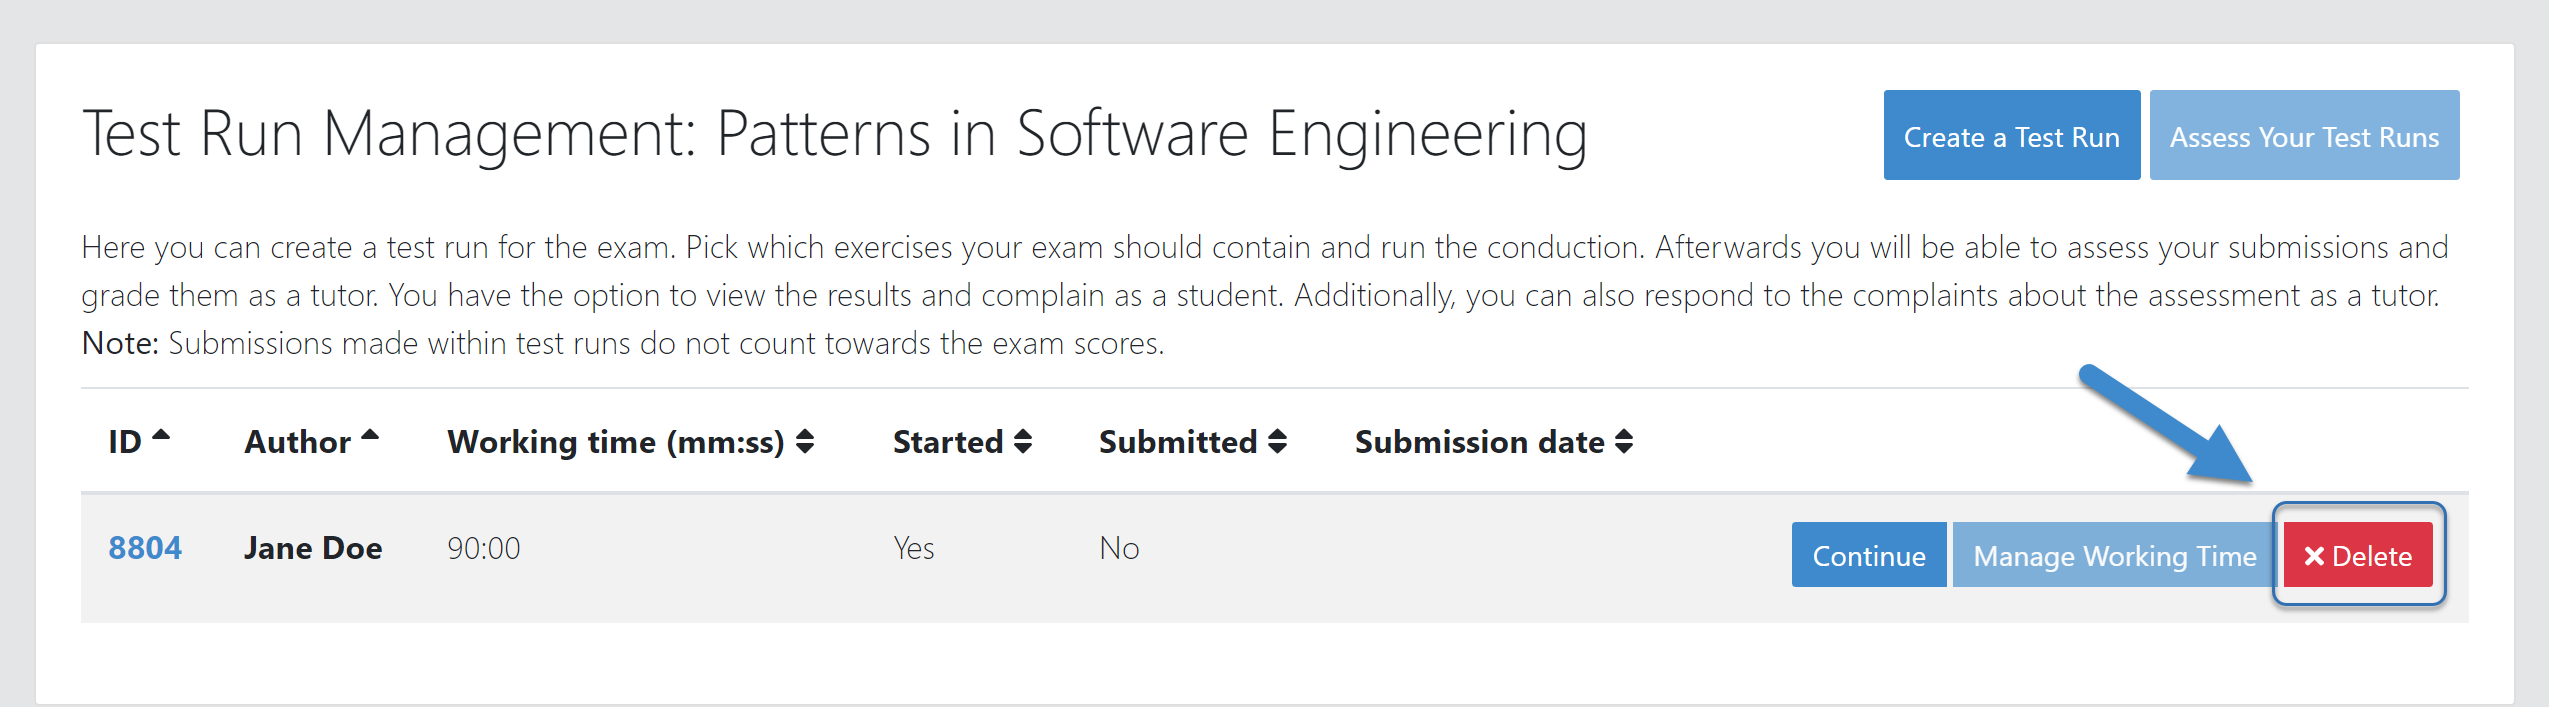
Test Run Management
Test runs are designed to offer the instructors confidence that the exam conduction will run smoothly. They allow you to experience the exam from the student’s perspective. A test run is distinct from a student exam and is not taken into consideration during the calculation of the exam scores.
You can manage your test runs from the Test Run page.
To create a new test run you can press
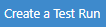 . This will open a popup where you can select an exercise for each exercise group. You can also set the
 working time. A test run will have as many exercises as there are exercise groups. It does consider thenumber of exercisesset in the exam configuration.Note
Exercise groups with no exercises are ignored.
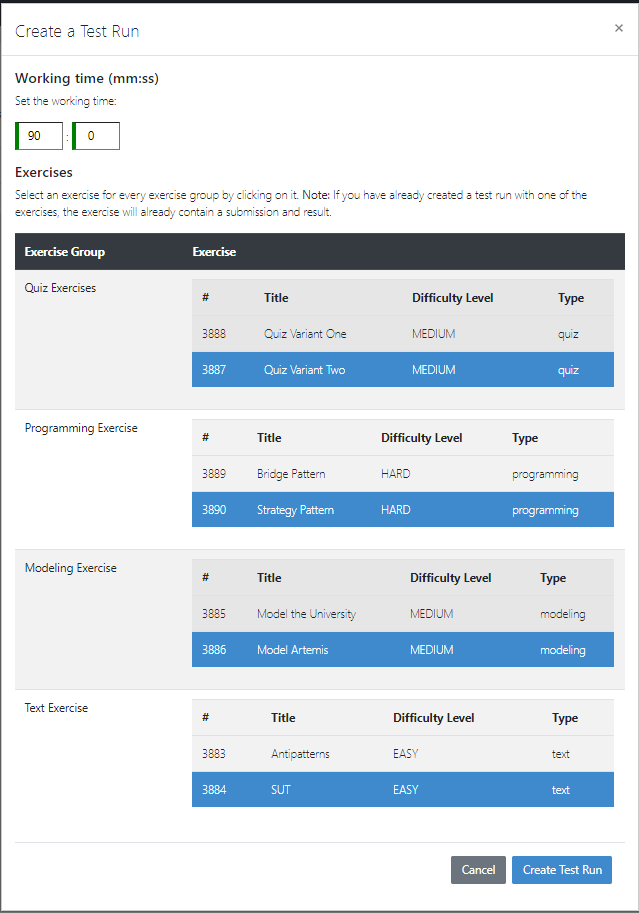
Create test run popup with one exercise variant selected for each exercise group.
When you start the test run, you conduct the exam similar to how a student would. You can create submissions for the different exercises and end the test run.
An instructor can also assess his test run submissions. To do this, you must have completed at least one test run. To navigate to the assessment screen of the test runs click
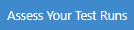 .
.
Test run conduction marked with the banner on the top left.
Note
Only the creator of the test run is able to assess his submissions.
You can view the results of the assessment of the test run by clicking on
 . This page simulates the Student Exam Summary where the students can view their submissions and the results once they are published.
Here instructors can also use the
complaintfeature and respond to it to conclude the full exam timeline.
Note
You should delete test runs before the actual exam conduction takes place.
2. Conduction
The exam conduction starts when the exam becomes visible to the students and ends when the latest working time is over. When the exam conduction begins, you cannot make any changes anymore to the exam configuration or individual student exams. When the conduction starts, the students can access and start their exam. They can submit their solutions to the exercises within the given individual working time. When a student submits the exam, he cannot make any changes anymore to his exercise submissions. For more information, see participating in the online exam.
3. Assessment
The assessment begins as soon as the latest student exam working time is over. During this period, your team can assess the submissions of the students and provide results. Artemis executes the test suites for programming exercises automatically and grades these. You can enhance the automatic grading with a manual review. You can also trigger the automatic grading of the quiz exercises via the Manage Student Exams Screen.
3.1 Assess Student Exams
Once the exam conduction is over and the latest individual working time has passed, your team can begin the assessment process.
This is done through the Assessment Dashboard.
Note
If the exam conduction is not over, you will not be able to access this page.
The assessment process is anonymised. Artemis omits personal student data from the assessors.
The Assessment Dashboard provides an overview over the current assessment progress per exercise. For each exercise, you can view how many submissions have already been assessed and how many are still left. The status of the student complaints is also displayed here.
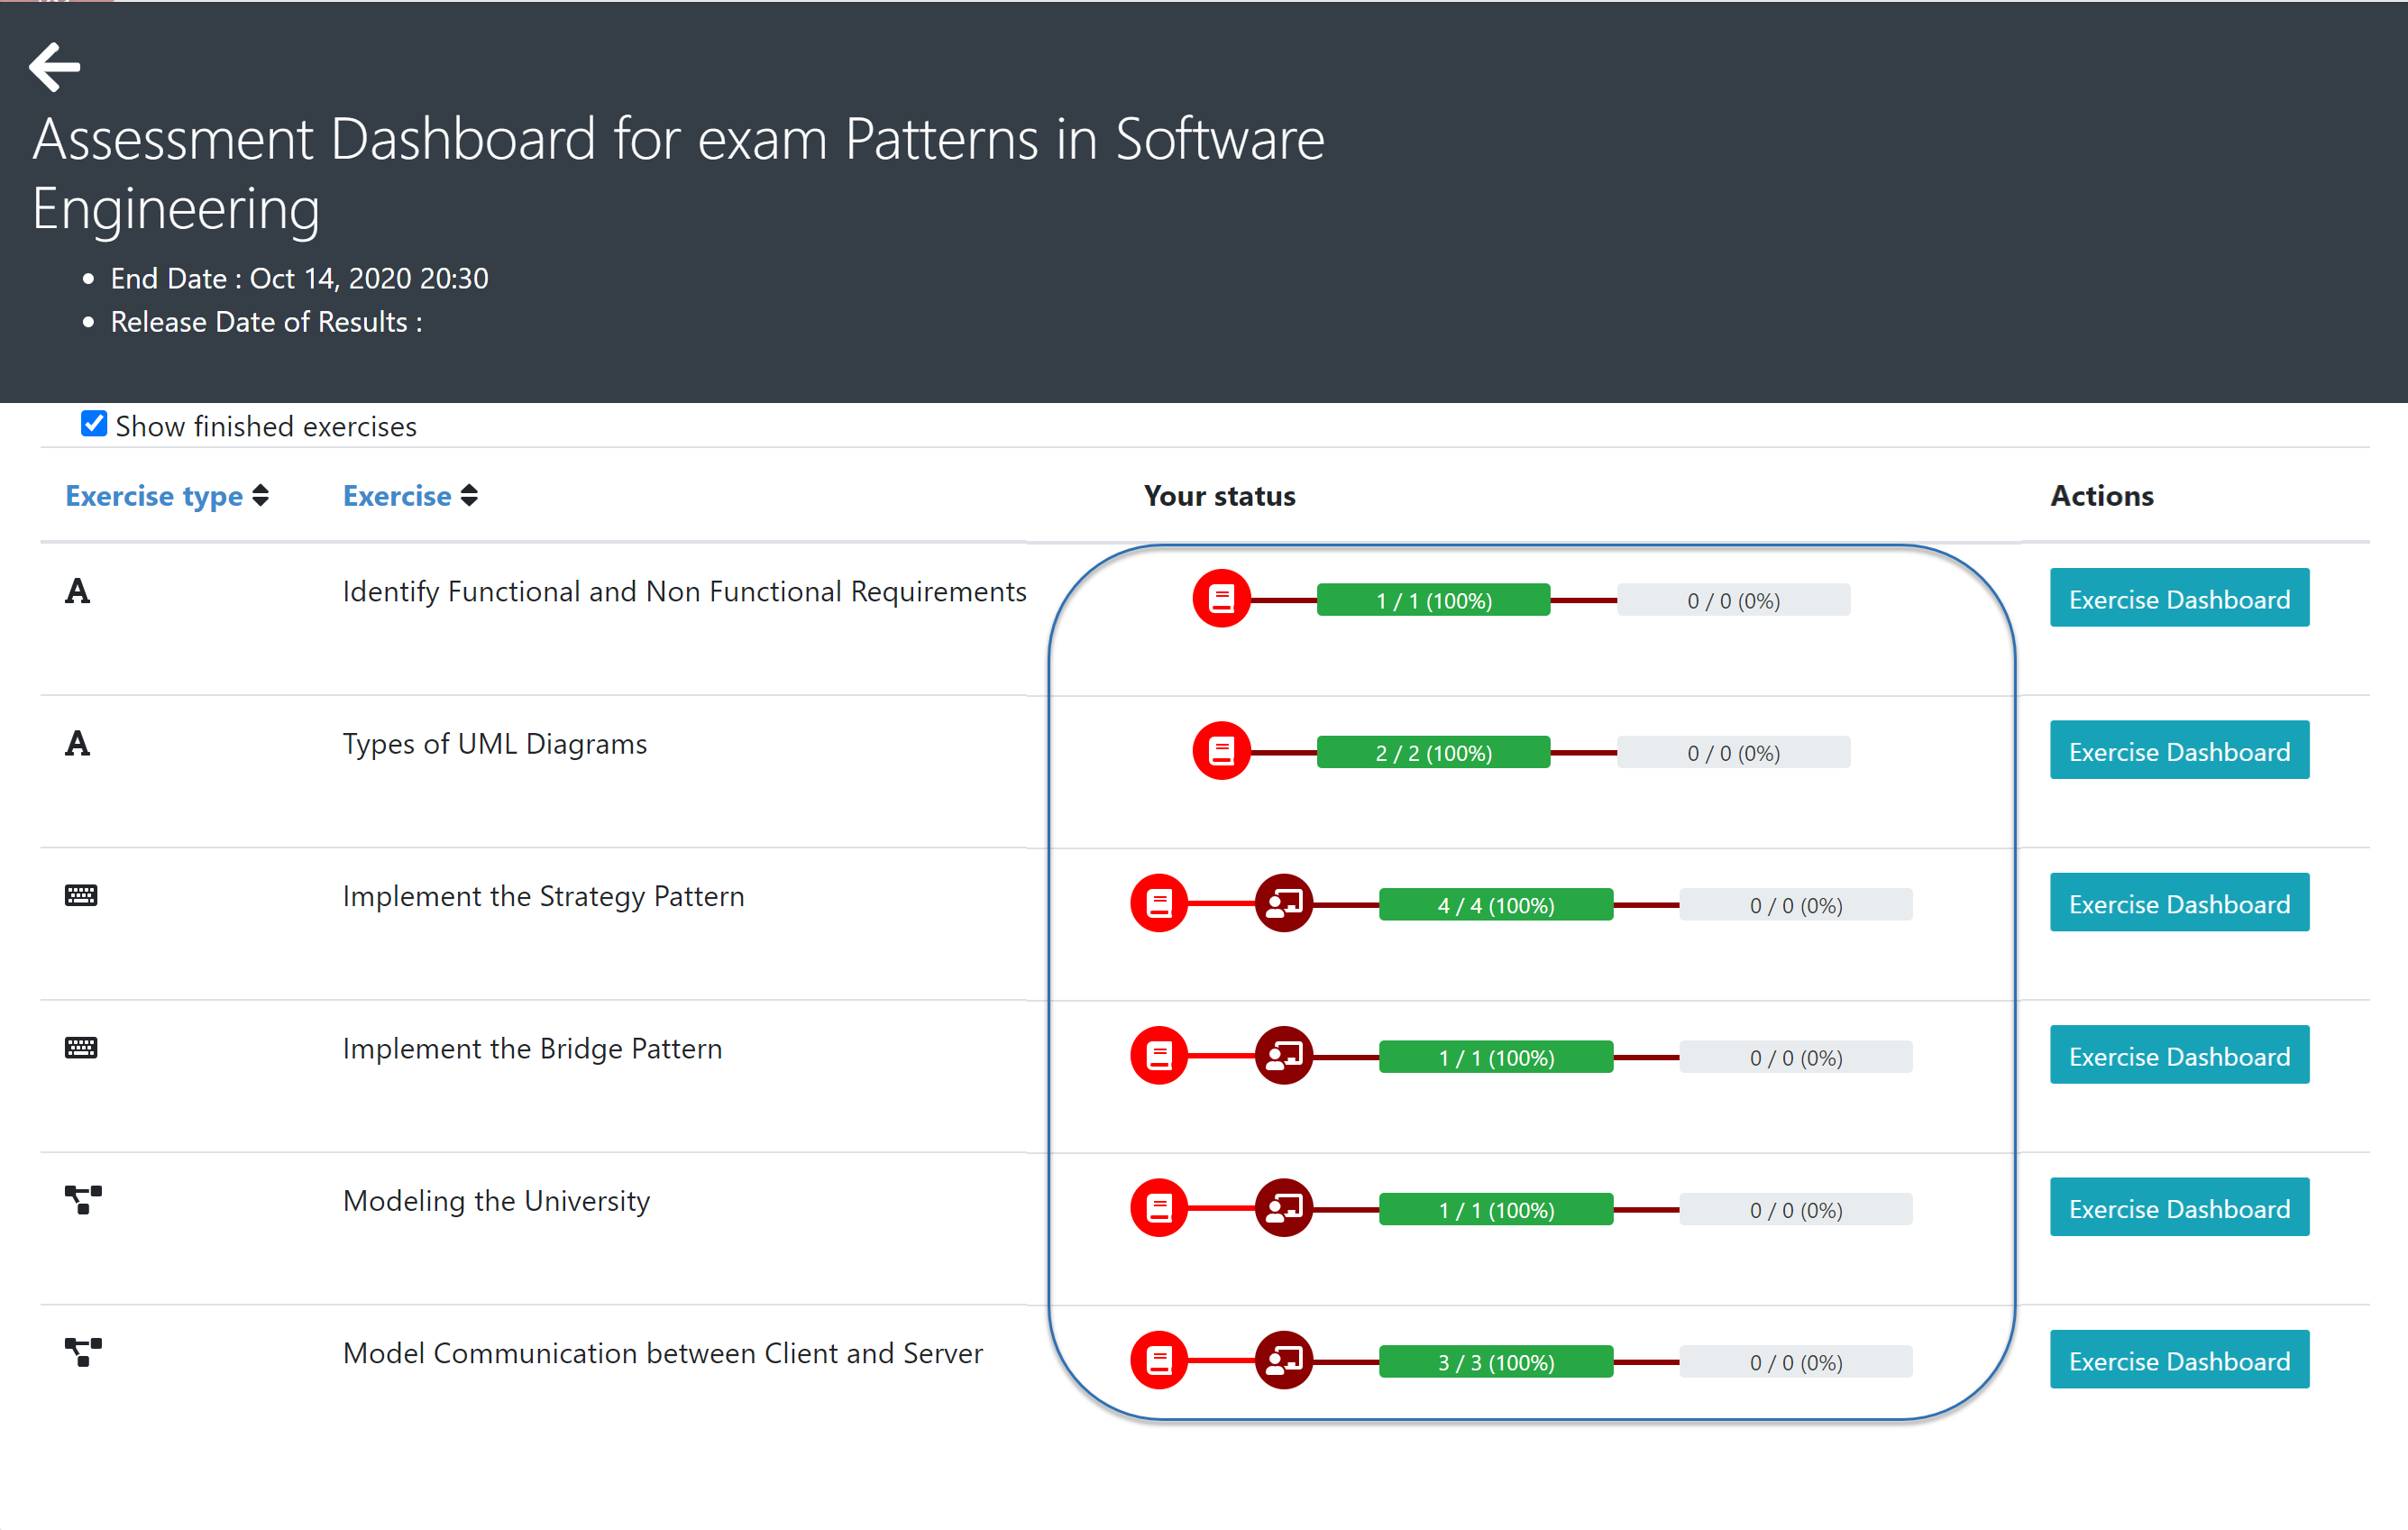
Assessment Dashboard
To assess a submission for an exercise, you can click on
 .
.Your assessors must first complete the example submissions and assessments, if you have attached those to the exercise, see 1.4 Add Exercises.
If there is a submission which has not been assessed yet, you can click
 . This will fetch a random student submission of this exercise which you can then assess.
Artemis grades programming exercises automatically. However, if the exercise allows a manual assessment, you can review and enhance the automatic results.
You can trigger Artemis to automatically grade quiz exercises via the Manage Student Exams Screen. Therefore, quiz exercises do not appear in the Assessment Dashboard.
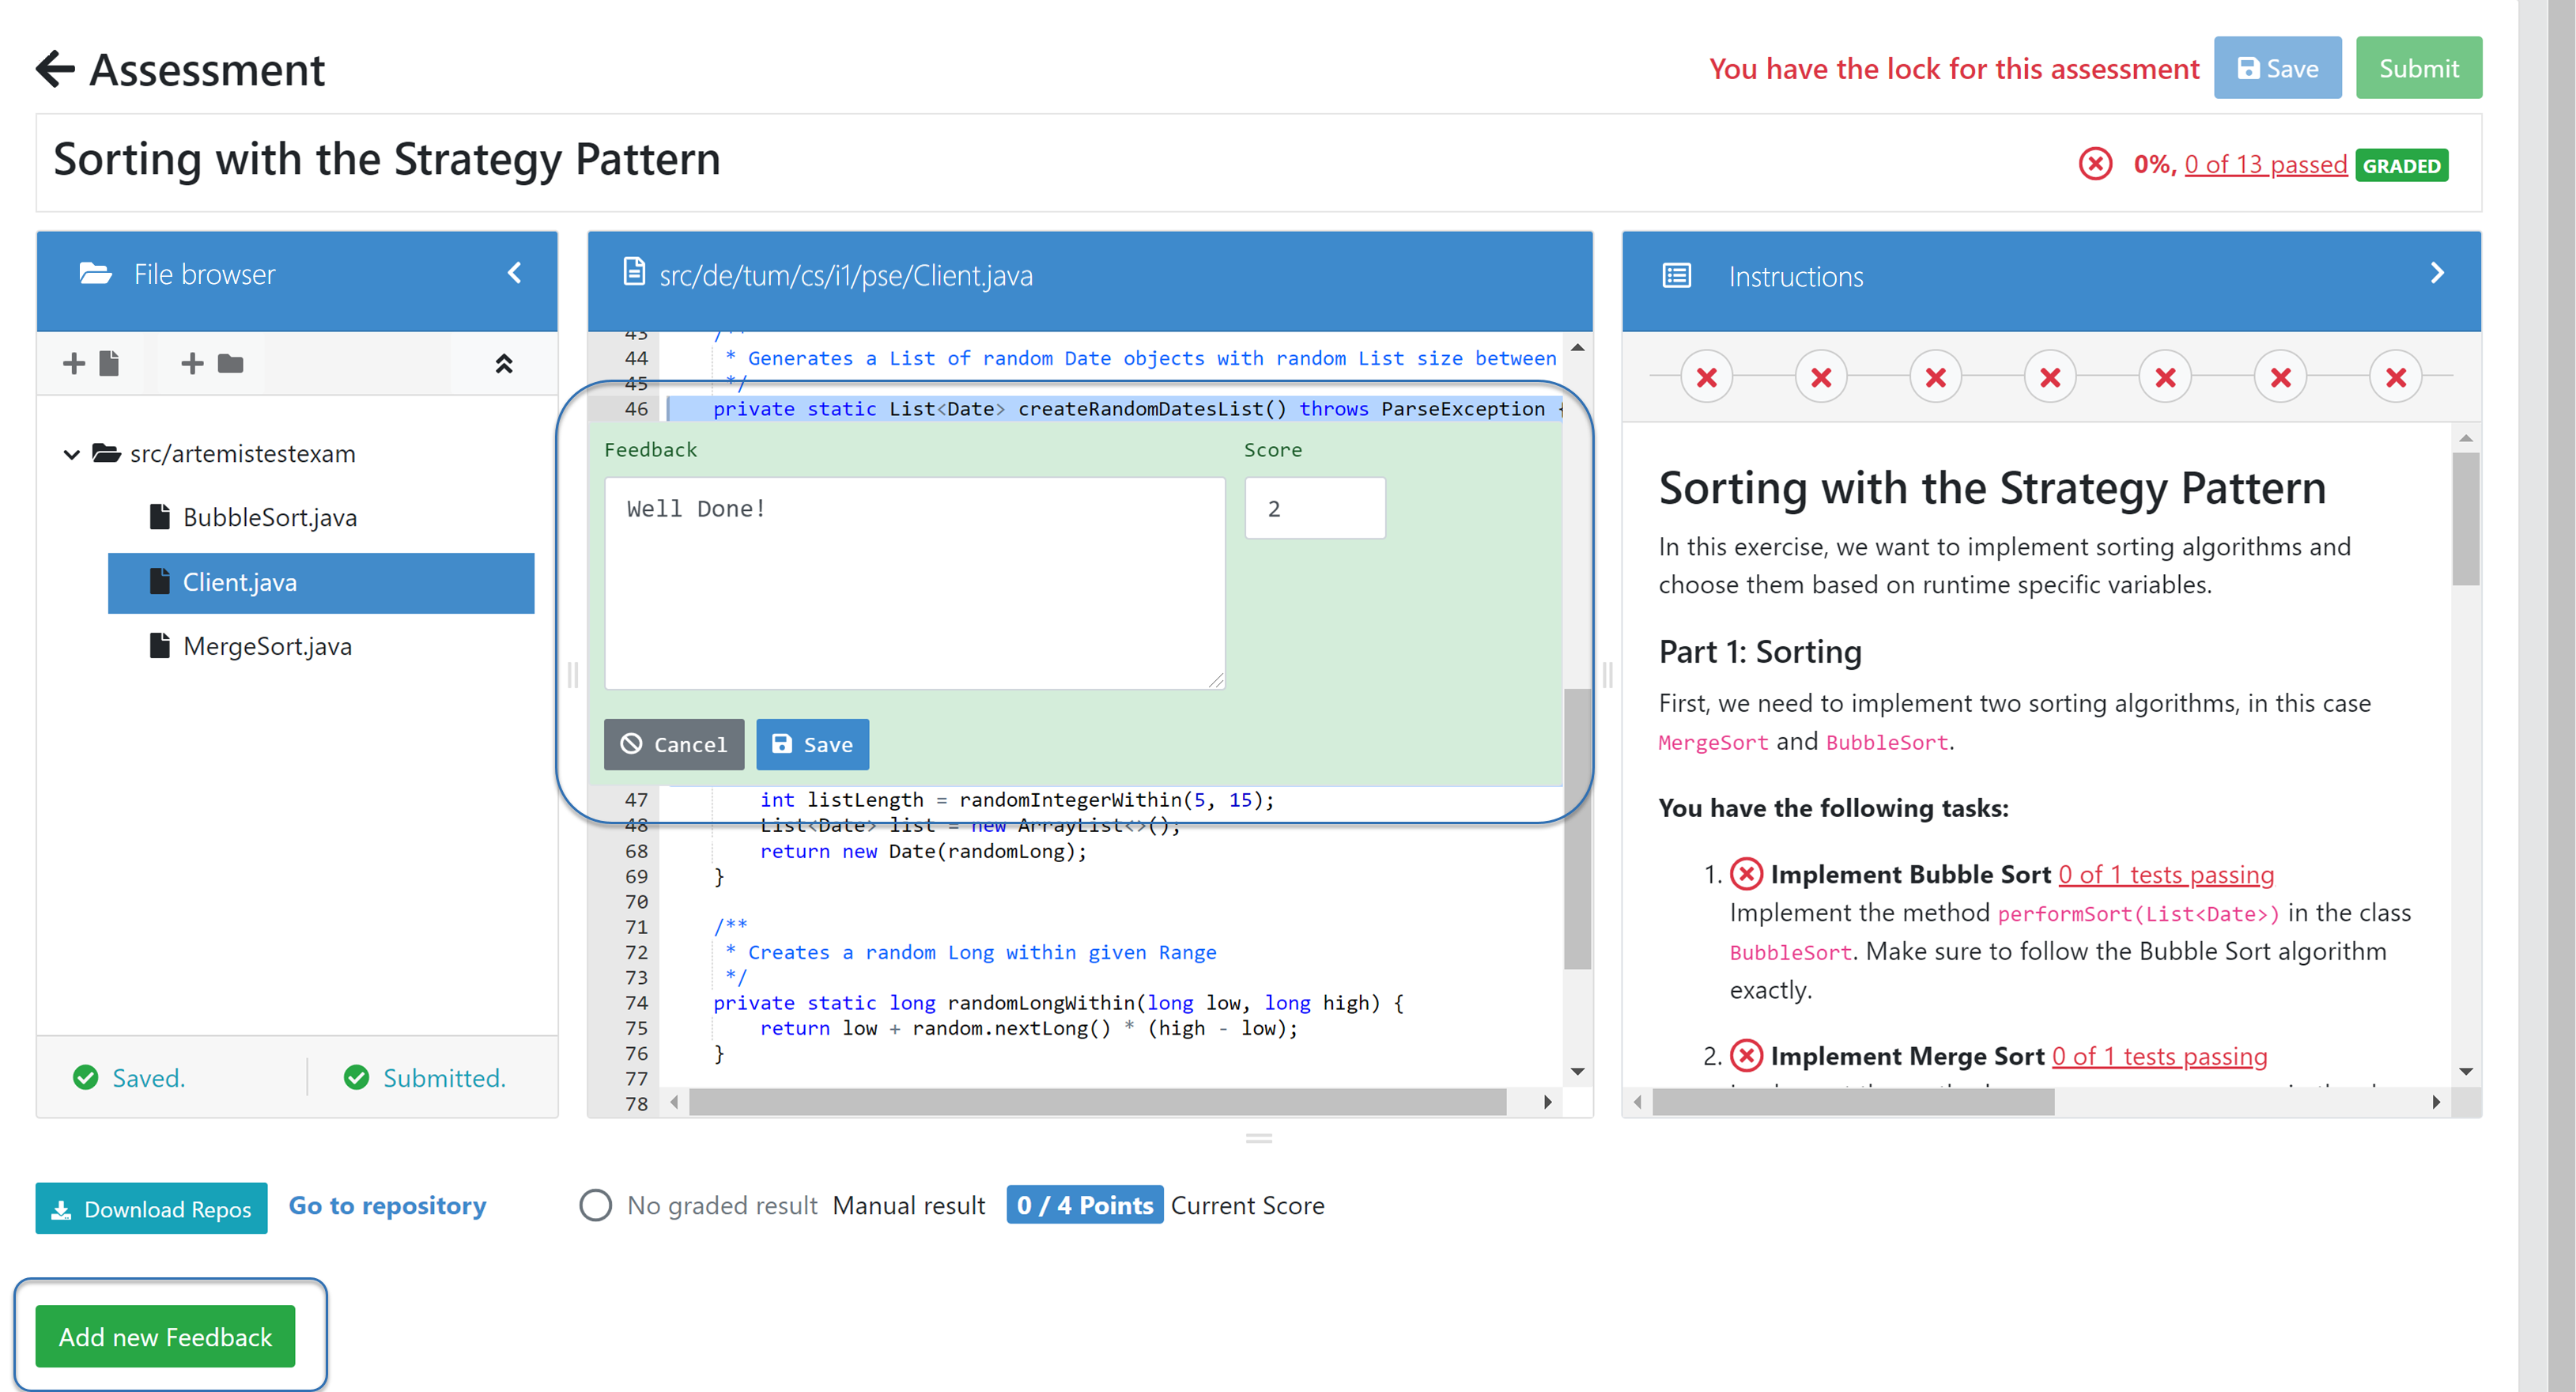
Manually Assessing a Programming Submission
Artemis also allows you to detect plagiarism attempts.
Artemis conducts this by analyzing the similarities between all student submissions and flagging those which exceed a given threshold. You can compare all flagged submissions side by side and confirm plagiarism attempts.
Instructors can download a
CSVreport of accepted and rejected plagiarism attempts for further processing on external systems.To apply the plagiarism check, you must navigate to the individual exercise. This can be done by navigating to:
->  ->
->  on the specific exercise.
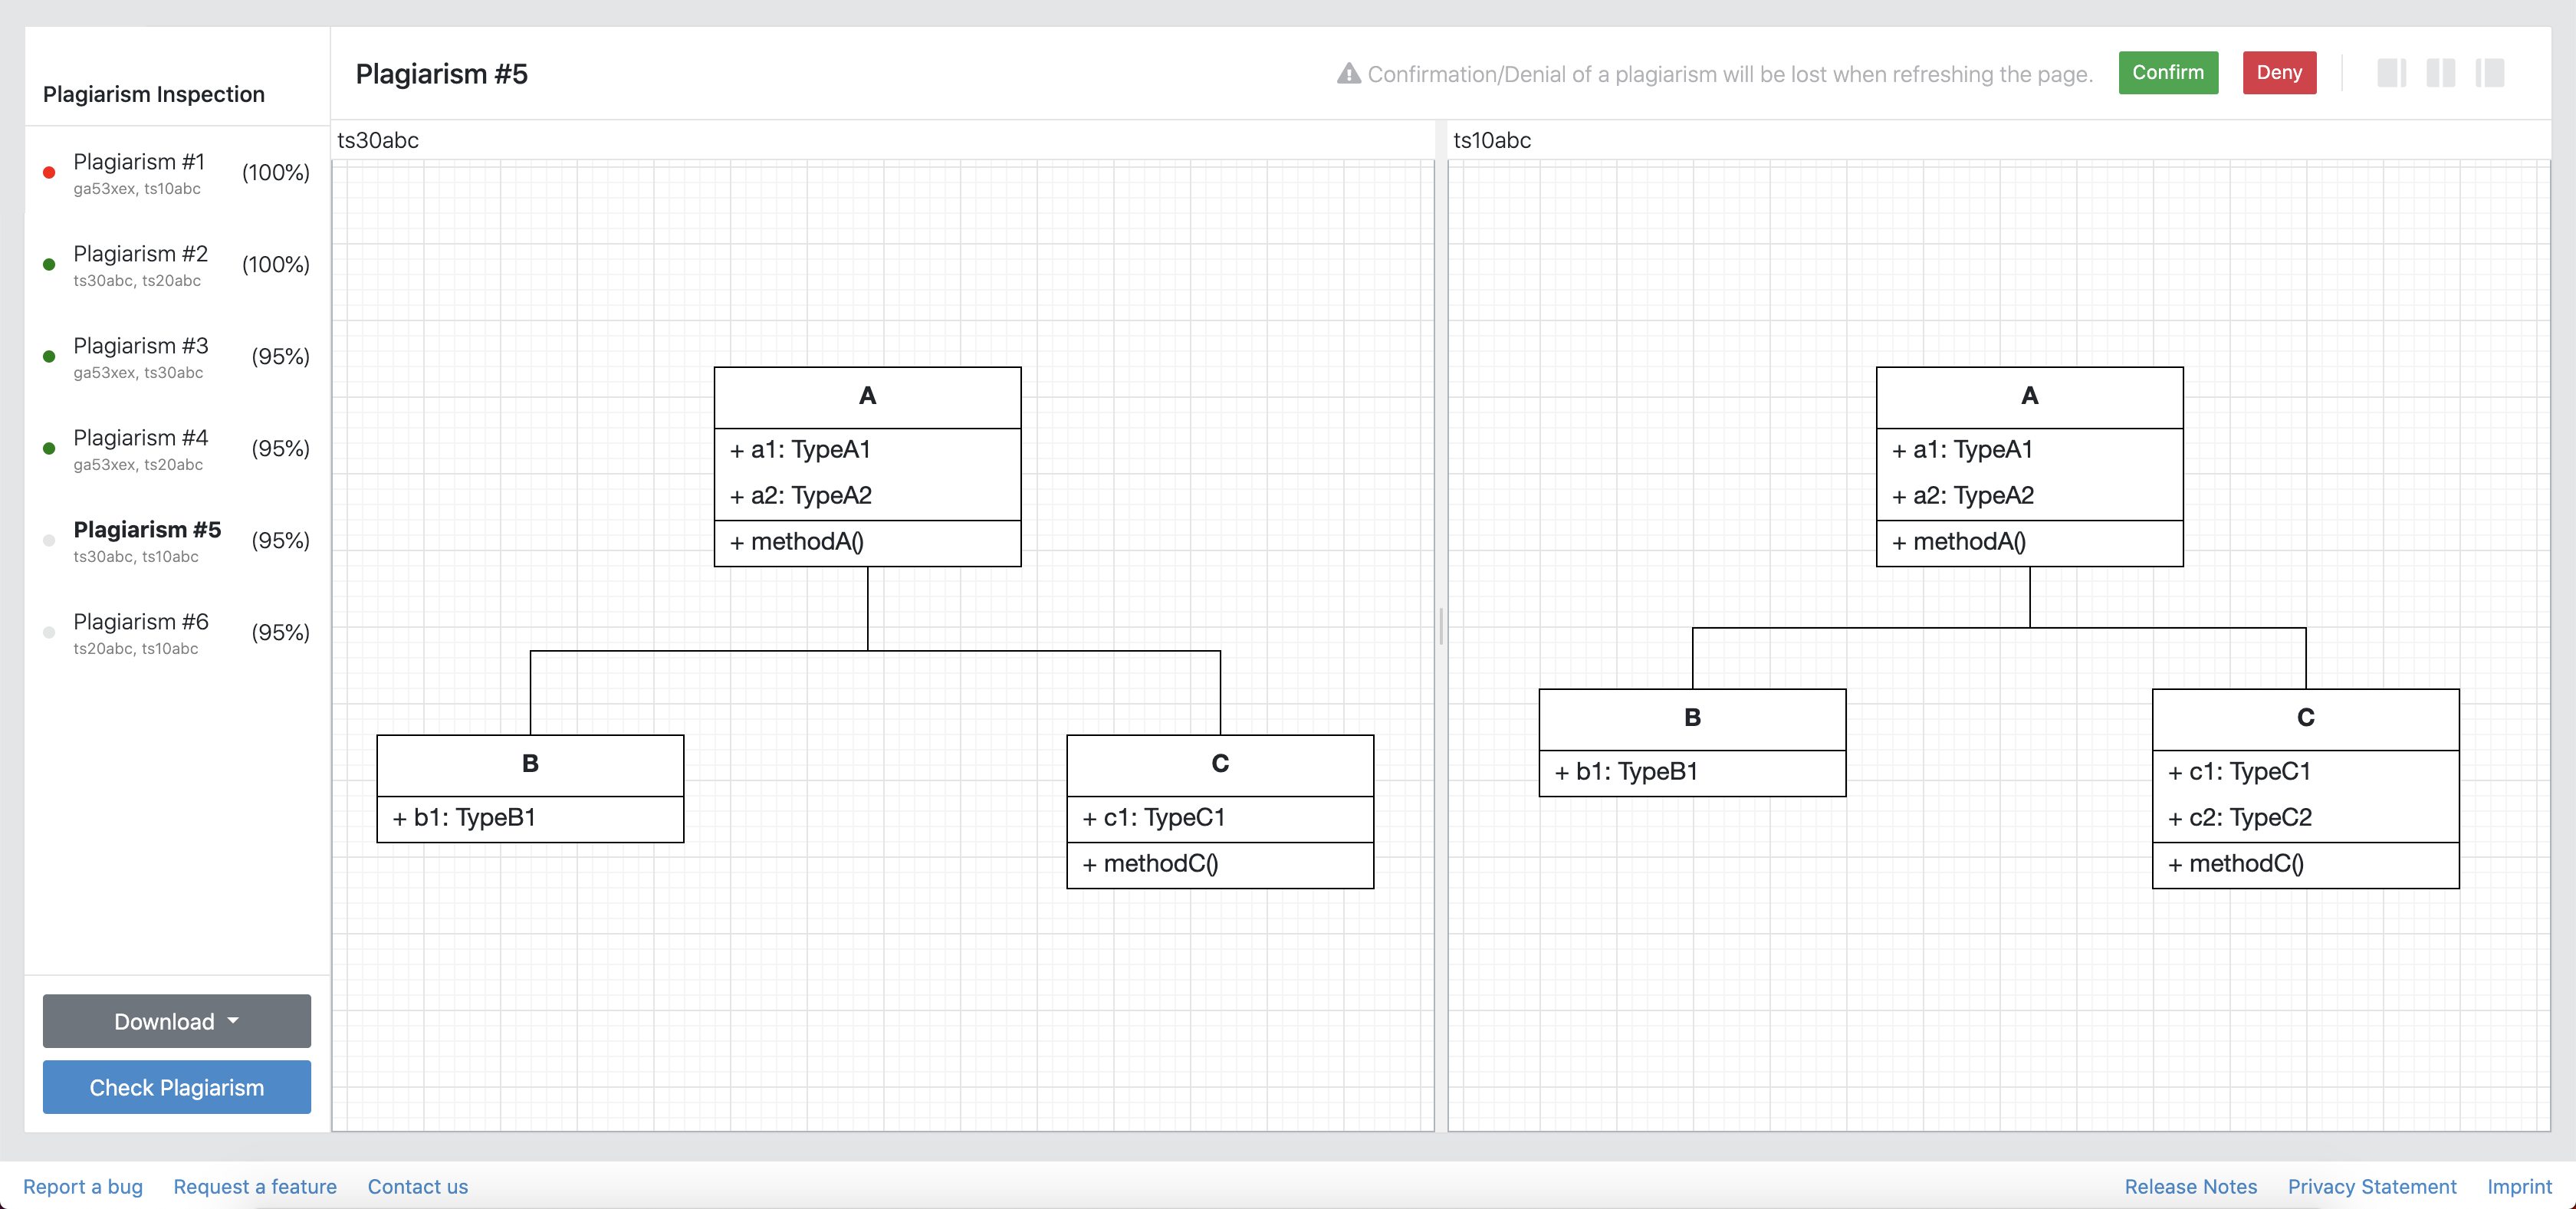
Detecting Plagiarism attempts on Modeling Exercises
At the bottom of the page you will find the option
 .
.
4. Publication of Results
You can specify the moment when Artemis publishes the results of the exam, see 1.2 Create and Configure Exam. This is usually when the exam assessment ends, but you can specify this at any point in time. During the publication of the results, the student can view their results from their summary page. You can also view the exam statistics from the exam Scores page and export the data into external platforms such as TUM Online as a CSV file, see 4.1 Exam Scores.
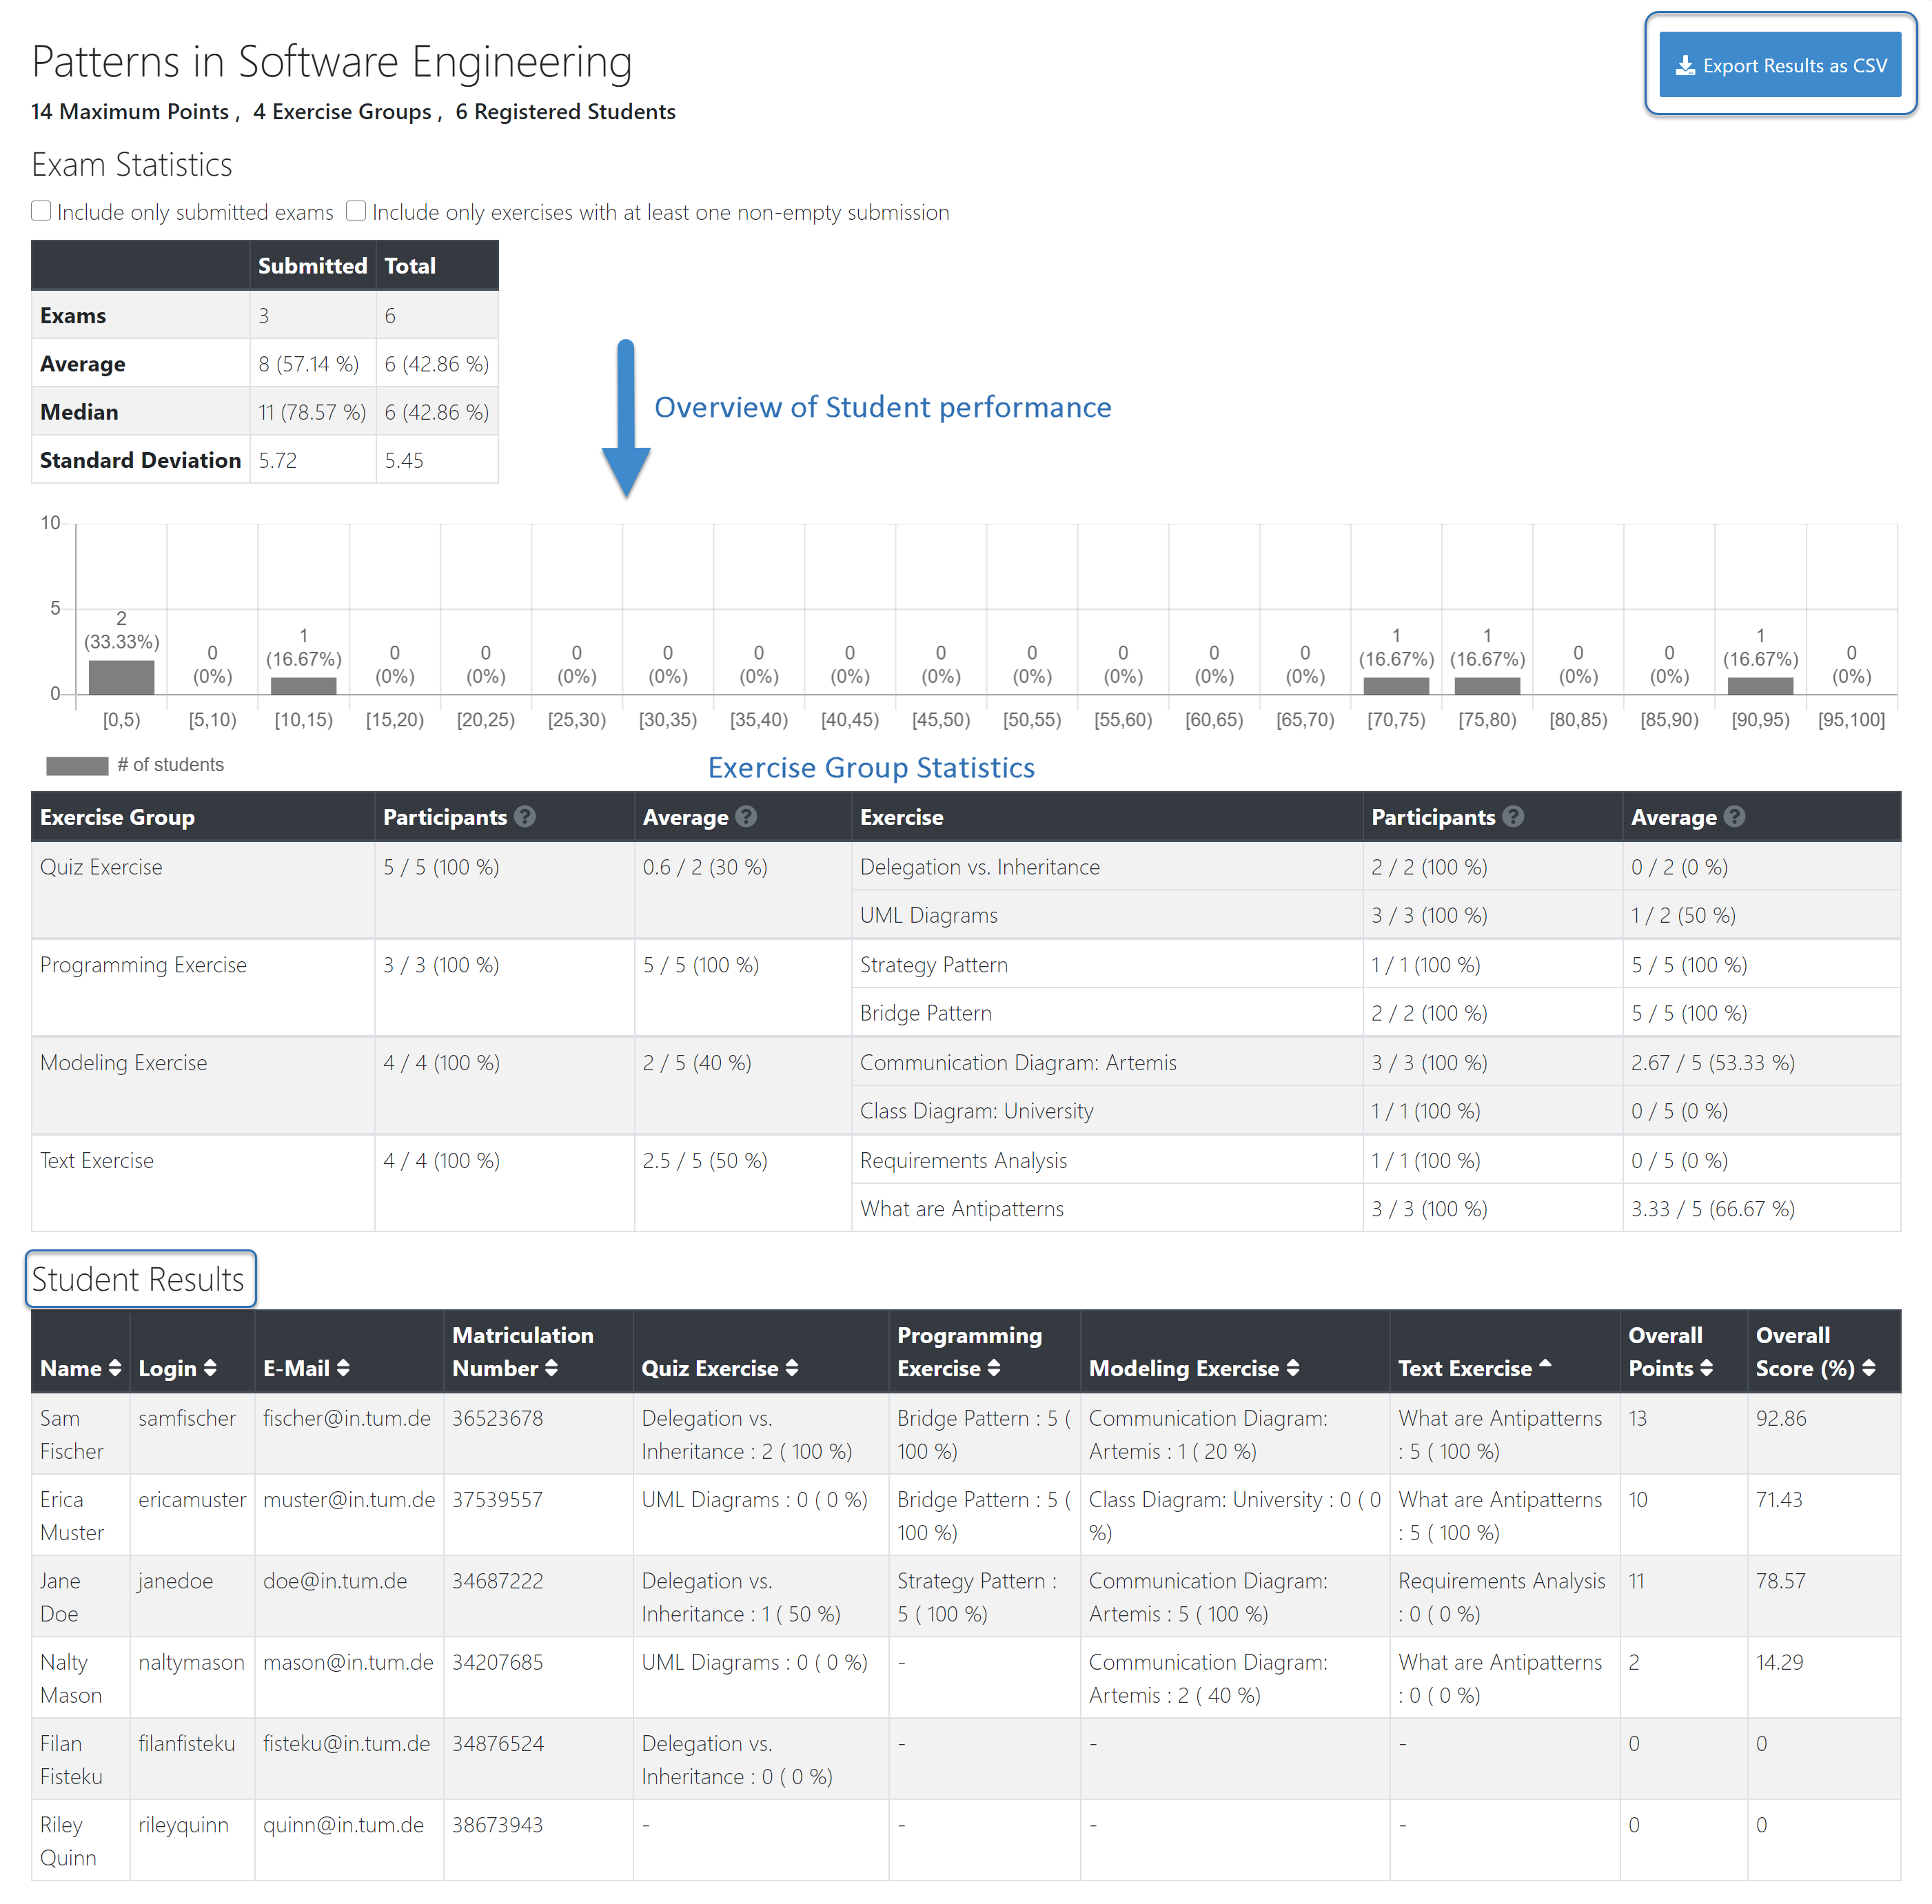
4.1 Exam Scores
You can access the exam scores by clicking on
 . This view aggregates the results of the students and combines them to provide an overview over the students’ performance.
You can view the spread between different achieved scores, the average results per exercise, as well as the individual students’ results.
Additionally, you can choose to modify the dataset by selecting
only include submitted examsoronly include exercises with at least one non-empty submission.
Note
Unsubmitted exams are not eligable for the assessment process.
Review student performance using various metrics such as average, median and standard deviation.
Unsubmitted exams are not eligable for assessment and thereby appear as having no score. It can happen that an exercise is not part of any student exam. This is the case when Artemis selects a different exercise of the same exercise group for every student exam. Similarly to the unsubmitted exams, they can warp the results and statistics of the exam. By eliminating unsubmitted exams and exercises which were not part of the exam conduction, you can gain a more realistic overview of the performance of the students.
Review the students perceived difficulty of every exercise to improve exams in the future.
The exam scores can also be exported via
 . This is useful to upload the results into university systems like TUM Online as a
 CSVfile.The exported
CSVfile includes thestudents name,username,email,registration number, their assignedexercises, and theirscorefor every exercise.The exported
CSVfile also contains the aggregated statistics of the exam conduction such as thenumber of participationsand theaverage scoreper exercise.
5. Student Review
During the review period, students have the opportunity to review the assessment of their exam. If they find inconsistencies, they can submit complaints about perceived mistakes made in the assessment. Students can provide their reasoning through a text message to clarify their objections. You can set the student review period in the exam configuration, see 1.2 Create and Configure Exam.
Students can submit complaints about their assessment in the Summary page.
During the student review, a complaint button will appear for every manually assessed exercise.
Students cannot submit complaints for automatically assessed exercises like quiz and programming exercises.
Students will be able to submit a complaint for programming exercises, if the automatic result has been reviewed manually by an assessor. This is only possible if manual assessment is enabled for the programming exercise.
Note
If you have found a mistake in the automatic assessment of quiz and programming exercises, you can edit those and re-trigger the evaluation for all participants.
For more information on how students can participate in the student review and submit complaints, see student summary guide.
6. Complaint Assessment
Artemis collects the complaints submitted by the students during the student review. You can access and review the complaints similar to the submissions from the Assessment Dashboard. Every assessor can evaluate a complaint about the assessment of his/her peers and either accept or reject the complaint. Artemis will automatically update the results of accepted complaints. You can view the updated scores immediately in the Scores page. There you can also export the updated data in CSV format, see 4.1 Exam Scores.
The complaints appear below the exercise submissions.
The original assessor of an assessment cannot respond to the complaint. A second assessor must review the complaint and respond to it.
Artemis tracks the progress of the complaint assessment and displays a progress bar in the Assessment Dashboard. This allows you to keep track of the complaint assessment and see how many open complaints are left.
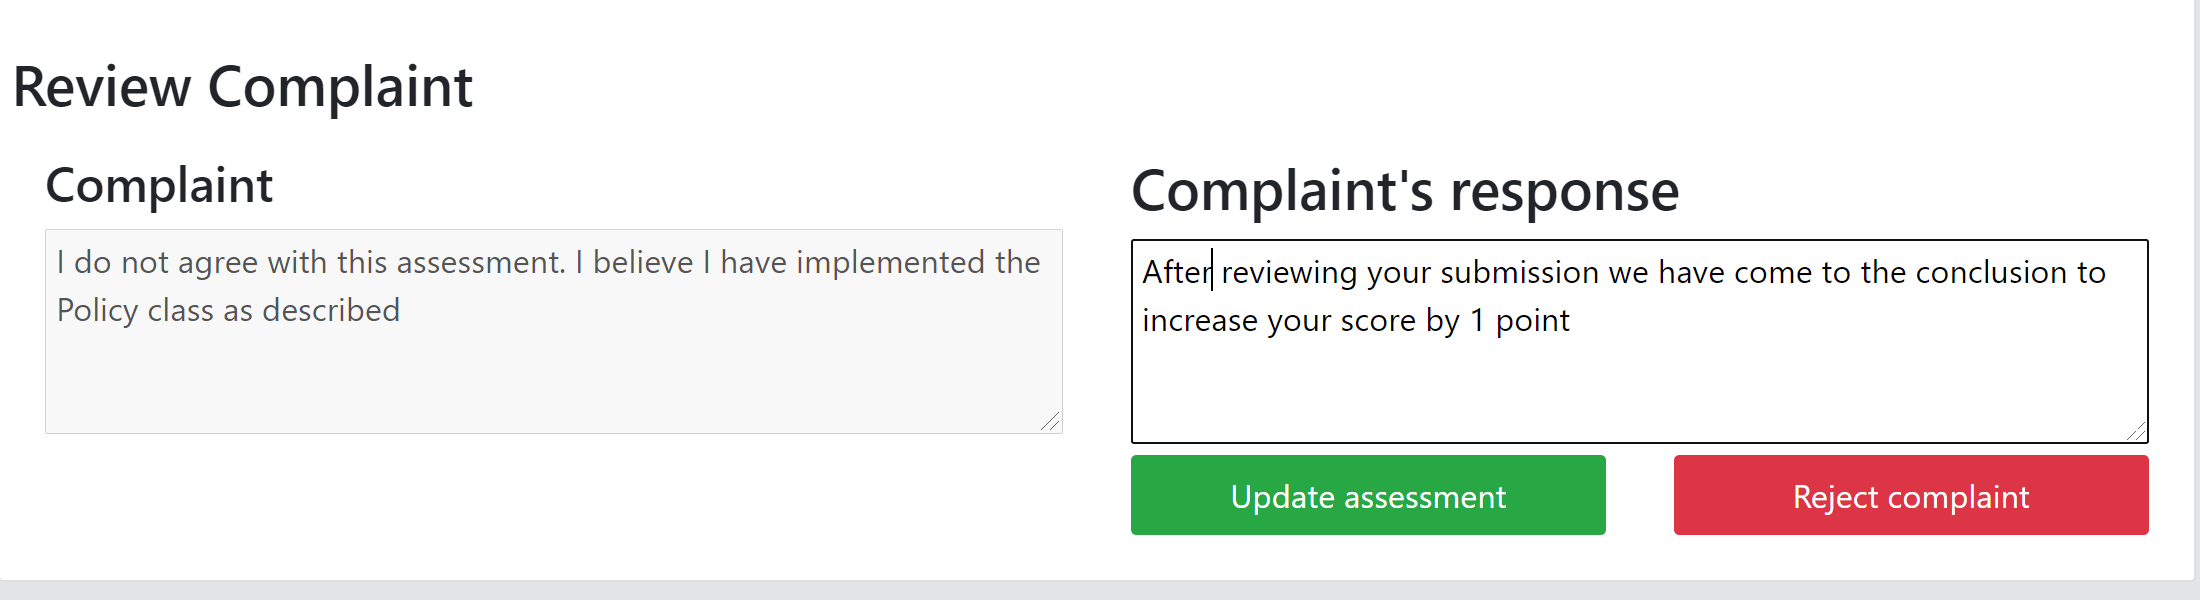
Assessor responding to a Complaint